
User Manual
Page 2
... Changing the Volume setting 13 Reverse Side 14 Adjusting the Product Tilt 15 Anti-theft Lock 16 Precautions for moving the monitor 17 Installing the Wall Mount 18 Wall Mount Kit Specifications (VESA) 18 Installation 19 Attaching the Stand (C22F390FH* / C22F392FH* / C24F390FH* / C24F392FH* / C24F394FH* / C24F399FH* / C27F390FH*...use the product 26 Driver Installation 26 Setting Optimum Resolution 26 Screen Setup SAMSUNG MAGIC Bright 27 Brightness 28 Contrast 28 Sharpness 28 Color 28 SAMSUNG MAGIC Upscale 29 HDMI Black Level 29 Eye Saver Mode 29 Game Mode...
... Changing the Volume setting 13 Reverse Side 14 Adjusting the Product Tilt 15 Anti-theft Lock 16 Precautions for moving the monitor 17 Installing the Wall Mount 18 Wall Mount Kit Specifications (VESA) 18 Installation 19 Attaching the Stand (C22F390FH* / C22F392FH* / C24F390FH* / C24F392FH* / C24F394FH* / C24F399FH* / C27F390FH*...use the product 26 Driver Installation 26 Setting Optimum Resolution 26 Screen Setup SAMSUNG MAGIC Bright 27 Brightness 28 Contrast 28 Sharpness 28 Color 28 SAMSUNG MAGIC Upscale 29 HDMI Black Level 29 Eye Saver Mode 29 Game Mode...
User Manual
Page 18
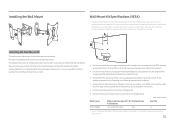
.... This may result in the table below. Before attaching the wall mount to follow the product installation instructions. •• Do not mount the product at more than plaster board, please contact your wall mount on your own. •• Do not use with the wall mount. Samsung is not liable for these kinds of the product. •...
.... This may result in the table below. Before attaching the wall mount to follow the product installation instructions. •• Do not mount the product at more than plaster board, please contact your wall mount on your own. •• Do not use with the wall mount. Samsung is not liable for these kinds of the product. •...


