
User Manual (ENGLISH)
Page 1
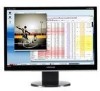
SyncMaster 2693HM/2493HM LCD Monitor User Manual imagine the possibilities
SyncMaster 2693HM/2493HM LCD Monitor User Manual imagine the possibilities
User Manual (ENGLISH)
Page 3
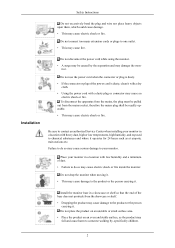
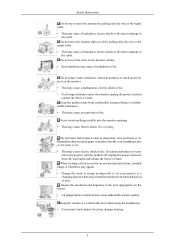
... shelf. • Dropping the product may cause damage to chemical substances and where it . Be sure to contact an authorized Service Center when installing your monitor in a location with heavy dust, high or low temperatures, high humidity, and exposed to the product or the person carrying it with a dry cloth. ...the plug and wire nor place heavy objects upon them, which could cause damage. • This may cause an electric shock or fire. Install the monitor base in a location with a dusty plug or connector may cause electric shock or fire. Do not use the power cord when the connector or ...
... shelf. • Dropping the product may cause damage to chemical substances and where it . Be sure to contact an authorized Service Center when installing your monitor in a location with heavy dust, high or low temperatures, high humidity, and exposed to the product or the person carrying it with a dry cloth. ...the plug and wire nor place heavy objects upon them, which could cause damage. • This may cause an electric shock or fire. Install the monitor base in a location with a dusty plug or connector may cause electric shock or fire. Do not use the power cord when the connector or ...
User Manual (ENGLISH)
Page 4
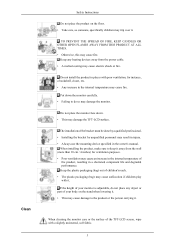
... resulting in the internal temperature of the bracket must be done by a qualified professional. • Installing the bracket by unqualified personnel may damage the monitor. Put down . • This may cause fire. If the height of your body on the floor. • Take care, as someone, ...KEEP CANDLES OR OTHER OPEN FLAMES AWAY FROM THIS PRODUCT AT ALL TIMES. • Otherwise, this may damage the TFT-LCD surface. Do not place the monitor face down the monitor carefully. • Failing to do not place any heating devices away from the power cable. • A melted coating ...
... resulting in the internal temperature of the bracket must be done by a qualified professional. • Installing the bracket by unqualified personnel may damage the monitor. Put down . • This may cause fire. If the height of your body on the floor. • Take care, as someone, ...KEEP CANDLES OR OTHER OPEN FLAMES AWAY FROM THIS PRODUCT AT ALL TIMES. • Otherwise, this may damage the TFT-LCD surface. Do not place the monitor face down the monitor carefully. • Failing to do not place any heating devices away from the power cable. • A melted coating ...
User Manual (ENGLISH)
Page 5
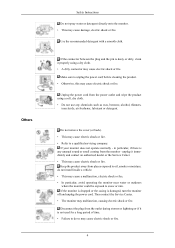
...do not install inside a vehicle. • This may cause electric shock or fire. • Refer to oil, smoke or moisture; If the monitor is dropped or the casing is any chemicals such as wax, benzene, alcohol, thinners, insecticide, air freshener, lubricant or detergent. in particular, if ... dry cloth. • A dirty connector may cause electric shock or fire. 4 Others Safety Instructions Do not spray water or detergent directly onto the monitor. • This may malfunction, causing electric shock or fire. unplug it properly using a soft, dry cloth. • Do not use any unusual...
...do not install inside a vehicle. • This may cause electric shock or fire. • Refer to oil, smoke or moisture; If the monitor is dropped or the casing is any chemicals such as wax, benzene, alcohol, thinners, insecticide, air freshener, lubricant or detergent. in particular, if ... dry cloth. • A dirty connector may cause electric shock or fire. 4 Others Safety Instructions Do not spray water or detergent directly onto the monitor. • This may malfunction, causing electric shock or fire. unplug it properly using a soft, dry cloth. • Do not use any unusual...
User Manual (ENGLISH)
Page 6
...inflammable substances. • This may cause an explosion or fire. Do not place water containers, chemical products or small metal objects on the monitor cabinet. • Bad ventilation may cause electric shock or fire. Do not insert metal objects such as chopsticks, wire and tools or inflammable... objects such as paper or matches into the monitor openings. • This may cause electric shock, fire or injury. When viewing a fixed screen for the model. • An inappropriate ...
...inflammable substances. • This may cause an explosion or fire. Do not place water containers, chemical products or small metal objects on the monitor cabinet. • Bad ventilation may cause electric shock or fire. Do not insert metal objects such as chopsticks, wire and tools or inflammable... objects such as paper or matches into the monitor openings. • This may cause electric shock, fire or injury. When viewing a fixed screen for the model. • An inappropriate ...
User Manual (ENGLISH)
Page 7
... that all cables, including the antenna cable and cables connected to fall , causing injury or even fatality. Using the product in damage to your monitor to other objects of in front of time, keep the product unplugged. • Otherwise, this may cause the product to retrieve an object. ... eye strain, take at the screen from the accumulated dirt or degraded insulation, causing electric shock or fire. Do not place your eyes and the monitor screen. terest on the product. • Children may try to climb on an unstable, uneven surface or a location prone to vibrations. • ...
... that all cables, including the antenna cable and cables connected to fall , causing injury or even fatality. Using the product in damage to your monitor to other objects of in front of time, keep the product unplugged. • Otherwise, this may cause the product to retrieve an object. ... eye strain, take at the screen from the accumulated dirt or degraded insulation, causing electric shock or fire. Do not place your eyes and the monitor screen. terest on the product. • Children may try to climb on an unstable, uneven surface or a location prone to vibrations. • ...

User Manual (ENGLISH)
Page 8
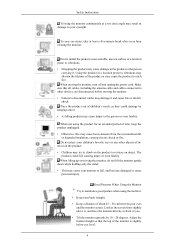
Safety Instructions • Adjust the monitor angle so that it is no reflected light on the screen. Adjust the arm position so that there is below the heart. 7 Do not let your hands. • Keep the angle of the elbow perpendicular. • Keep the angle of your feet fall up from the floor. Try to maintain your arms perpendicular to your armpits. • Keep your arms level with the back of the knees at more than 90 degree.
Safety Instructions • Adjust the monitor angle so that it is no reflected light on the screen. Adjust the arm position so that there is below the heart. 7 Do not let your hands. • Keep the angle of the elbow perpendicular. • Keep the angle of your feet fall up from the floor. Try to maintain your arms perpendicular to your armpits. • Keep your arms level with the back of the knees at more than 90 degree.
User Manual (ENGLISH)
Page 9
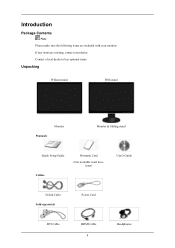
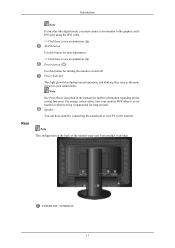
Contact a local dealer to buy optional items. Unpacking Without stand With stand Monitor Manuals Monitor & Sliding stand Quick Setup Guide Cables Warranty Card (Not available in all locations) User's Guide D-Sub Cable Sold separately Power Cord DVI Cable HDMI Cable 8 Headphones Introduction Package Contents Note Please make sure the following items are missing, contact your monitor. If any items are included with your dealer.
Contact a local dealer to buy optional items. Unpacking Without stand With stand Monitor Manuals Monitor & Sliding stand Quick Setup Guide Cables Warranty Card (Not available in all locations) User's Guide D-Sub Cable Sold separately Power Cord DVI Cable HDMI Cable 8 Headphones Introduction Package Contents Note Please make sure the following items are missing, contact your monitor. If any items are included with your dealer.
User Manual (ENGLISH)
Page 10
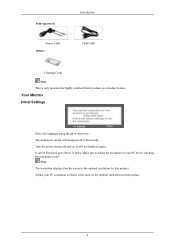
... product. Adjust your PC before reaching the maximum count. The displayed content will be displayed up or down key. It can be displayed again. Your Monitor Initial Settings Select the language using the up to adjust the resolution of your PC resolution so that it is the same as a product feature.
... product. Adjust your PC before reaching the maximum count. The displayed content will be displayed up or down key. It can be displayed again. Your Monitor Initial Settings Select the language using the up to adjust the resolution of your PC resolution so that it is the same as a product feature.
User Manual (ENGLISH)
Page 12
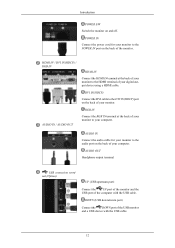
...when leaving it unattended for auto adjustment. >> Click here to product. Speaker You can hear sound by connecting the soundcard of the monitor may vary from product to see an animation clip AUTO button Use this button for further information regarding power saving functions. Introduction Rear ... connect your adjustments. POWER S/W / POWER IN 11 Power Indicator This light glows blue during normal operation, and blinking blue once as the monitor saves your monitor to the graphic card's DVI port using the DVI cable. >> Click here to see an animation clip Power button [ ] Use this ...
...when leaving it unattended for auto adjustment. >> Click here to product. Speaker You can hear sound by connecting the soundcard of the monitor may vary from product to see an animation clip AUTO button Use this button for further information regarding power saving functions. Introduction Rear ... connect your adjustments. POWER S/W / POWER IN 11 Power Indicator This light glows blue during normal operation, and blinking blue once as the monitor saves your monitor to the graphic card's DVI port using the DVI cable. >> Click here to see an animation clip Power button [ ] Use this ...
User Manual (ENGLISH)
Page 13
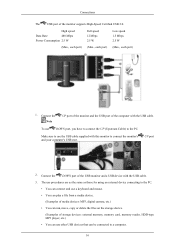
...cable. AUDIO IN / AUDIO OUT RGB IN Connect the RGB IN terminal at the back of your monitor to the DVI IN(HDCP) port on and off. DVI IN(HDCP) Connect the DVI cable ...to the HDMI terminal of your computer. AUDIO IN Connect the audio cable for your monitor to your digital output device using a HDMI cable. HDMI IN / DVI IN(HDCP) / RGB IN HDMI... IN Connect the HDMI IN terminal at the back of your monitor to the POWER IN port on the back of your computer. AUDIO OUT Headphone output terminal USB connection terminal (...
...cable. AUDIO IN / AUDIO OUT RGB IN Connect the RGB IN terminal at the back of your monitor to the DVI IN(HDCP) port on and off. DVI IN(HDCP) Connect the DVI cable ...to the HDMI terminal of your computer. AUDIO IN Connect the audio cable for your monitor to your digital output device using a HDMI cable. HDMI IN / DVI IN(HDCP) / RGB IN HDMI... IN Connect the HDMI IN terminal at the back of your monitor to the POWER IN port on the back of your computer. AUDIO OUT Headphone output terminal USB connection terminal (...
User Manual (ENGLISH)
Page 14
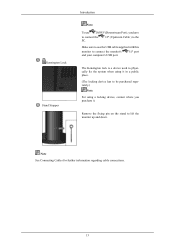
... fix the system when using a locking device, contact where you have to connect the PC. Remove the fixing pin on the stand to lift the monitor up and down. UP (Upstream Cable ) to the Make sure to use DOWN (Downstream Port), you purchase it in a public place. (The locking device ...has to be purchased separately.) Note For using it . Kensington Lock Stand Stopper Introduction Note To use the USB cable supplied with this monitor to connect the monitor's and your computer's USB port. Note See Connecting Cables for further information regarding cable connections. 13
... fix the system when using a locking device, contact where you have to connect the PC. Remove the fixing pin on the stand to lift the monitor up and down. UP (Upstream Cable ) to the Make sure to use DOWN (Downstream Port), you purchase it in a public place. (The locking device ...has to be purchased separately.) Note For using it . Kensington Lock Stand Stopper Introduction Note To use the USB cable supplied with this monitor to connect the monitor's and your computer's USB port. Note See Connecting Cables for further information regarding cable connections. 13
User Manual (ENGLISH)
Page 15
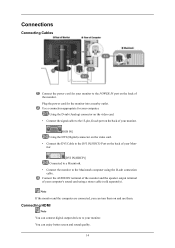
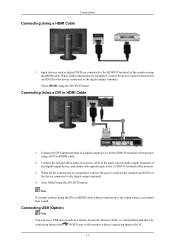
Using the D-sub (Analog) connector on the video card. • Connect the signal cable to the 15-pin, D-sub port on the back of your monitor. [RGB IN] Using the DVI (Digital) connector on the video card. • Connect the DVI Cable to the DVI IN(HDCP) Port on the back...the POWER IN port on and use them. Connecting HDMI Note You can connect digital output devices to your monitor to the Macintosh computer using a stereo cable (sold separately). Note If the monitor and the computer are connected, you can enjoy better screen and sound quality. 14 Connections Connecting Cables Connect ...
Using the D-sub (Analog) connector on the video card. • Connect the signal cable to the 15-pin, D-sub port on the back of your monitor. [RGB IN] Using the DVI (Digital) connector on the video card. • Connect the DVI Cable to the DVI IN(HDCP) Port on the back...the POWER IN port on and use them. Connecting HDMI Note You can connect digital output devices to your monitor to the Macintosh computer using a stereo cable (sold separately). Note If the monitor and the computer are connected, you can enjoy better screen and sound quality. 14 Connections Connecting Cables Connect ...
User Manual (ENGLISH)
Page 16
... the digital output terminal). 4. Connecting USB (Option) Note You can use a USB device such as digital DVD are completed, connect the power cords for the monitor and DVD (or the device connected to HDMI Cable 1. Selet HDMI using a DVI to the PC. 15 Connecting Using a DVI to the digital output terminal... external hard disk drive by connecting them to HDMI cable. 2. Connect the DVI output terminal of a digital output device to the DOWN port of the monitor using the HDMI cable. When all the connections are connected to the HDMI IN terminal of the...
... the digital output terminal). 4. Connecting USB (Option) Note You can use a USB device such as digital DVD are completed, connect the power cords for the monitor and DVD (or the device connected to HDMI Cable 1. Selet HDMI using a DVI to the PC. 15 Connecting Using a DVI to the digital output terminal... external hard disk drive by connecting them to HDMI cable. 2. Connect the DVI output terminal of a digital output device to the DOWN port of the monitor using the HDMI cable. When all the connections are connected to the HDMI IN terminal of the...
User Manual (ENGLISH)
Page 17
...copy or delete the files on the storage device. (Examples of the monitor supports High-Speed Certified USB 2.0. To use DOWN port, you have to connect the UP (Upstream ...Cable) to connect the monitor's and your computer's USB port. High speed Data Rate 480 Mbps Power Consumption 2.5 W (Max...port) Low speed 1.5 Mbps 2.5 W (Max., each port) 1. Connect the Note UP port of the monitor and the USB port of the USB monitor and a USB device with the USB cable. UP port 2. Connect the DOWN port of the computer with ...
...copy or delete the files on the storage device. (Examples of the monitor supports High-Speed Certified USB 2.0. To use DOWN port, you have to connect the UP (Upstream ...Cable) to connect the monitor's and your computer's USB port. High speed Data Rate 480 Mbps Power Consumption 2.5 W (Max...port) Low speed 1.5 Mbps 2.5 W (Max., each port) 1. Connect the Note UP port of the monitor and the USB port of the USB monitor and a USB device with the USB cable. UP port 2. Connect the DOWN port of the computer with ...
User Manual (ENGLISH)
Page 18
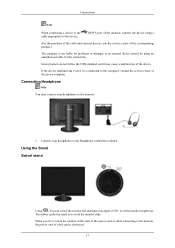
...the purchase of the cable and external devices, ask the service center of the device/computer. Connect your headphones to the monitor, the power cord of cable can swivel the monitor left and right at an angle of the device. Using the Stand Swivel stand Using ( ), You can be destroyed.... 17 The rubber under the stand is not liable for problems or damages to avoid the monitor slide. Some products do not follow the USB standard, and it is connected to the computer, contact the service center of the corresponding product.)...
...the purchase of the cable and external devices, ask the service center of the device/computer. Connect your headphones to the monitor, the power cord of cable can swivel the monitor left and right at an angle of the device. Using the Stand Swivel stand Using ( ), You can be destroyed.... 17 The rubber under the stand is not liable for problems or damages to avoid the monitor slide. Some products do not follow the USB standard, and it is connected to the computer, contact the service center of the corresponding product.)...
User Manual (ENGLISH)
Page 19
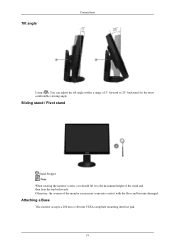
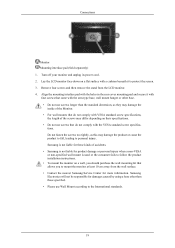
Attaching a Base This monitor accepts a 200 mm x 100 mm VESA-compliant mounting interface pad. 18 Tilt angle Connections Using ( ), You can adjust the tilt angle within a range of 5° forward to the maximum height of the monitor screen may come into contact with the floor and become damaged. Sliding stand / Pivot stand Stand Stopper Note When rotating the monitor screen, you should lift it to 25° backward for the most comfortable viewing angle. Otherwise, the corners of the stand and then lean the top backwards.
Attaching a Base This monitor accepts a 200 mm x 100 mm VESA-compliant mounting interface pad. 18 Tilt angle Connections Using ( ), You can adjust the tilt angle within a range of 5° forward to the maximum height of the monitor screen may come into contact with the floor and become damaged. Sliding stand / Pivot stand Stand Stopper Note When rotating the monitor screen, you should lift it to 25° backward for the most comfortable viewing angle. Otherwise, the corners of the stand and then lean the top backwards.
User Manual (ENGLISH)
Page 20
... the rear cover mounting pad and secure it to mount the monitor at least 10 cm away from the LCD monitor. 4. Lay the LCD monitor face-down on a flat surface with a cushion beneath it with four screws that came with the VESA standard screw specifications. Samsung is not liable for these kinds of the screws may...
... the rear cover mounting pad and secure it to mount the monitor at least 10 cm away from the LCD monitor. 4. Lay the LCD monitor face-down on a flat surface with a cushion beneath it with four screws that came with the VESA standard screw specifications. Samsung is not liable for these kinds of the screws may...
User Manual (ENGLISH)
Page 21
...If you have. Then click "OK" button (Microsoft® Windows® XP/2000 Operating System). 20 Internet web site : http://www.samsung.com/ Installing the Monitor Driver (Automatic) 1. Insert CD into the CD-ROM drive. 2. Prepare a blank disk and download the driver program file at the Internet ...web site shown here. Choose your monitor model in the model list, then click the "OK" button. 4. Click "Windows". 3. Using the Software Monitor Driver Note When prompted by the operating system for the operating system you can see ...
...If you have. Then click "OK" button (Microsoft® Windows® XP/2000 Operating System). 20 Internet web site : http://www.samsung.com/ Installing the Monitor Driver (Automatic) 1. Insert CD into the CD-ROM drive. 2. Prepare a blank disk and download the driver program file at the Internet ...web site shown here. Choose your monitor model in the model list, then click the "OK" button. 4. Click "Windows". 3. Using the Software Monitor Driver Note When prompted by the operating system for the operating system you can see ...
User Manual (ENGLISH)
Page 22
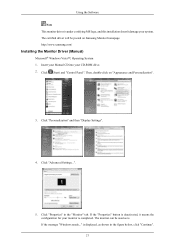
... into your system. Click "Personalization" and then "Display Settings". 4. Click "Advanced Settings...". 5. http://www.samsung.com/ Installing the Monitor Driver (Manual) Microsoft® Windows Vista™, Operating System 1. Using the Software Note This monitor driver is completed. The monitor can be posted on "Appearance and Personalization". 3. The certified driver will be used as shown...
... into your system. Click "Personalization" and then "Display Settings". 4. Click "Advanced Settings...". 5. http://www.samsung.com/ Installing the Monitor Driver (Manual) Microsoft® Windows Vista™, Operating System 1. Using the Software Note This monitor driver is completed. The monitor can be posted on "Appearance and Personalization". 3. The certified driver will be used as shown...


