
Quick Guide (ENGLISH)
Page 3
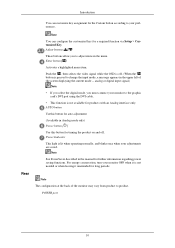
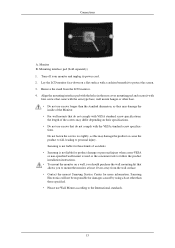
... the maximum count. Introduction Note Cleaning Cloth is not on the screen, push the button to adjust brightness. Front MENU button [MENU/ ] Opens the on . Turn the Power button off and on -screen menu and exits from the menu. Make sure to the previous menu. Brightness button [ ] When OSD is only... return to adjust the resolution of your PC resolution so that it is the optimal resolution for this product. It can be displayed again. Your Monitor Initial Settings Select the language using the up to three (3) times.
... the maximum count. Introduction Note Cleaning Cloth is not on the screen, push the button to adjust brightness. Front MENU button [MENU/ ] Opens the on . Turn the Power button off and on -screen menu and exits from the menu. Make sure to the previous menu. Brightness button [ ] When OSD is only... return to adjust the resolution of your PC resolution so that it is the optimal resolution for this product. It can be displayed again. Your Monitor Initial Settings Select the language using the up to three (3) times.
Quick Guide (ENGLISH)
Page 4
Note See PowerSaver described in the upper left of the screen displaying the current mode -- For energy conservation, turn your monitor to the graphic card's DVI port using the DVI cable. • This function is pressed to product. POWER port 10 Push the ' ', then selects ...When the ' ' button is not available for turning the product on and off. Power Indicator This light is not needed or when leaving it is lit when operating normally, and blinks once when your preferences. Note The configuration at the back of the monitor may vary from product to change the input...
Note See PowerSaver described in the upper left of the screen displaying the current mode -- For energy conservation, turn your monitor to the graphic card's DVI port using the DVI cable. • This function is pressed to product. POWER port 10 Push the ' ', then selects ...When the ' ' button is not available for turning the product on and off. Power Indicator This light is not needed or when leaving it is lit when operating normally, and blinks once when your preferences. Note The configuration at the back of the monitor may vary from product to change the input...
Quick Guide (ENGLISH)
Page 5
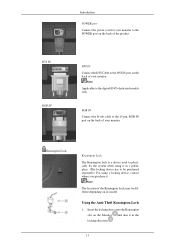
... the DVI IN port on the back of your monitor. RGB IN Connect the D-sub cable to the 15-pin, RGB IN port on the back of your monitor. Note The location of the product. DVI IN RGB... IN Introduction POWER port Connect the power cord for your monitor to the POWER port on the back of the Kensington Lock may be purchased separately.) ...For using it in the locking direction . 11 Insert the locking device into the Kensington slot on the Monitor and turn it in a public place. (The locking device has to the digital (DVI)-dedicated models only. Note Applicable...
... the DVI IN port on the back of your monitor. RGB IN Connect the D-sub cable to the 15-pin, RGB IN port on the back of your monitor. Note The location of the product. DVI IN RGB... IN Introduction POWER port Connect the power cord for your monitor to the POWER port on the back of the Kensington Lock may be purchased separately.) ...For using it in the locking direction . 11 Insert the locking device into the Kensington slot on the Monitor and turn it in a public place. (The locking device has to the digital (DVI)-dedicated models only. Note Applicable...
Quick Guide (ENGLISH)
Page 8
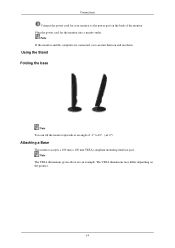
Note The VESA dimensions given above are connected, you can tilt the monitor upwards at an angle of the monitor. Plug the power cord for your monitor to the power port on the back of -1° to 16°. ( ±1.0°) Attaching a Base This monitor accepts a 100 mm x 100 mm VESA-compliant mounting interface pad. The VESA dimensions may differ depending on and use them on the product. 14 Note If the monitor and the computer are an example. Connections Connect the power cord for the monitor into a nearby outlet. Using the Stand Folding the base Note You can turn them .
Note The VESA dimensions given above are connected, you can tilt the monitor upwards at an angle of the monitor. Plug the power cord for your monitor to the power port on the back of -1° to 16°. ( ±1.0°) Attaching a Base This monitor accepts a 100 mm x 100 mm VESA-compliant mounting interface pad. The VESA dimensions may differ depending on and use them on the product. 14 Note If the monitor and the computer are an example. Connections Connect the power cord for the monitor into a nearby outlet. Using the Stand Folding the base Note You can turn them .
Quick Guide (ENGLISH)
Page 9
... 1. Lay the LCD monitor face-down on a wall, you should purchase the wall mounting kit that allows you to protect the screen. 3. Turn off your monitor and unplug its power cord. 2. Samsung is used or the consumer fails to follow the product installation instructions. • To mount the monitor on a flat ...than those specified. • Please use screws that do not comply with VESA standard screw specifications, the length of accidents. • Samsung is not liable for product damage or personal injury when a non-VESA or non-specified wall mount is not liable for these kinds...
... 1. Lay the LCD monitor face-down on a wall, you should purchase the wall mounting kit that allows you to protect the screen. 3. Turn off your monitor and unplug its power cord. 2. Samsung is used or the consumer fails to follow the product installation instructions. • To mount the monitor on a flat ...than those specified. • Please use screws that do not comply with VESA standard screw specifications, the length of accidents. • Samsung is not liable for product damage or personal injury when a non-VESA or non-specified wall mount is not liable for these kinds...
Quick Guide (ENGLISH)
Page 10
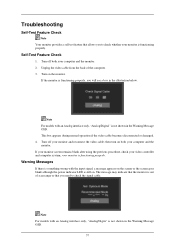
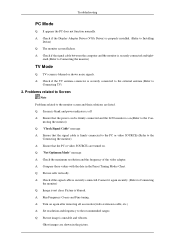
... a self test feature that allows you need to check whether your computer and the monitor. then turn on . your computer and the monitor. 2. The message may indicate that you to check the signal cable. If the monitor is out of the computer. 3. Note For models with an Analog interface only, ...appears on the screen or the screen goes blank although the power indicator LED is still on both your monitor is not shown in the Warning Message OSD. Turn on the monitor. Turn off your video controller and computer system; Unplug the video cable from the back of scan range or that...
... a self test feature that allows you need to check whether your computer and the monitor. then turn on . your computer and the monitor. 2. The message may indicate that you to check the signal cable. If the monitor is out of the computer. 3. Note For models with an Analog interface only, ...appears on the screen or the screen goes blank although the power indicator LED is still on both your monitor is not shown in the Warning Message OSD. Turn on the monitor. Turn off your video controller and computer system; Unplug the video cable from the back of scan range or that...
Quick Guide (ENGLISH)
Page 11
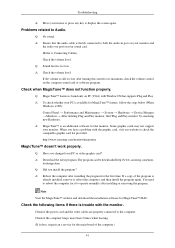
...do need assistance, please call the phone number on the screen? Troubleshooting Environment The location and the position of the monitor may influence the quality and other features of the monitor. I cannot turn on the screen. Press ' ' button to become noisy, and video mode not supported, etc. Q: If ... reboot the computer to analog. Q: Can you see the initial screen (the login screen), which can remedy any sub woofer speakers near the monitor, unplug and relocate the woofer to analog. A: If the initial screen (the login screen) appears, boot the computer in working condition If ...
...do need assistance, please call the phone number on the screen? Troubleshooting Environment The location and the position of the monitor may influence the quality and other features of the monitor. I cannot turn on the screen. Press ' ' button to become noisy, and video mode not supported, etc. Q: If ... reboot the computer to analog. Q: Can you see the initial screen (the login screen), which can remedy any sub woofer speakers near the monitor, unplug and relocate the woofer to analog. A: If the initial screen (the login screen) appears, boot the computer in working condition If ...
Quick Guide (ENGLISH)
Page 13
... → Appearance and Themes → Display → Settings. My computer is on and the LED is a message that reads "Unrecognized monitor, Plug & Play (VESA DDC) monitor found" Q: Have you changed after changing Q: Have the Windows colors been set properly? A: Windows XP : Set the resolution at the ... on the menu? Q: See the video card manual to the Preset Timing Modes) LED is in hibernation mode (The monitor turns off). 40 Q: Have you installed the monitor driver? The screen is out of the video card signals. A: Adjust the resolution and frequency at the video card. ...
... → Appearance and Themes → Display → Settings. My computer is on and the LED is a message that reads "Unrecognized monitor, Plug & Play (VESA DDC) monitor found" Q: Have you changed after changing Q: Have the Windows colors been set properly? A: Windows XP : Set the resolution at the ... on the menu? Q: See the video card manual to the Preset Timing Modes) LED is in hibernation mode (The monitor turns off). 40 Q: Have you installed the monitor driver? The screen is out of the video card signals. A: Adjust the resolution and frequency at the video card. ...
Quick Guide (ENGLISH)
Page 14
...is available for the monitor. Q: Have you changed your mouse or press any key to its maximum, check the volume control on the computer sound card or software program. A: Reboot the computer after installing the program for it to operate normally after turning the control to ... (Refer to reboot the computer for the first time. When you install the program? http://www.samsung.com/monitor/magictune MagicTune™ doesn't work properly. The program can be downloaded http://www.samsung.com/mon- itor/magictune Q: Did you have a problem with the graphic card, visit our website...
...is available for the monitor. Q: Have you changed your mouse or press any key to its maximum, check the volume control on the computer sound card or software program. A: Reboot the computer after installing the program for it to operate normally after turning the control to ... (Refer to reboot the computer for the first time. When you install the program? http://www.samsung.com/monitor/magictune MagicTune™ doesn't work properly. The program can be downloaded http://www.samsung.com/mon- itor/magictune Q: Did you have a problem with the graphic card, visit our website...
Quick Guide (easy Manual) (ver.1.0) (English)
Page 4
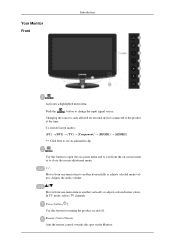
Adjusts the audio volume. Power button [ ] Use this spot on the Monitor. To switch Screen modes: [PC] →[DVI] → [TV] → [Component] → [HDMI1] → [HDMI2] >> Click here to see an animation clip Use this button ... button for external devices connected to change the input signal source. Moves from one menu item to another vertically or adjusts selected menu values. Your Monitor Front Introduction Activates a highlighted menu item. Push the ' ', button to the product at the time. Changing the source is only allowed for...
Adjusts the audio volume. Power button [ ] Use this spot on the Monitor. To switch Screen modes: [PC] →[DVI] → [TV] → [Component] → [HDMI1] → [HDMI2] >> Click here to see an animation clip Use this button ... button for external devices connected to change the input signal source. Moves from one menu item to another vertically or adjusts selected menu values. Your Monitor Front Introduction Activates a highlighted menu item. Push the ' ', button to the product at the time. Changing the source is only allowed for...
Quick Guide (easy Manual) (ver.1.0) (English)
Page 5
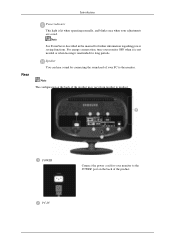
...The configuration at the back of the product. Note See PowerSaver described in the manual for your monitor to the POWER port on the back of the product may vary from product to the monitor. PC IN POWER Connect the power cord for further information regarding power saving functions. Introduction Rear ...Power indicator This light is not needed or when leaving it unattended for long periods. For energy conservation, turn your monitor OFF when it is lit when operating normally, and blinks once when your PC to product.
...The configuration at the back of the product. Note See PowerSaver described in the manual for your monitor to the POWER port on the back of the product may vary from product to the monitor. PC IN POWER Connect the power cord for further information regarding power saving functions. Introduction Rear ...Power indicator This light is not needed or when leaving it unattended for long periods. For energy conservation, turn your monitor OFF when it is lit when operating normally, and blinks once when your PC to product.

Quick Guide (easy Manual) (ver.1.0) (English)
Page 8
... Lock 1. Remote Control Insert the locking device into the Kensington slot on its model. The appearance and locking method may be different depending on the Monitor ( ) and turn it in a public place. The locking device has to the manual provided with the Kensington Lock for further information regarding cable connections. Connect the...
... Lock 1. Remote Control Insert the locking device into the Kensington slot on its model. The appearance and locking method may be different depending on the Monitor ( ) and turn it in a public place. The locking device has to the manual provided with the Kensington Lock for further information regarding cable connections. Connect the...
Quick Guide (easy Manual) (ver.1.0) (English)
Page 9
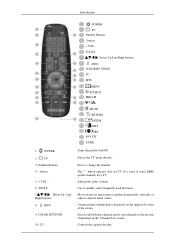
button 5. + VOL - 6. Right buttons 8. CC Turns the product On/Off. Press to add or delete channels and to store channels to change the channel. Down-Up Left- COLOR BUTTONS 10. The "-" ...
button 5. + VOL - 6. Right buttons 8. CC Turns the product On/Off. Press to add or delete channels and to store channels to change the channel. Down-Up Left- COLOR BUTTONS 10. The "-" ...
Quick Guide (easy Manual) (ver.1.0) (English)
Page 12
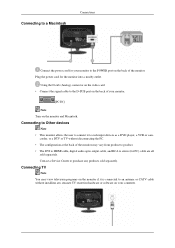
... video card. • Connect the signal cable to the D-SUB port on the monitor and Macintosh. Contact a Service Center to purchase any separate TV reception hardware or software on your monitor. [PC IN] Note Turn on the back of the monitor. Connecting TV Note You may vary from product to product. • The DVI...
... video card. • Connect the signal cable to the D-SUB port on the monitor and Macintosh. Contact a Service Center to purchase any separate TV reception hardware or software on your monitor. [PC IN] Note Turn on the back of the monitor. Connecting TV Note You may vary from product to product. • The DVI...
Quick Guide (easy Manual) (ver.1.0) (English)
Page 13
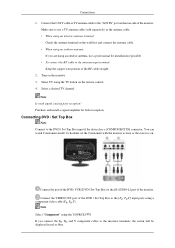
Turn on the remote control. 4. Connecting DVD / Set Top Box Note Connect to the incorrect terminals, ... on. Note Is weak signal causing poor reception? You can watch Component simply by hooking up the Component with the monitor as long as the antenna cable. • When using an interior antenna terminal: Check the antenna terminal on the rear...VCR (DVD / Set-Top Box) to the antenna input terminal: Keep the copper wire portion of the monitor. Make sure to use a professional for better reception. Select a desired TV channel. Connections 1. Connect the VIDEO OUT port of ...
Turn on the remote control. 4. Connecting DVD / Set Top Box Note Connect to the incorrect terminals, ... on. Note Is weak signal causing poor reception? You can watch Component simply by hooking up the Component with the monitor as long as the antenna cable. • When using an interior antenna terminal: Check the antenna terminal on the rear...VCR (DVD / Set-Top Box) to the antenna input terminal: Keep the copper wire portion of the monitor. Make sure to use a professional for better reception. Select a desired TV channel. Connections 1. Connect the VIDEO OUT port of ...
Quick Guide (easy Manual) (ver.1.0) (English)
Page 17
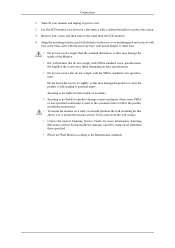
... these kinds of the screws may damage the product or cause the product to fall, leading to protect the screen. 3. Samsung Electronics will not be responsible for more information. Lay the LCD monitor face-down on a flat surface with a cushion beneath it with four screws that came with VESA standard screw specifications, the... holes in the rear cover mounting pad and secure it to personal injury. Connections 1. Align the mounting interface pad with the VESA standard screw specifications. Turn off your monitor and unplug its power cord. 2.
... these kinds of the screws may damage the product or cause the product to fall, leading to protect the screen. 3. Samsung Electronics will not be responsible for more information. Lay the LCD monitor face-down on a flat surface with a cushion beneath it with four screws that came with VESA standard screw specifications, the... holes in the rear cover mounting pad and secure it to personal injury. Connections 1. Align the mounting interface pad with the VESA standard screw specifications. Turn off your monitor and unplug its power cord. 2.
Quick Guide (easy Manual) (ver.1.0) (English)
Page 18
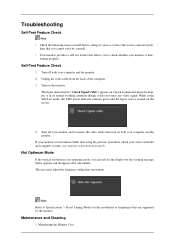
...for service. Unplug the video cable from the back of the computer. 3. Turn on both your monitor is func- then turn on the monitor. your computer and the monitor. 2. Turn off your monitor is functioning properly. lems that one minute. The user must adjust the frequency ...Preset Timing Modes for the resolutions or frequencies that are supported by yourself. • Your monitor provides a self test feature that allows you cannot solve by the monitor. Turn off both your video controller and computer system; Maintenance and Cleaning 1. Troubleshooting Self-Test ...
...for service. Unplug the video cable from the back of the computer. 3. Turn on both your monitor is func- then turn on the monitor. your computer and the monitor. 2. Turn off your monitor is functioning properly. lems that one minute. The user must adjust the frequency ...Preset Timing Modes for the resolutions or frequencies that are supported by yourself. • Your monitor provides a self test feature that allows you cannot solve by the monitor. Turn off both your video controller and computer system; Maintenance and Cleaning 1. Troubleshooting Self-Test ...
Quick Guide (easy Manual) (ver.1.0) (English)
Page 20
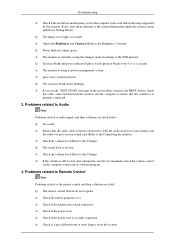
..." message A: Ensure that the signal cable is firmly connected to the PC or video SOURCEs.(Refer to the Connecting the monitor) A: Ensure that the power cord is firmly connected and the LCD monitor is on.(Refer to the Con- Picture is securely connected to the external antenna.(Refer to Connecting the... blurred or shows noise signals. Q: "Not Optimum Mode" message A: Check the maximum resolution and the frequency of the video adapter. Q: Picture rolls vertically. A: Turn on . A: Check if the Display Adapter Driver (VGA Driver) is off A: Ensure that the PC or video SOURCEs are...
..." message A: Ensure that the signal cable is firmly connected to the PC or video SOURCEs.(Refer to the Connecting the monitor) A: Ensure that the power cord is firmly connected and the LCD monitor is on.(Refer to the Con- Picture is securely connected to the external antenna.(Refer to Connecting the... blurred or shows noise signals. Q: "Not Optimum Mode" message A: Check the maximum resolution and the frequency of the video adapter. Q: Picture rolls vertically. A: Turn on . A: Check if the Display Adapter Driver (VGA Driver) is off A: Ensure that the PC or video SOURCEs are...
Quick Guide (easy Manual) (ver.1.0) (English)
Page 21
..., Contrast) Q: Power Indicator blinks green. Q: Screen is blank and power indicator light is steady green or blinks every 0.5 or 1 seconds A: The monitor is properly connected. 3. A: Check the battery polarities (+/-). Troubleshooting A: Check if the resolution and frequency set for the computer video card falls in settings ...the connector is using its maximum, check the volume control on the keyboard Q: The screen is blank and is still too low after turning the control to the remote control and their solutions are listed. A: Check if the power is too light or too dark A: Adjust...
..., Contrast) Q: Power Indicator blinks green. Q: Screen is blank and power indicator light is steady green or blinks every 0.5 or 1 seconds A: The monitor is properly connected. 3. A: Check the battery polarities (+/-). Troubleshooting A: Check if the resolution and frequency set for the computer video card falls in settings ...the connector is using its maximum, check the volume control on the keyboard Q: The screen is blank and is still too low after turning the control to the remote control and their solutions are listed. A: Check if the power is too light or too dark A: Adjust...

User Manual (user Manual) (ver.1.0) (English)
Page 6
... in an explosion or fire. Contact a Service Center. • Otherwise, this may result in a location exposed to the cable. Do not lift or move the monitor by a table or curtain. • Otherwise, it may fall and result in electric shock, damage to the product or fire due to damage to an... increase in the internal temperature. When you drop the product or the case is broken, turn the power off and disconnect the power cord. icines as well as matches or paper, inside the product (through the ventilating openings, input and output...
... in an explosion or fire. Contact a Service Center. • Otherwise, this may result in a location exposed to the cable. Do not lift or move the monitor by a table or curtain. • Otherwise, it may fall and result in electric shock, damage to the product or fire due to damage to an... increase in the internal temperature. When you drop the product or the case is broken, turn the power off and disconnect the power cord. icines as well as matches or paper, inside the product (through the ventilating openings, input and output...


