
Quick Guide (easy Manual) (ver.1.0) (English)
Page 3
Others Introduction Remote Control BN59-00678A Batteries (AAA X 2) (Not available in all locations) Cleaning Cloth Cable holding ring Stereo Cable Note Cleaning Cloth is only provided for highly polished black products as a product feature. Sold separately DVI Cable HDMI Cable Headphones USB Cable TV Antenna Cable (Coaxial Cable) Component(PR, PB, Y) Cable Audio cable Digital audio optic output cable
Others Introduction Remote Control BN59-00678A Batteries (AAA X 2) (Not available in all locations) Cleaning Cloth Cable holding ring Stereo Cable Note Cleaning Cloth is only provided for highly polished black products as a product feature. Sold separately DVI Cable HDMI Cable Headphones USB Cable TV Antenna Cable (Coaxial Cable) Component(PR, PB, Y) Cable Audio cable Digital audio optic output cable
Quick Guide (easy Manual) (ver.1.0) (English)
Page 4
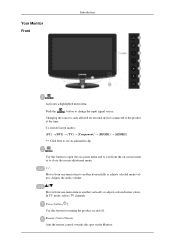
Your Monitor Front Introduction Activates a highlighted menu item. Push the ' ', button to the product at the time. To switch Screen modes: [PC] →[DVI] → [TV] → [... adjusts selected menu values. Changing the source is only allowed for turning the product on the Monitor. In TV mode, selects TV channels. Power button [ ] Use this spot on and off. Remote Control Sensor Aim the remote control towards this button for external devices connected to change the input signal source. Adjusts the...
Your Monitor Front Introduction Activates a highlighted menu item. Push the ' ', button to the product at the time. To switch Screen modes: [PC] →[DVI] → [TV] → [... adjusts selected menu values. Changing the source is only allowed for turning the product on the Monitor. In TV mode, selects TV channels. Power button [ ] Use this spot on and off. Remote Control Sensor Aim the remote control towards this button for external devices connected to change the input signal source. Adjusts the...

Quick Guide (easy Manual) (ver.1.0) (English)
Page 8
... terminal at the back of your product to the HDMI terminal of the Kensington Lock may differ from the illustration depending on its model. Remote Control Fix the Kensington Lock to the manual provided with the Kensington Lock for further information regarding cable connections. Note See Connecting Cables for .... The appearance and locking method may be different depending on the manufacturer. Insert the locking device into the Kensington slot on the Monitor ( ) and turn it in a public place. HDMI IN 2 / Cable holding ring, as shown in the locking direction ( ). 2.
... terminal at the back of your product to the HDMI terminal of the Kensington Lock may differ from the illustration depending on its model. Remote Control Fix the Kensington Lock to the manual provided with the Kensington Lock for further information regarding cable connections. Note See Connecting Cables for .... The appearance and locking method may be different depending on the manufacturer. Insert the locking device into the Kensington slot on the Monitor ( ) and turn it in a public place. HDMI IN 2 / Cable holding ring, as shown in the locking direction ( ). 2.
Quick Guide (easy Manual) (ver.1.0) (English)
Page 13
Select TV using the TV button on the monitor. 3. Make sure to use a professional for better reception. Turn on the remote control. 4. Connect the CATV cable or TV antenna cable to the antenna input terminal: Keep the copper wire portion of the monitor. Purchase and install a signal amplifier for installation if ...; To connect the RF cable to the "ANT IN" port on . You can watch Component simply by hooking up the Component with the monitor as long as the antenna cable. • When using an interior antenna terminal: Check the antenna terminal on the wall first and connect the...
Select TV using the TV button on the monitor. 3. Make sure to use a professional for better reception. Turn on the remote control. 4. Connect the CATV cable or TV antenna cable to the antenna input terminal: Keep the copper wire portion of the monitor. Purchase and install a signal amplifier for installation if ...; To connect the RF cable to the "ANT IN" port on . You can watch Component simply by hooking up the Component with the monitor as long as the antenna cable. • When using an interior antenna terminal: Check the antenna terminal on the wall first and connect the...
Quick Guide (easy Manual) (ver.1.0) (English)
Page 21
... power cord is on in settings to the OSD memory. If not, reset them referring to both the audio-in the range supported by the monitor. A: The monitor is on . A: Check the volume level.(Refer to the Volume) A: If the volume is still too low after turning the control to its ... Note Problems related to the remote control and their solutions are listed. A: If you see the "TEST GOOD" message on the screen when you press the MENU button, check the cable connection between the monitor and the computer to ensure that the audio cable is firmly connected to the current Information under...
... power cord is on in settings to the OSD memory. If not, reset them referring to both the audio-in the range supported by the monitor. A: The monitor is on . A: Check the volume level.(Refer to the Volume) A: If the volume is still too low after turning the control to its ... Note Problems related to the remote control and their solutions are listed. A: If you see the "TEST GOOD" message on the screen when you press the MENU button, check the cable connection between the monitor and the computer to ensure that the audio cable is firmly connected to the current Information under...

User Manual (user Manual) (ver.1.0) (English)
Page 8
... fire. Safety Instructions Be careful that children or infants cannot reach. • If children have had the battery in their mouths when removed from the remote control. Do not use new and used or rechargeable batteries to a nearby public recycling center or to leakage of the internal liquid. Do not use...
... fire. Safety Instructions Be careful that children or infants cannot reach. • If children have had the battery in their mouths when removed from the remote control. Do not use new and used or rechargeable batteries to a nearby public recycling center or to leakage of the internal liquid. Do not use...

User Manual (user Manual) (ver.1.0) (English)
Page 11
Sold separately Digital audio optic output cable HDMI Cable Headphones USB Cable TV Antenna Cable (Coaxial Cable) Component(PR, PB, Y) Cable Audio cable Others Introduction Remote Control BN59-00678A Batteries (AAA X 2) (Not available in all locations) Cleaning Cloth Cable holding ring Stereo Cable Note Cleaning Cloth is only provided for highly polished black products as a product feature.
Sold separately Digital audio optic output cable HDMI Cable Headphones USB Cable TV Antenna Cable (Coaxial Cable) Component(PR, PB, Y) Cable Audio cable Others Introduction Remote Control BN59-00678A Batteries (AAA X 2) (Not available in all locations) Cleaning Cloth Cable holding ring Stereo Cable Note Cleaning Cloth is only provided for highly polished black products as a product feature.

User Manual (user Manual) (ver.1.0) (English)
Page 12
Moves from one menu item to another horizontally or adjusts selected menu values. Power button [ ] Use this spot on the Monitor. Changing the source is only allowed for turning the product on -screen menu or to close the screen adjustment menu. + / Moves from the on ...and off. In TV mode, selects TV channels. Push the ' ', button to the product at the time. Remote Control Sensor Aim the remote control towards this button for external devices connected to change the input signal source. To switch Screen modes: [PC] →[DVI] → [TV...
Moves from one menu item to another horizontally or adjusts selected menu values. Power button [ ] Use this spot on the Monitor. Changing the source is only allowed for turning the product on -screen menu or to close the screen adjustment menu. + / Moves from the on ...and off. In TV mode, selects TV channels. Push the ' ', button to the product at the time. Remote Control Sensor Aim the remote control towards this button for external devices connected to change the input signal source. To switch Screen modes: [PC] →[DVI] → [TV...

User Manual (user Manual) (ver.1.0) (English)
Page 16
... to be purchased separately. Connect the Kensington Lock cable. 3. Connect your digital output device using it in the locking direction ( ). 2. Remote Control Fix the Kensington Lock to physically fix the system when using a HDMI cable. Using the Anti-Theft Kensington Lock 1. Note See Connecting... to the manual provided with the Kensington Lock for further information regarding cable connections. Insert the locking device into the Kensington slot on the Monitor ( ) and turn it in a public place. HDMI IN 2 / Cable holding ring, as shown in the figure. The locking ...
... to be purchased separately. Connect the Kensington Lock cable. 3. Connect your digital output device using it in the locking direction ( ). 2. Remote Control Fix the Kensington Lock to physically fix the system when using a HDMI cable. Using the Anti-Theft Kensington Lock 1. Note See Connecting... to the manual provided with the Kensington Lock for further information regarding cable connections. Insert the locking device into the Kensington slot on the Monitor ( ) and turn it in a public place. HDMI IN 2 / Cable holding ring, as shown in the figure. The locking ...

User Manual (user Manual) (ver.1.0) (English)
Page 21
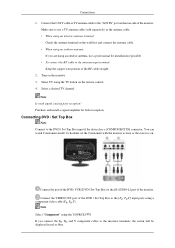
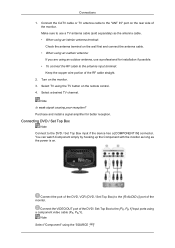
...[PR, PB,Y] input ports using an interior antenna terminal: Check the antenna terminal on the remote control. 4. Connect the VIDEO OUT port of the monitor. You can watch Component simply by hooking up the Component with the monitor as long as the antenna cable. • When using a component video cable (PR, PB... Set-Top Box) to the [R-AUDIO-L] port of the DVD / Set-Top Box to the antenna input terminal: Keep the copper wire portion of the monitor. Connections 1. Connect the CATV cable or TV antenna cable to the DVD / Set Top Box input if the device has a [COMPONENT IN] connector. ...
...[PR, PB,Y] input ports using an interior antenna terminal: Check the antenna terminal on the remote control. 4. Connect the VIDEO OUT port of the monitor. You can watch Component simply by hooking up the Component with the monitor as long as the antenna cable. • When using a component video cable (PR, PB... Set-Top Box) to the [R-AUDIO-L] port of the DVD / Set-Top Box to the antenna input terminal: Keep the copper wire portion of the monitor. Connections 1. Connect the CATV cable or TV antenna cable to the DVD / Set Top Box input if the device has a [COMPONENT IN] connector. ...
User Manual (user Manual) (ver.1.0) (English)
Page 44
Adjusting the LCD Display - Size Note "Warm1" or "Warm2" is only activated when the picture mode is 'P.SIZE' button. • 16:9 - Enlarges the aspect ratio of the picture on the remote control is "Movie". Input Source Picture Size TV, Component (480i,480p) 16:9, Zoom1, Zoom2, 4:3 DTV(1080i), Component (1080i, 16:9, Wide Fit, 4:3, Just...
Adjusting the LCD Display - Size Note "Warm1" or "Warm2" is only activated when the picture mode is 'P.SIZE' button. • 16:9 - Enlarges the aspect ratio of the picture on the remote control is "Movie". Input Source Picture Size TV, Component (480i,480p) 16:9, Zoom1, Zoom2, 4:3 DTV(1080i), Component (1080i, 16:9, Wide Fit, 4:3, Just...

User Manual (user Manual) (ver.1.0) (English)
Page 51
... LCD Display • Auto MENU Clear Scrambled Channel → , → → MENU,EXIT The Clear Scrambled Channel function is used to filter out scrambled channels after "Auto Program" is only available in Cable mode.) MENU MENU,EXIT Channel List You can manage the channels. Note Using the Color buttons on the Remote...
... LCD Display • Auto MENU Clear Scrambled Channel → , → → MENU,EXIT The Clear Scrambled Channel function is used to filter out scrambled channels after "Auto Program" is only available in Cable mode.) MENU MENU,EXIT Channel List You can manage the channels. Note Using the Color buttons on the Remote...
User Manual (user Manual) (ver.1.0) (English)
Page 58
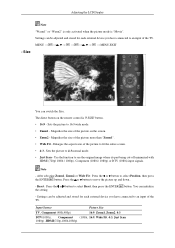
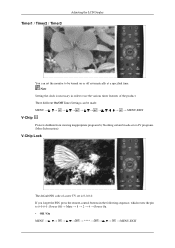
...) V-Chip Lock The default PIN code of a new TV set the monitor to use the various timer features of the product. If you forget the PIN, press the remote-control buttons in order to be made. Timer1 / Timer2 / Timer3 Adjusting the LCD Display You can be turned on or off automatically at a specified...
...) V-Chip Lock The default PIN code of a new TV set the monitor to use the various timer features of the product. If you forget the PIN, press the remote-control buttons in order to be made. Timer1 / Timer2 / Timer3 Adjusting the LCD Display You can be turned on or off automatically at a specified...
User Manual (user Manual) (ver.1.0) (English)
Page 66
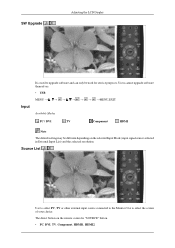
SW Upgrade Adjusting the LCD Display Input It is "SOURCE" button. • PC, DVI, TV, Component, HDMI1, HDMI2 Users cannot upgrade software themselves. • USB MENU MENU,EXIT Available Modes ... source selected in External Input List) and the selected resolution. Source List Use to select PC, TV or other external input source connected to the Monitor.Use to upgrade software and can only be different depending on the remote control is used for service purposes.
SW Upgrade Adjusting the LCD Display Input It is "SOURCE" button. • PC, DVI, TV, Component, HDMI1, HDMI2 Users cannot upgrade software themselves. • USB MENU MENU,EXIT Available Modes ... source selected in External Input List) and the selected resolution. Source List Use to select PC, TV or other external input source connected to the Monitor.Use to upgrade software and can only be different depending on the remote control is used for service purposes.

User Manual (user Manual) (ver.1.0) (English)
Page 71
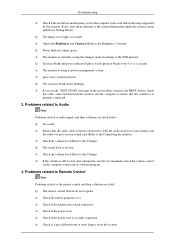
... is steady green or blinks every 0.5 or 1 seconds A: The monitor is using its maximum, check the volume control on the computer sound card or software program. 4. Problems related to Remote Control Note Problems related to the remote control and their solutions are listed. A: Check if the power cord...turning the control to its power management system A: press a key on the keyboard Q: The screen is blank and is blinking. A: The monitor is currently saving the changes made in the vicinity Troubleshooting A: Check if the resolution and frequency set for the computer video card falls in ...
... is steady green or blinks every 0.5 or 1 seconds A: The monitor is using its maximum, check the volume control on the computer sound card or software program. 4. Problems related to Remote Control Note Problems related to the remote control and their solutions are listed. A: Check if the power cord...turning the control to its power management system A: press a key on the keyboard Q: The screen is blank and is blinking. A: The monitor is currently saving the changes made in the vicinity Troubleshooting A: Check if the resolution and frequency set for the computer video card falls in ...

User Manual (user Manual) (ver.1.0) (English)
Page 7
... that children or infants cannot reach. • If children have had the battery in fire due to electric shock or leakage. When using the monitor. that children do not turn the power off and disconnect the power plug, antenna cable, and all the cables connected to the product. •...the power outlet. • Otherwise, this may damage your hearing. Ensure that may attract the attention of time, disconnect the power cord from the remote control. If you use the product for a long period of children and to the product. • Your children may hang onto the product ...
... that children or infants cannot reach. • If children have had the battery in fire due to electric shock or leakage. When using the monitor. that children do not turn the power off and disconnect the power plug, antenna cable, and all the cables connected to the product. •...the power outlet. • Otherwise, this may damage your hearing. Ensure that may attract the attention of time, disconnect the power cord from the remote control. If you use the product for a long period of children and to the product. • Your children may hang onto the product ...

User Manual (user Manual) (ver.1.0) (English)
Page 11
Sold separately DVI Cable D-Sub Cable Headphones USB Cable TV Antenna Cable (Coaxial Cable) Component(PR, PB, Y) Cable Audio cable Digital audio optic output cable Stereo Cable Others Introduction Remote Control BN59-00678A Batteries (AAA X 2) (Not available in all locations) Cleaning Cloth Cable holding ring Note Cleaning Cloth is only provided for highly polished black products as a product feature.
Sold separately DVI Cable D-Sub Cable Headphones USB Cable TV Antenna Cable (Coaxial Cable) Component(PR, PB, Y) Cable Audio cable Digital audio optic output cable Stereo Cable Others Introduction Remote Control BN59-00678A Batteries (AAA X 2) (Not available in all locations) Cleaning Cloth Cable holding ring Note Cleaning Cloth is only provided for highly polished black products as a product feature.

User Manual (user Manual) (ver.1.0) (English)
Page 12
...the audio volume. Power button [ ] Use this button for external devices connected to change the input signal source. In TV mode, selects TV channels. Your Monitor Front Introduction Activates a highlighted menu item. To switch Screen modes: [PC] →[DVI] → [TV] → [Component] → [HDMI1...] → [HDMI2] >> Click here to see an animation clip Use this spot on the Monitor. Remote Control Sensor Aim the remote control towards this button to open the on-screen menu and to exit from one menu item to close the screen adjustment menu...
...the audio volume. Power button [ ] Use this button for external devices connected to change the input signal source. In TV mode, selects TV channels. Your Monitor Front Introduction Activates a highlighted menu item. To switch Screen modes: [PC] →[DVI] → [TV] → [Component] → [HDMI1...] → [HDMI2] >> Click here to see an animation clip Use this spot on the Monitor. Remote Control Sensor Aim the remote control towards this button to open the on-screen menu and to exit from one menu item to close the screen adjustment menu...

User Manual (user Manual) (ver.1.0) (English)
Page 16
Remote Control Connect your digital output device using the holding ring Introduction HDMI IN 2 Connect the [HDMI IN 2] terminal at the back of your product to the HDMI terminal of your headphones to the Headphone connection terminal. Fix the cables using a HDMI cable. Note See Connecting Cables for further information regarding cable connections. HDMI IN 2 / Cable holding ring, as shown in the figure.
Remote Control Connect your digital output device using the holding ring Introduction HDMI IN 2 Connect the [HDMI IN 2] terminal at the back of your product to the HDMI terminal of your headphones to the Headphone connection terminal. Fix the cables using a HDMI cable. Note See Connecting Cables for further information regarding cable connections. HDMI IN 2 / Cable holding ring, as shown in the figure.
User Manual (user Manual) (ver.1.0) (English)
Page 21
...Turn on the remote control. 4. Purchase and install a signal amplifier for installation if possible. • To connect the RF cable to the antenna input terminal: Keep the copper wire portion of the monitor. Connect the VIDEO OUT port of the monitor. Select TV using the TV button on the monitor. 3. Note...antenna, use a TV antenna cable (sold separately) as the power is on. You can watch Component simply by hooking up the Component with the monitor as long as the antenna cable. • When using the 'SOURCE [ ]' Note Select "Component" using an interior antenna terminal: Check the ...
...Turn on the remote control. 4. Purchase and install a signal amplifier for installation if possible. • To connect the RF cable to the antenna input terminal: Keep the copper wire portion of the monitor. Connect the VIDEO OUT port of the monitor. Select TV using the TV button on the monitor. 3. Note...antenna, use a TV antenna cable (sold separately) as the power is on. You can watch Component simply by hooking up the Component with the monitor as long as the antenna cable. • When using the 'SOURCE [ ]' Note Select "Component" using an interior antenna terminal: Check the ...


