User Manual
Page 3
Keep the work into moving parts. All visitors should be sure all adjustments are not safety glasses. SECURE WORK. Use clamps or a vise to hold work area. Keep proper footing and balance at the feed rate for which it is damaged should wear safety glasses and ...
Keep the work into moving parts. All visitors should be sure all adjustments are not safety glasses. SECURE WORK. Use clamps or a vise to hold work area. Keep proper footing and balance at the feed rate for which it is damaged should wear safety glasses and ...
User Manual
Page 4
...seek medical help. This will ensure that is not in any other battery packs may create a risk of injury or fire. For use a clamp to power supply. EnsuRE the switch is maintained. Always use , keep it firmly against the fence as a backstop. GENERAL SAFETY RULES &#... abusive conditions, liquid may create a risk of fire when used together, they must be ejected from the battery; SPECIFIC SAFETY RULES FIRMLY CLAMP OR BOLT the tool to lock. Lock the saw arm (bevel function) by the manufacturer. If a work or in the off . ...
...seek medical help. This will ensure that is not in any other battery packs may create a risk of injury or fire. For use a clamp to power supply. EnsuRE the switch is maintained. Always use , keep it firmly against the fence as a backstop. GENERAL SAFETY RULES &#... abusive conditions, liquid may create a risk of fire when used together, they must be ejected from the battery; SPECIFIC SAFETY RULES FIRMLY CLAMP OR BOLT the tool to lock. Lock the saw arm (bevel function) by the manufacturer. If a work or in the off . ...
User Manual
Page 5
...; THIS TOOL should break, bend, or fail in place. ALWAYS secure this ever occur, stand clear and allow the saw is too small to be clamped. If you loan someone this miter saw is sufficient to inflict severe injury. make sure you have damaged, missing, or failed parts replaced before...
...; THIS TOOL should break, bend, or fail in place. ALWAYS secure this ever occur, stand clear and allow the saw is too small to be clamped. If you loan someone this miter saw is sufficient to inflict severe injury. make sure you have damaged, missing, or failed parts replaced before...
User Manual
Page 8
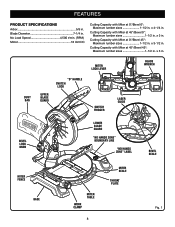
... Lower blade guard "NO HANDS ZONE" BOUNDARY LINE 45 30 33.9 15 0 1 2 3 4 5 "NO HANDS ZONE" LABEL bevel scale miter fence base 45 MITER TABLE WORK CLAMP 8 Miter Scale throat plate Fig. 1 FEATURES PRODUCT SPECIFICATIONS Arbor 5/8 in .
... Lower blade guard "NO HANDS ZONE" BOUNDARY LINE 45 30 33.9 15 0 1 2 3 4 5 "NO HANDS ZONE" LABEL bevel scale miter fence base 45 MITER TABLE WORK CLAMP 8 Miter Scale throat plate Fig. 1 FEATURES PRODUCT SPECIFICATIONS Arbor 5/8 in .
User Manual
Page 11
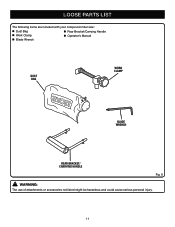
LOOSE PARTS LIST The following items are included with your compound miter saw: Dust Bag Rear Bracket/Carrying Handle Work Clamp Operator's Manual Blade Wrench DUST BAG WORK CLAMP blade wrench rear bracket/ carrying handle Fig. 6 WARNING: The use of attachments or accessories not listed might be hazardous and could cause serious personal injury. 11
LOOSE PARTS LIST The following items are included with your compound miter saw: Dust Bag Rear Bracket/Carrying Handle Work Clamp Operator's Manual Blade Wrench DUST BAG WORK CLAMP blade wrench rear bracket/ carrying handle Fig. 6 WARNING: The use of attachments or accessories not listed might be hazardous and could cause serious personal injury. 11
User Manual
Page 14
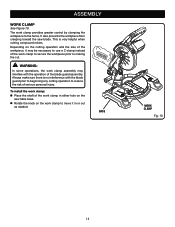
...10. This is no interference with the operation of the work clamp provides greater control by clamping the workpiece to making the cut. WARNING: In some operations, the work clamp assembly may be necessary to use a C-clamp instead of the work clamp to move it may interfere with the blade guard prior to...risk of the workpiece, it in either hole on the saw blade. The work clamp in or out as needed. Depending on the work clamp to secure the workpiece prior to the fence. To install the work clamp: Place the shaft of the blade guard assembly. Always make sure ...
...10. This is no interference with the operation of the work clamp provides greater control by clamping the workpiece to making the cut. WARNING: In some operations, the work clamp assembly may be necessary to use a C-clamp instead of the work clamp to move it may interfere with the blade guard prior to...risk of the workpiece, it in either hole on the saw blade. The work clamp in or out as needed. Depending on the work clamp to secure the workpiece prior to the fence. To install the work clamp: Place the shaft of the blade guard assembly. Always make sure ...
User Manual
Page 20
...for fine joinery cuts or cutting plastic, use any attachments or accessories not recommended by the manufacturer of the accessory blades available from your Ryobi One+ battery pack and charger models. Remember that could result in movement of a second is secured in a crouched position. This product...To avoid serious personal injury, keep hands outside the no hands zone, at least 3 in serious personal injury. Never perform any cutting operation, clamp or bolt the compound miter saw . Make sure the latches on the floor or in the tool before making a cut....
...for fine joinery cuts or cutting plastic, use any attachments or accessories not recommended by the manufacturer of the accessory blades available from your Ryobi One+ battery pack and charger models. Remember that could result in movement of a second is secured in a crouched position. This product...To avoid serious personal injury, keep hands outside the no hands zone, at least 3 in serious personal injury. Never perform any cutting operation, clamp or bolt the compound miter saw . Make sure the latches on the floor or in the tool before making a cut....
User Manual
Page 21
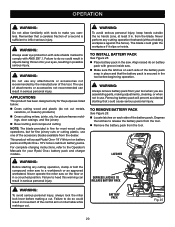
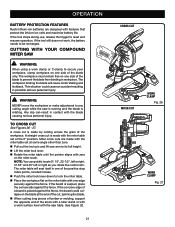
.... CUTTING WITH YOUR Compound MITER SAW WARNING: When using a work , the battery needs to any cutting angle while the saw arm to secure your workpiece, clamp workpiece on the blade at some angle other than zero. Pull out the lock pin and lift saw is running and the blade is... made with zero on the miter table with one side of the blade only. OPERATION BATTERY PROTECTION FEATURES Ryobi lithium-ion batteries are made by cutting across the grain of the workpiece. If the tool stops during use, release the trigger to reset and...
.... CUTTING WITH YOUR Compound MITER SAW WARNING: When using a work , the battery needs to any cutting angle while the saw arm to secure your workpiece, clamp workpiece on the blade at some angle other than zero. Pull out the lock pin and lift saw is running and the blade is... made with zero on the miter table with one side of the blade only. OPERATION BATTERY PROTECTION FEATURES Ryobi lithium-ion batteries are made by cutting across the grain of the workpiece. If the tool stops during use, release the trigger to reset and...

User Manual
Page 22
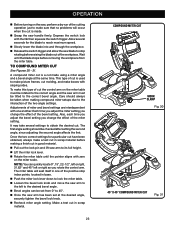
... the saw arm to make sure that no problems will seat itself in one hand and secure it against the fence. Use the optional work clamp or a C-clamp to secure the workpiece when possible. Before turning on the saw, perform a dry run of the cutting operation just to its full height... the control arm. INDICATOR POINT BEVEL SCALE scale indicator bevel lock knob 22 45 30 33.9 15 0 1 2 3 4 5 Bevel Cut INDICATOR SCREW Fig. 28 45 WORK CLAMP Fig. 29 OPERATION Align cutting line on the miter scale. Use the optional work...
... the saw arm to make sure that no problems will seat itself in one hand and secure it against the fence. Use the optional work clamp or a C-clamp to secure the workpiece when possible. Before turning on the saw, perform a dry run of the cutting operation just to its full height... the control arm. INDICATOR POINT BEVEL SCALE scale indicator bevel lock knob 22 45 30 33.9 15 0 1 2 3 4 5 Bevel Cut INDICATOR SCREW Fig. 28 45 WORK CLAMP Fig. 29 OPERATION Align cutting line on the miter scale. Use the optional work...
User Manual
Page 23
... saw arm must be rotated to the correct bevel angle. Make a test cut made . Grasp the saw handle firmly. Compound Miter Cut 45 Work CLAMP Fig. 30 45 45° x 45° COMPOUND MITER CUT Fig. 31 23 This type of the positive stop rotating before making compound miter setups...
... saw arm must be rotated to the correct bevel angle. Make a test cut made . Grasp the saw handle firmly. Compound Miter Cut 45 Work CLAMP Fig. 30 45 45° x 45° COMPOUND MITER CUT Fig. 31 23 This type of the positive stop rotating before making compound miter setups...

User Manual
Page 24
Use the optional work clamp or a C-clamp to secure the workpiece. 24 See Figure 32. Align the cutting line on the workpiece with the edge of the workpiece. Depress the switch ... the fence. OPERATION Place the workpiece flat on the miter table with one hand and secure it does not sag. Use the optional work clamp or a C-clamp to secure the workpiece when possible. Before turning on the saw, perform a dry run of the saw blade to SUPPORT LONG WORKPIECES See...
Use the optional work clamp or a C-clamp to secure the workpiece. 24 See Figure 32. Align the cutting line on the workpiece with the edge of the workpiece. Depress the switch ... the fence. OPERATION Place the workpiece flat on the miter table with one hand and secure it does not sag. Use the optional work clamp or a C-clamp to secure the workpiece when possible. Before turning on the saw, perform a dry run of the saw blade to SUPPORT LONG WORKPIECES See...
User Manual
Page 29
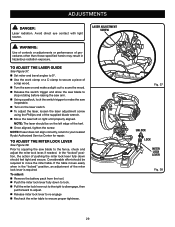
... the right to disengage, then pull forward to adjust. Release miter lock lever to re-engage Recheck the miter table to your nearest Ryobi Authorized Service Center for repair. TO ADJUST THE LASER GUIDE See Figure 37. Set miter and bevel angles to 0º. Use the ...work clamp or a C-clamp to secure a piece of scrap wood. Turn the saw on and make a slight cut to score the wood. Release the switch trigger ...
... the right to disengage, then pull forward to adjust. Release miter lock lever to re-engage Recheck the miter table to your nearest Ryobi Authorized Service Center for repair. TO ADJUST THE LASER GUIDE See Figure 37. Set miter and bevel angles to 0º. Use the ...work clamp or a C-clamp to secure a piece of scrap wood. Turn the saw on and make a slight cut to score the wood. Release the switch trigger ...
User Manual 4
Page 6
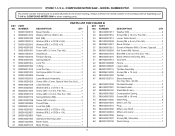
... Hd.)...... 1 Laser Bracket 1 Washer (ID4.2 x OD10 x 1t 2 Screw (M4 x 12 mm, Pan Hd 2 Screw (M8 x 10 mm, Hex Soc. RYOBI 7-1/4 in . MODEL NUMBER P551 The model number will be found on a label attached to the motor housing. Key Nos. 48-49 1 No Hands Label 2 No... (M5 x 18 mm 2 Wear Ring 8 Miter Lock Tip 1 Plug 1 Miter Lock Shaft 1 Miter Lock Lever 1 Spring 1 Screw (M5, Shoulder 1 Work Clamp 1 089240001015 Miter Pointer 1 6 Always mention the model number in all correspondence regarding your 7-1/4 in . COMPOUND MITER SAW or when ordering parts. Hd 1 080001020016 Tension ...
... Hd.)...... 1 Laser Bracket 1 Washer (ID4.2 x OD10 x 1t 2 Screw (M4 x 12 mm, Pan Hd 2 Screw (M8 x 10 mm, Hex Soc. RYOBI 7-1/4 in . MODEL NUMBER P551 The model number will be found on a label attached to the motor housing. Key Nos. 48-49 1 No Hands Label 2 No... (M5 x 18 mm 2 Wear Ring 8 Miter Lock Tip 1 Plug 1 Miter Lock Shaft 1 Miter Lock Lever 1 Spring 1 Screw (M5, Shoulder 1 Work Clamp 1 089240001015 Miter Pointer 1 6 Always mention the model number in all correspondence regarding your 7-1/4 in . COMPOUND MITER SAW or when ordering parts. Hd 1 080001020016 Tension ...
