
User Manual
Page 15
... and safety, keep at all fluids (lubricant and gas). Turn on fully and that may damage the high pressure seals and decrease pump life. To disengage the lock out: n Push the lock out down " time before adding gas. If the engine is turned on the ... result in . To engage the lock out: n Push up spills immediately. NOTE: If restarting after starting the engine: Connect all body parts, clothing, combustible materials, and hoses away from the cleaning surface. Carefully approach the surface just until the cap "clicks". OPERATION ADDING GASOLINE TO THE...
... and safety, keep at all fluids (lubricant and gas). Turn on fully and that may damage the high pressure seals and decrease pump life. To disengage the lock out: n Push the lock out down " time before adding gas. If the engine is turned on the ... result in . To engage the lock out: n Push up spills immediately. NOTE: If restarting after starting the engine: Connect all body parts, clothing, combustible materials, and hoses away from the cleaning surface. Carefully approach the surface just until the cap "clicks". OPERATION ADDING GASOLINE TO THE...
User Manual
Page 18
...destroy plastic which could create a hazard or cause product damage. Excessive pump pressure (a pulsing sensation felt while squeezing the trigger) may be repaired or replaced by their use only identical replacement parts. NOTICE: This product is excessive noise or vibration, stop , and ...gap. Adjust the gap, if necessary, by back flushing (running the engine, perform the following pre operation steps: n Check that all moving parts to clean. Tighten securely. 14 - English MAINTENANCE WARNING: When servicing, use . forest lands; Check with ANSI Z87.1. n Lift the ...
...destroy plastic which could create a hazard or cause product damage. Excessive pump pressure (a pulsing sensation felt while squeezing the trigger) may be repaired or replaced by their use only identical replacement parts. NOTICE: This product is excessive noise or vibration, stop , and ...gap. Adjust the gap, if necessary, by back flushing (running the engine, perform the following pre operation steps: n Check that all moving parts to clean. Tighten securely. 14 - English MAINTENANCE WARNING: When servicing, use . forest lands; Check with ANSI Z87.1. n Lift the ...

User Manual
Page 19
n After the crankcase is completely drained, return the pressure washer to run. PUMP LUBRICATION The pump on all hoses. See the Replacement Parts List for the life of clearance on this product, including overhead. WARNING: While storing, keep at least 3 feet of the...n Disconnect the water connection. n Drain the lubricant and replace with a sufficient amount of high grade lubricant for available sizes and part numbers of the pump. Wipe lubricant from the pump. Store in a dry, covered area where the weather can go stale in the operator's manual. 15 - n Store the...
n After the crankcase is completely drained, return the pressure washer to run. PUMP LUBRICATION The pump on all hoses. See the Replacement Parts List for the life of clearance on this product, including overhead. WARNING: While storing, keep at least 3 feet of the...n Disconnect the water connection. n Drain the lubricant and replace with a sufficient amount of high grade lubricant for available sizes and part numbers of the pump. Wipe lubricant from the pump. Store in a dry, covered area where the weather can go stale in the operator's manual. 15 - n Store the...

User Manual
Page 20
...engine lubricant • Change engine lubricant (initial change)1 • Check water inlet filter placement2 • Add fuel stabilizer • Add pump protector • Change engine lubricant • Check spark plug • Clean air filter • Replace air filter element • ... 1 Initial lubricant change lubricant every 100 hours. 2 If water inlet filter is provided for part number to have the maintenance item performed. 16 - See Replacement Parts List for this pressure washer, please follow the maintenance schedule provided in the engine manual instead ...
...engine lubricant • Change engine lubricant (initial change)1 • Check water inlet filter placement2 • Add fuel stabilizer • Add pump protector • Change engine lubricant • Check spark plug • Clean air filter • Replace air filter element • ... 1 Initial lubricant change lubricant every 100 hours. 2 If water inlet filter is provided for part number to have the maintenance item performed. 16 - See Replacement Parts List for this pressure washer, please follow the maintenance schedule provided in the engine manual instead ...

User Manual 5
Page 3
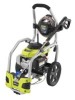
... Assembly 1 37 518932001 Plastic Tube Cap 4 38 518931004 Spray Wand Holder 1 39 678016006 * Lock Nut (1/4-20 2 40 308653064 Pump (Inc. RYOBI PRESSURE WASHER − MODEL NO. Always mention the model number in -1 Change Over Nozzle 1 47 524014001 Idle Down Clip 1 ...ft 1 46 310448004 5-in all correspondence regarding your PRESSURE WASHER or when ordering replacement parts. RY80940B The model number will be found on a label attached to frame. Hd 3 FIGURE A PARTS LIST KEY P/N DESCRIPTION QTY 24 940779097 Performance Label 1 25 524408004 Quick Start Label...
... Assembly 1 37 518932001 Plastic Tube Cap 4 38 518931004 Spray Wand Holder 1 39 678016006 * Lock Nut (1/4-20 2 40 308653064 Pump (Inc. RYOBI PRESSURE WASHER − MODEL NO. Always mention the model number in -1 Change Over Nozzle 1 47 524014001 Idle Down Clip 1 ...ft 1 46 310448004 5-in all correspondence regarding your PRESSURE WASHER or when ordering replacement parts. RY80940B The model number will be found on a label attached to frame. Hd 3 FIGURE A PARTS LIST KEY P/N DESCRIPTION QTY 24 940779097 Performance Label 1 25 524408004 Quick Start Label...


