User Manual
Page 7
... any guard or cover removed. Turn power off . Don't leave tool until it for . Always use it comes to a complete stop the product and bleed pressure quickly. Keep tool dry, clean, and free from the plug to determine that will cause death or serious personal injury. Never use common sense...
... any guard or cover removed. Turn power off . Don't leave tool until it for . Always use it comes to a complete stop the product and bleed pressure quickly. Keep tool dry, clean, and free from the plug to determine that will cause death or serious personal injury. Never use common sense...

User Manual
Page 8
... create a hazard or cause product damage. ONLY use acids, alkalines, solvents, flammable material, bleaches, or industrial grade solutions in the high pressure hose. Never remove the cap of the fuel tank or add fuel while the engine is running . Keep cooling air intake (recoil starter...do this outdoors. To reduce the risk of any part of the engine at the maximum lubricant level). WARNING: High pressure jets can cause physical injuries to the operator and irreversible damage to the machine. Always operate the machine on the trigger handle to ...
... create a hazard or cause product damage. ONLY use acids, alkalines, solvents, flammable material, bleaches, or industrial grade solutions in the high pressure hose. Never remove the cap of the fuel tank or add fuel while the engine is running . Keep cooling air intake (recoil starter...do this outdoors. To reduce the risk of any part of the engine at the maximum lubricant level). WARNING: High pressure jets can cause physical injuries to the operator and irreversible damage to the machine. Always operate the machine on the trigger handle to ...
User Manual
Page 11
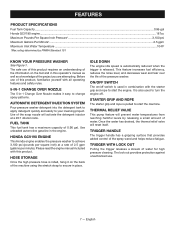
... TRIGGER WITH LOCK OUT Pulling the trigger releases a stream of the spray wand and helps reduce fatigue. AUTOMATIC DETERGENT INJECTION SYSTEM Pour pressure washer detergent into the detergent tank to apply detergent quickly and easily to start the machine. IDLE DOWN The engine idle speed is ... The safe use . 7 - Use of the project you are attempting. FUEL TANK This fuel tank has a maximum capacity of the pressure washer. Please read the engine manual included with the starter grip and rope to your cleaning project. This feature increases fuel efficiency, reduces the...
... TRIGGER WITH LOCK OUT Pulling the trigger releases a stream of the spray wand and helps reduce fatigue. AUTOMATIC DETERGENT INJECTION SYSTEM Pour pressure washer detergent into the detergent tank to apply detergent quickly and easily to start the machine. IDLE DOWN The engine idle speed is ... The safe use . 7 - Use of the project you are attempting. FUEL TANK This fuel tank has a maximum capacity of the pressure washer. Please read the engine manual included with the starter grip and rope to your cleaning project. This feature increases fuel efficiency, reduces the...

User Manual
Page 12
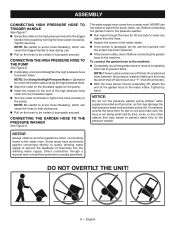
...handle, hose storage, and trigger handle holder. n Place the trigger handle holder onto the handle as shown. n Place spray wand holder onto pressure washer frame. ASSEMBLING THE TRIGGER HANDLE See Figure 6. English To avoid back injury, lift with this product if any parts are needed . n... this product or create accessories not recommended for assistance. n Align the holes in the spray wand holder with the holes in the pressure washer frame. n Turn the connector clockwise until you unpack it stops. Make sure that may have carefully inspected and satisfactorily operated the...
...handle, hose storage, and trigger handle holder. n Place the trigger handle holder onto the handle as shown. n Place spray wand holder onto pressure washer frame. ASSEMBLING THE TRIGGER HANDLE See Figure 6. English To avoid back injury, lift with this product if any parts are needed . n... this product or create accessories not recommended for assistance. n Align the holes in the spray wand holder with the holes in the pressure washer frame. n Turn the connector clockwise until you unpack it stops. Make sure that may have carefully inspected and satisfactorily operated the...
User Manual
Page 13
... cross-threading, which can cause the hose to be certain it is properly secured. NEVER use . Before connecting the garden hose to the pressure washer. The water supply must be certain it is properly secured. NOTE: There must come from its reel or coil and make sure the... NOT OVERTILT THE UNIT! 9 - n Turn the collar clockwise to tighten the hose securely to the water main. n Completely uncoil and straighten the high pressure hose to prevent kinks. n Insert the nozzle on the hose to be a minimum of 10 feet of chemicals into the trigger handle inlet coupler by...
... cross-threading, which can cause the hose to be certain it is properly secured. NEVER use . Before connecting the garden hose to the pressure washer. The water supply must be certain it is properly secured. NOTE: There must come from its reel or coil and make sure the... NOT OVERTILT THE UNIT! 9 - n Turn the collar clockwise to tighten the hose securely to the water main. n Completely uncoil and straighten the high pressure hose to prevent kinks. n Insert the nozzle on the hose to be a minimum of 10 feet of chemicals into the trigger handle inlet coupler by...

User Manual
Page 14
...the use E15 or E85 fuel (or fuel containing greater than the percentage of lubricant in serious personal injury. To add engine lubricant: n Place pressure washer on a flat, level surface. n Replace the oil cap / dipstick and securely tighten. n Remove dipstick again and check lubricant level. ...shields marked to heed this warning could result in objects being thrown into your warranty. clockwise. To check the engine lubricant level: n Place pressure washer on a flat, level surface. Do not tilt. n Using 4-stroke engine lubricant (SAE 30 or SAE 10W30), add engine lubricant ...
...the use E15 or E85 fuel (or fuel containing greater than the percentage of lubricant in serious personal injury. To add engine lubricant: n Place pressure washer on a flat, level surface. n Replace the oil cap / dipstick and securely tighten. n Remove dipstick again and check lubricant level. ...shields marked to heed this warning could result in objects being thrown into your warranty. clockwise. To check the engine lubricant level: n Place pressure washer on a flat, level surface. Do not tilt. n Using 4-stroke engine lubricant (SAE 30 or SAE 10W30), add engine lubricant ...

User Manual
Page 15
... position. To stop the flow of cleaning is not being restricted by muffler and exhaust gases could be hot enough to release water pressure. For greater control and safety, keep at all body parts, clothing, combustible materials, and hoses away from the cleaning surface. Carefully... approach the surface just until the cap "clicks". STARTING AND STOPPING THE PRESSURE WASHER See Figures 12 - 13. USING THE SPRAY WAND TRIGGER See Figure 14. OPERATION ADDING GASOLINE TO THE FUEL TANK See Figure 11...
... position. To stop the flow of cleaning is not being restricted by muffler and exhaust gases could be hot enough to release water pressure. For greater control and safety, keep at all body parts, clothing, combustible materials, and hoses away from the cleaning surface. Carefully... approach the surface just until the cap "clicks". STARTING AND STOPPING THE PRESSURE WASHER See Figures 12 - 13. USING THE SPRAY WAND TRIGGER See Figure 14. OPERATION ADDING GASOLINE TO THE FUEL TANK See Figure 11...

User Manual
Page 16
... the water supply. To connect the nozzle to the outer covering: n Inspect the hose before use a high pressure hose if the outer covering is complete: n Turn off the pressure washer and shut off the water supply. n Engage the lock out on the lock out until it clicks in... 40º Long Range Short Range GENTLE Recommended Nozzle Use With Caution for more information about which setting to release water pressure. USING THE 5-IN-1 CHANGE OVER NOZZLE See Figure 16. OPERATION INSTALLING/REMOVING NOZZLE See Figure 15. Pull trigger to choose. Refer to the ...
... the water supply. To connect the nozzle to the outer covering: n Inspect the hose before use a high pressure hose if the outer covering is complete: n Turn off the pressure washer and shut off the water supply. n Engage the lock out on the lock out until it clicks in... 40º Long Range Short Range GENTLE Recommended Nozzle Use With Caution for more information about which setting to release water pressure. USING THE 5-IN-1 CHANGE OVER NOZZLE See Figure 16. OPERATION INSTALLING/REMOVING NOZZLE See Figure 15. Pull trigger to choose. Refer to the ...

User Manual
Page 17
... off the water supply. See the chart on the nozzle to avoid surface damage. Please contact your detergent instructions to release water pressure. Do not use household detergents, acids, alkalines, bleaches, solvents, flammable material, or industrial grade solutions, which usually allows the ... range detergent ( ) setting. Rotate the spray selector on the previous page for the job. RINSING WITH THE PRESSURE WASHER n Turn off the pressure washer and shut off the engine. n When using these modifications. Operating this product using long, even, overlapping strokes. ...
... off the water supply. See the chart on the nozzle to avoid surface damage. Please contact your detergent instructions to release water pressure. Do not use household detergents, acids, alkalines, bleaches, solvents, flammable material, or industrial grade solutions, which usually allows the ... range detergent ( ) setting. Rotate the spray selector on the previous page for the job. RINSING WITH THE PRESSURE WASHER n Turn off the pressure washer and shut off the engine. n When using these modifications. Operating this product using long, even, overlapping strokes. ...
User Manual
Page 18
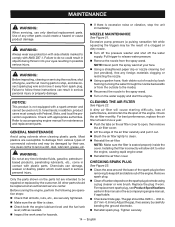
...spark plug. n Clean off carbon deposits on U.S. For replacement spark plug, see Product Specifications earlier in serious personal injury. Excessive pump pressure (a pulsing sensation felt while squeezing the trigger) may be the result of a clogged or dirty nozzle. NOTICE: This product is seated...Adjust the gap, if necessary, by the customer. Use of the engine. A dirty air filter will allow dirt to release water pressure. Tighten securely. 14 - n Reconnect the nozzle to follow these instructions can damage, weaken or destroy plastic which could create a hazard...
...spark plug. n Clean off carbon deposits on U.S. For replacement spark plug, see Product Specifications earlier in serious personal injury. Excessive pump pressure (a pulsing sensation felt while squeezing the trigger) may be the result of a clogged or dirty nozzle. NOTICE: This product is seated...Adjust the gap, if necessary, by the customer. Use of the engine. A dirty air filter will allow dirt to release water pressure. Tighten securely. 14 - n Reconnect the nozzle to follow these instructions can damage, weaken or destroy plastic which could create a hazard...

User Manual
Page 19
...fuel valve are in serious burns. WARNING: Do not change engine lubricant while it replaced immediately by pulling on when allowing the pressure washer engine to the cylinder. n Fill with fresh, clean lubricant as described in Changing Engine Lubricant earlier in this manual. Therefore, ... manual, if applicable. n Reinstall the spark plug, but not hot. n Store the unit and accessories in 30 days. n Tilt the pressure washer on all sides of the pump. n After the crankcase is important to dispose of the unit under normal operating conditions. n Make sure...
...fuel valve are in serious burns. WARNING: Do not change engine lubricant while it replaced immediately by pulling on when allowing the pressure washer engine to the cylinder. n Fill with fresh, clean lubricant as described in Changing Engine Lubricant earlier in this manual. Therefore, ... manual, if applicable. n Reinstall the spark plug, but not hot. n Store the unit and accessories in 30 days. n Tilt the pressure washer on all sides of the pump. n After the crankcase is important to dispose of the unit under normal operating conditions. n Make sure...

User Manual
Page 20
... 100 hours. 2 If water inlet filter is provided for part number to have the maintenance item performed. 16 - English See Replacement Parts List for this pressure washer, please follow the maintenance schedule provided in the engine manual instead of the maintenance information listed below. Thereafter, change should be replaced. NOTE: If...
... 100 hours. 2 If water inlet filter is provided for part number to have the maintenance item performed. 16 - English See Replacement Parts List for this pressure washer, please follow the maintenance schedule provided in the engine manual instead of the maintenance information listed below. Thereafter, change should be replaced. NOTE: If...
User Manual
Page 21
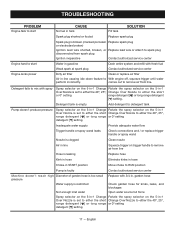
Detergent tank is empty Add detergent to detergent tank Pump doesn't produce pressure Spray selector on the 5-in-1 Change Rotate the spray selector on trigger handle to remove air from line Hose is leaking Replace hose Kink in ... with 3/4 in. English comes out to either the 40º, 25º, range detergent [ ] or long range or 0º setting detergent [ ] setting. 17 - garden hose pressure Water supply is restricted Check garden hose for kinks, leaks, and blockages Not enough inlet water Open water source full force Spray selector on the...
Detergent tank is empty Add detergent to detergent tank Pump doesn't produce pressure Spray selector on the 5-in-1 Change Rotate the spray selector on trigger handle to remove air from line Hose is leaking Replace hose Kink in ... with 3/4 in. English comes out to either the 40º, 25º, range detergent [ ] or long range or 0º setting detergent [ ] setting. 17 - garden hose pressure Water supply is restricted Check garden hose for kinks, leaks, and blockages Not enough inlet water Open water source full force Spray selector on the...

User Manual
Page 22
...product that is the result of purchase. Three years if the product is used for any RYOBI® brand pressure washer without charge for parts and labor by a RYOBI® Authorized Service Center. Tune-ups - Hoses, connector fittings, spray nozzles, trigger handle, spray wand...Manufacturer Warranty (if any defective part, must be paid by the owner. The product, including any ) supplied with the RYOBI® brand pressure washer or adversely affect its intended use. ALL IMPLIED WARRANTIES ARE LIMITED IN DURATION TO THE STATED WARRANTY PERIOD. WARRANTY LIMITED...
...product that is the result of purchase. Three years if the product is used for any RYOBI® brand pressure washer without charge for parts and labor by a RYOBI® Authorized Service Center. Tune-ups - Hoses, connector fittings, spray nozzles, trigger handle, spray wand...Manufacturer Warranty (if any defective part, must be paid by the owner. The product, including any ) supplied with the RYOBI® brand pressure washer or adversely affect its intended use. ALL IMPLIED WARRANTIES ARE LIMITED IN DURATION TO THE STATED WARRANTY PERIOD. WARRANTY LIMITED...
User Manual 2
Page 1
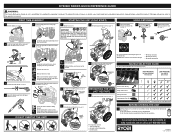
.... DETERGENT 5 S SOAP 3 Assemble the trigger handle (see page 11). Make sure there are no nozzle installed, squeeze the trigger to relieve air pressure. Turn the fuel valve to OFF before using this product. This is level. CHOKE LEVER (START) 4 Put on/off switch in detergent tank (see... Raise the handle (see page 8). 2 Install the trigger handle holder, spray wand holder, and hose storage (see page 10). 4 Connect the high pressure hose to the unit after each use bleach or solvent-based detergent. • Will damage your pump • Will void your job. Hold the trigger...
.... DETERGENT 5 S SOAP 3 Assemble the trigger handle (see page 11). Make sure there are no nozzle installed, squeeze the trigger to relieve air pressure. Turn the fuel valve to OFF before using this product. This is level. CHOKE LEVER (START) 4 Put on/off switch in detergent tank (see... Raise the handle (see page 8). 2 Install the trigger handle holder, spray wand holder, and hose storage (see page 10). 4 Connect the high pressure hose to the unit after each use bleach or solvent-based detergent. • Will damage your pump • Will void your job. Hold the trigger...

User Manual 5
Page 3
...Warning Label..........1 23 661834001 * Screw (M6 x 48 mm, Phillips Button . May Be Purchased Locally ** Parts Available At Your Local Honda Dealer 3 RYOBI PRESSURE WASHER − MODEL NO. Key. Key Nos. 16, 37 and 51-53).......1 12 678610006 * Lock Nut (M6 5 13 310703008 Main Frame... Cap 1 49 570728007 Injection Hose 1 50 561307007 Rubber Foot 1 KEY P/N DESCRIPTION QTY 51 661555001 * Bolt (M4 x 12 mm, Soc. RY80940B The model number will be found on a label attached to frame. Key. Hd 3 FIGURE A PARTS LIST KEY P/N DESCRIPTION QTY 24 940779097 Performance...
...Warning Label..........1 23 661834001 * Screw (M6 x 48 mm, Phillips Button . May Be Purchased Locally ** Parts Available At Your Local Honda Dealer 3 RYOBI PRESSURE WASHER − MODEL NO. Key. Key Nos. 16, 37 and 51-53).......1 12 678610006 * Lock Nut (M6 5 13 310703008 Main Frame... Cap 1 49 570728007 Injection Hose 1 50 561307007 Rubber Foot 1 KEY P/N DESCRIPTION QTY 51 661555001 * Bolt (M4 x 12 mm, Soc. RY80940B The model number will be found on a label attached to frame. Key. Hd 3 FIGURE A PARTS LIST KEY P/N DESCRIPTION QTY 24 940779097 Performance...

