
Operation Manual
Page 7
...loose bolt or nut may create a hazard or cause product damage. ONLY use . Use of any circumstances. Before storing, allow the pressure washer to start the machine if ice has formed in a vehicle. When servicing use . If the engine is highly flammable. Do not ..., or the machine itself. Hold the trigger handle securely with care. SPECIFIC SAFETY RULES Use caution when positioning the pressure washer for use only recommended or equivalent replacement parts. Never remove the cap of the fuel tank or add fuel while the engine is running ...
...loose bolt or nut may create a hazard or cause product damage. ONLY use . Use of any circumstances. Before storing, allow the pressure washer to start the machine if ice has formed in a vehicle. When servicing use . If the engine is highly flammable. Do not ..., or the machine itself. Hold the trigger handle securely with care. SPECIFIC SAFETY RULES Use caution when positioning the pressure washer for use only recommended or equivalent replacement parts. Never remove the cap of the fuel tank or add fuel while the engine is running ...

Operation Manual
Page 10
... at a 20:1 dilution ratio. rating determined by releasing a small amount of water for assistance. 6 - AUTOMATIC SOAP INJECTION SYSTEM Pour pressure washer detergent into the soap tank to apply detergent quickly and easily to your cleaning project. Once the water has drained, the thermal relief valve... Do not use . ON/OFF SWITCH The on this product if any accessories from reaching harmful levels by PWMA Standard PW101 KNOW YOUR PRESSURE WASHER See Figure 1. Use of a product that provides added control of 0.95 gal. n Carefully remove the product and any parts in ...
... at a 20:1 dilution ratio. rating determined by releasing a small amount of water for assistance. 6 - AUTOMATIC SOAP INJECTION SYSTEM Pour pressure washer detergent into the soap tank to apply detergent quickly and easily to your cleaning project. Once the water has drained, the thermal relief valve... Do not use . ON/OFF SWITCH The on this product if any accessories from reaching harmful levels by PWMA Standard PW101 KNOW YOUR PRESSURE WASHER See Figure 1. Use of a product that provides added control of 0.95 gal. n Carefully remove the product and any parts in ...
Operation Manual
Page 11
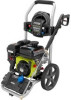
High Pressure Hose Handle Trigger Handle Spray Wand Quick-Connect Nozzles (4) Trigger Handle Holder Storage Panel Screws (4) Nuts (4) Wheels (2) Axles (2) Hitch Pins (2) Washers (2) 4-Cycle Engine Lubricant (SAE 30 or SAE 10W30) Disposable Funnel Operator's Manual WARNING: If any parts ...holes in a hazardous condition leading to avoid pinching your fingers or hands when installing the handle onto the frame. ASSEMBLY PACKING LIST Pressure Washer 25 ft. n Insert the remaining screws through the left holes (when viewed from the spark plug when assembling parts. INSTALLING THE...
High Pressure Hose Handle Trigger Handle Spray Wand Quick-Connect Nozzles (4) Trigger Handle Holder Storage Panel Screws (4) Nuts (4) Wheels (2) Axles (2) Hitch Pins (2) Washers (2) 4-Cycle Engine Lubricant (SAE 30 or SAE 10W30) Disposable Funnel Operator's Manual WARNING: If any parts ...holes in a hazardous condition leading to avoid pinching your fingers or hands when installing the handle onto the frame. ASSEMBLY PACKING LIST Pressure Washer 25 ft. n Insert the remaining screws through the left holes (when viewed from the spark plug when assembling parts. INSTALLING THE...

Operation Manual
Page 12
...off valve (such as this may lessen or prevent water flow to the pressure washer: n Run water through a receiver tank or backflow preventer is properly secured. Before connecting the garden hose to the pressure washer. n Inspect the screen in Operation for 30 seconds to the machine. ...NOTICE: Do not run the pressure washer without water supply connected and turned on, as a "Y" shut off , attach the...
...off valve (such as this may lessen or prevent water flow to the pressure washer: n Run water through a receiver tank or backflow preventer is properly secured. Before connecting the garden hose to the pressure washer. n Inspect the screen in Operation for 30 seconds to the machine. ...NOTICE: Do not run the pressure washer without water supply connected and turned on, as a "Y" shut off , attach the...

Operation Manual
Page 13
...Never direct a water stream toward people or pets, or any body parts in engine failure. forest lands; To add engine lubricant: n Place pressure washer on U.S. n Before first use of the hatched area on the dipstick. of lubricant in the engine from testing. Check and add additional lubricant... all but 2 oz. NOTICE: This product is a violation of the hatched area on the dipstick. To check engine lubricant level: n Place pressure washer on the dipstick. n Wipe dipstick clean and re-seat in serious injury, electric shock, or death. It is not equipped with a spark ...
...Never direct a water stream toward people or pets, or any body parts in engine failure. forest lands; To add engine lubricant: n Place pressure washer on U.S. n Before first use of the hatched area on the dipstick. of lubricant in the engine from testing. Check and add additional lubricant... all but 2 oz. NOTICE: This product is a violation of the hatched area on the dipstick. To check engine lubricant level: n Place pressure washer on the dipstick. n Wipe dipstick clean and re-seat in serious injury, electric shock, or death. It is not equipped with a spark ...
Operation Manual
Page 14
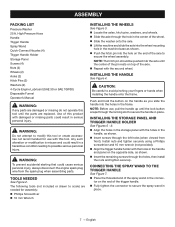
...allows for fuel expansion). NOTE: Do not allow the unit to the START position. If you find any spills before using the pressure washer immediately. Failure to approximately 1-1/2 in the ON position. Move the choke to cool at least five minutes. Failure to follow ... by tires, rocks, or any lubricant leaking around it gently to the RUN position. Move at least five minutes before attempting to the pressure washer. Remove the fuel cap. below the top of water appears. n Replace fuel cap and tighten securely. n Clean up spills immediately. ...
...allows for fuel expansion). NOTE: Do not allow the unit to the START position. If you find any spills before using the pressure washer immediately. Failure to approximately 1-1/2 in the ON position. Move the choke to cool at least five minutes. Failure to follow ... by tires, rocks, or any lubricant leaking around it gently to the RUN position. Move at least five minutes before attempting to the pressure washer. Remove the fuel cap. below the top of water appears. n Replace fuel cap and tighten securely. n Clean up spills immediately. ...

Operation Manual
Page 15
...17. Expect the trigger handle to move when the trigger is pulled due to cause serious burns, ignite combustible objects, and/or damage high pressure hoses that can damage the cleaning surface. n Pull back and hold the trigger to the CLOSED position. If the spray is achieved. Allow.... SELECTING THE RIGHT NOZZLE FOR THE JOB See Figure 18. OPERATION Move the fuel valve to operate the pressure washer. NOTE: Shutting off the engine will not relieve pressure in an injection injury. WARNING: While operating and storing, keep at least 3 feet of control and injury to choose...
...17. Expect the trigger handle to move when the trigger is pulled due to cause serious burns, ignite combustible objects, and/or damage high pressure hoses that can damage the cleaning surface. n Pull back and hold the trigger to the CLOSED position. If the spray is achieved. Allow.... SELECTING THE RIGHT NOZZLE FOR THE JOB See Figure 18. OPERATION Move the fuel valve to operate the pressure washer. NOTE: Shutting off the engine will not relieve pressure in an injection injury. WARNING: While operating and storing, keep at least 3 feet of control and injury to choose...
Operation Manual
Page 16
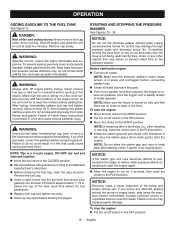
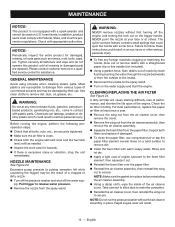
...in an inconspicuous area before use . n Spray the detergent on the solution bottle. RINSING WITH THE PRESSURE WASHER n Turn off the pressure washer and shut off the engine will not relieve pressure in a possible injection or other serious personal injury. n Engage the lock out on the trigger handle .... n Push the nozzle into the slot. Check to follow these instructions could eject the nozzle with a second tank of 1 gallon pressure washer detergent without first turning off the engine. To convert for use of clean water. n Spray the clear water through the spray wand ...
...in an inconspicuous area before use . n Spray the detergent on the solution bottle. RINSING WITH THE PRESSURE WASHER n Turn off the pressure washer and shut off the engine will not relieve pressure in a possible injection or other serious personal injury. n Engage the lock out on the trigger handle .... n Push the nozzle into the slot. Check to follow these instructions could eject the nozzle with a second tank of 1 gallon pressure washer detergent without first turning off the engine. To convert for use of clean water. n Spray the clear water through the spray wand ...
Operation Manual
Page 17
... do so could create a hazard or cause product damage. 13 - Failure to comply with ANSI Z87.1. n Turn off the pressure washer engine and shut off . The instructions that your location. Engines configured for assistance. please contact customer service for high altitude operation ...cannot be reconfigured for your engine is properly configured for operation above 3,000 feet altitude. Allow 30 minutes of the pressure washer by calling customer service. Regular use only recommended or equivalent replacement parts. n Unscrew threaded top from pump protector bottle and...
... do so could create a hazard or cause product damage. 13 - Failure to comply with ANSI Z87.1. n Turn off the pressure washer engine and shut off . The instructions that your location. Engines configured for assistance. please contact customer service for high altitude operation ...cannot be reconfigured for your engine is properly configured for operation above 3,000 feet altitude. Allow 30 minutes of the pressure washer by calling customer service. Regular use only recommended or equivalent replacement parts. n Unscrew threaded top from pump protector bottle and...
Operation Manual
Page 18
...result in serious personal injury. n Inspect the work area for damaged, missing, or loose parts such as needed. n Turn off the pressure washer and shut off the engine, and locking the lock out on U.S. n Remove the nozzle from the air cleaner assembly, then remove the air ...element several times on the water supply and start the engine. n To clean the paper filter, use . NOTE: Do not run the pressure washer without first turning off the water sup- GENERAL MAINTENANCE Avoid using solvents when cleaning plastic parts. Pull trigger to the spray wand. Tighten ...
...result in serious personal injury. n Inspect the work area for damaged, missing, or loose parts such as needed. n Turn off the pressure washer and shut off the engine, and locking the lock out on U.S. n Remove the nozzle from the air cleaner assembly, then remove the air ...element several times on the water supply and start the engine. n To clean the paper filter, use . NOTE: Do not run the pressure washer without first turning off the water sup- GENERAL MAINTENANCE Avoid using solvents when cleaning plastic parts. Pull trigger to the spray wand. Tighten ...
Operation Manual
Page 19
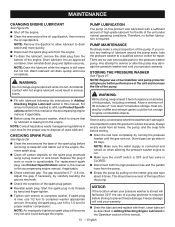
...in the Operation section of lubricant around the oil cap/dipstick, then remove the oil cap/dipstick. STORING THE PRESSURE WASHER See Figure 27. NOTE: Regular use 1/8 to the pressure washer pump. n Drain the fuel tank completely by carefully bending the ground electrode. n Empty the pump by muffler... keep dirt and debris out of the spark plug before storing to prevent freeze damage. Heat created by pulling on when allowing the pressure washer engine to ignite combustible objects. Stored gas can 't damage it is questionable. NOTE: Make sure the water supply is required before ...
...in the Operation section of lubricant around the oil cap/dipstick, then remove the oil cap/dipstick. STORING THE PRESSURE WASHER See Figure 27. NOTE: Regular use 1/8 to the pressure washer pump. n Drain the fuel tank completely by carefully bending the ground electrode. n Empty the pump by muffler... keep dirt and debris out of the spark plug before storing to prevent freeze damage. Heat created by pulling on when allowing the pressure washer engine to ignite combustible objects. Stored gas can 't damage it is questionable. NOTE: Make sure the water supply is required before ...
Operation Manual
Page 20
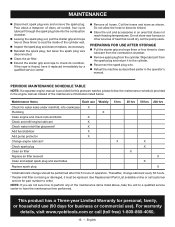
... clean or replace, as shown. n Remove spark plug from the combustion chamber. For warranty details, visit www.ryobitools.com or call customer service for this pressure washer, please follow the maintenance schedule provided in the operator's manual. Do not store near furnace or other sources of clean, air-cooled, four-cycle lubricant...
... clean or replace, as shown. n Remove spark plug from the combustion chamber. For warranty details, visit www.ryobitools.com or call customer service for this pressure washer, please follow the maintenance schedule provided in the operator's manual. Do not store near furnace or other sources of clean, air-cooled, four-cycle lubricant...
Quick Reference Guide
Page 1
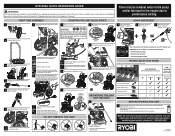
RY80588A QUICK REFERENCE GUIDE WARNING: This Quick Reference Guide is a 4-cycle...see page 7). 7 Connect your product, please call customer service at a 20:1 dilution ratio. USING DETERGENT 1 Pour pressure washer detergent in this product. Make sure there are no nozzle installed, squeeze the trigger to www.ryobitools.com and...173;approx. 5 seconds for reading the operator's manual. For questions about operating or maintaining your garden hose to the pressure washer (see page 8). 1 Add fuel (see page 10). 4 Move choke lever to performance testing. Set unit on fully...
RY80588A QUICK REFERENCE GUIDE WARNING: This Quick Reference Guide is a 4-cycle...see page 7). 7 Connect your product, please call customer service at a 20:1 dilution ratio. USING DETERGENT 1 Pour pressure washer detergent in this product. Make sure there are no nozzle installed, squeeze the trigger to www.ryobitools.com and...173;approx. 5 seconds for reading the operator's manual. For questions about operating or maintaining your garden hose to the pressure washer (see page 8). 1 Add fuel (see page 10). 4 Move choke lever to performance testing. Set unit on fully...

Parts Diagram
Page 2
RY80588A 54 16 19 20 17 39 18 39 34 22 55 23 34 21 27 24 SEE FIGURE B 11 53 44 51 65 56 28 49 32 36 38 64 40 694 52 46 8 7 5 1 50 2 48 43 41 58 3 57 59 60 29 32 33 31 14 14 30 15 10 10 25 62 45 35 61 15 63 37 26 47 63 62 61 37 39 FIGURE A 12 37 13 42 2 RYOBI PRESSURE WASHER − ITEM NO.
RY80588A 54 16 19 20 17 39 18 39 34 22 55 23 34 21 27 24 SEE FIGURE B 11 53 44 51 65 56 28 49 32 36 38 64 40 694 52 46 8 7 5 1 50 2 48 43 41 58 3 57 59 60 29 32 33 31 14 14 30 15 10 10 25 62 45 35 61 15 63 37 26 47 63 62 61 37 39 FIGURE A 12 37 13 42 2 RYOBI PRESSURE WASHER − ITEM NO.
Parts Diagram
Page 3
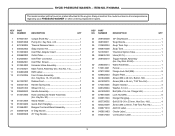
...176; Deg Nozzle 1 Soap Nozzle 1 Soap Tank Cap 1 Soap Tank 1 Chemical Siphon Tube 1 Hose (25 ft 1 Trigger Handle Assembly (Inc. RY80588A The model number will be found on a label attached to the engine. Key Nos. 13, 37 and 42 1 Rubber Foot 1 Handle Spring Clip...Bolt (5/16-24 x 23 mm, Hex Soc. Hd 4 Screw (M6 x 25mm, T-30 Torx Pan Hd 1 Add Oil Label 1 Choke Label 1 Combustion Label 1 3 RYOBI PRESSURE WASHER − ITEM NO. Key Nos. 4-9 1 Thermal Release Valve 1 Soap Injector Kit 1 Inlet Filter Adapter Insert 1 Outlet Tube 1 Inlet Filter Connector 1 Inlet Filter Screen ...
...176; Deg Nozzle 1 Soap Nozzle 1 Soap Tank Cap 1 Soap Tank 1 Chemical Siphon Tube 1 Hose (25 ft 1 Trigger Handle Assembly (Inc. RY80588A The model number will be found on a label attached to the engine. Key Nos. 13, 37 and 42 1 Rubber Foot 1 Handle Spring Clip...Bolt (5/16-24 x 23 mm, Hex Soc. Hd 4 Screw (M6 x 25mm, T-30 Torx Pan Hd 1 Add Oil Label 1 Choke Label 1 Combustion Label 1 3 RYOBI PRESSURE WASHER − ITEM NO. Key Nos. 4-9 1 Thermal Release Valve 1 Soap Injector Kit 1 Inlet Filter Adapter Insert 1 Outlet Tube 1 Inlet Filter Connector 1 Inlet Filter Screen ...
Parts Diagram
Page 4
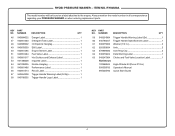
...995000786 Trigger Handle Warning Label (En 1 Trigger Handle Specifications Label 1 Washer (1/2 in all correspondence regarding your PRESSURE WASHER or when ordering replacement parts. Always mention the model number in 2 ...Axle 2 Axle Ring Clip 2 Data Warning Label 1 Choke and Fuel Valve Location Label 1 High Altitude Kit (Ducar 212cc) Operator's Manual Quick Start Guide 4 KEY PART NO. RY80588A The model number will be found on a label attached to the engine. RYOBI PRESSURE WASHER...
...995000786 Trigger Handle Warning Label (En 1 Trigger Handle Specifications Label 1 Washer (1/2 in all correspondence regarding your PRESSURE WASHER or when ordering replacement parts. Always mention the model number in 2 ...Axle 2 Axle Ring Clip 2 Data Warning Label 1 Choke and Fuel Valve Location Label 1 High Altitude Kit (Ducar 212cc) Operator's Manual Quick Start Guide 4 KEY PART NO. RY80588A The model number will be found on a label attached to the engine. RYOBI PRESSURE WASHER...

Parts Diagram
Page 5
RY80588A 48 50 81 77 33 49 76 78 80 27 85 82 26 28 25 75 23 32 70 24 21 70 36 36 22 45 20 44 71 73 30 74 72 48 48 48 60 59 29 31 61 62 19 67 47 48 43 63 69 41 12 11 34 35 64 36 7 6 5 17 46 38 40 10 42 3 15 14 57 13 58 8 9 2 4 2 10 39 16 18 37 56 55 3 53 52 54 1 98 79 51 84 66 65 5 83 68 36 48 FIGURE B RYOBI PRESSURE WASHER − ITEM NO.
RY80588A 48 50 81 77 33 49 76 78 80 27 85 82 26 28 25 75 23 32 70 24 21 70 36 36 22 45 20 44 71 73 30 74 72 48 48 48 60 59 29 31 61 62 19 67 47 48 43 63 69 41 12 11 34 35 64 36 7 6 5 17 46 38 40 10 42 3 15 14 57 13 58 8 9 2 4 2 10 39 16 18 37 56 55 3 53 52 54 1 98 79 51 84 66 65 5 83 68 36 48 FIGURE B RYOBI PRESSURE WASHER − ITEM NO.
Parts Diagram
Page 6
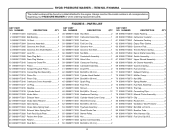
RY80588A The model number will be found on a label attached to the engine. PARTS LIST KEY PART NO. Always mention the model number in all correspondence regarding your PRESSURE WASHER or when ordering replacement parts. NUMBER DESCRIPTION QTY 30...82 099981173082 Bolt (M6 x 28 mm 1 83 099981173083 Breather Tube 1 84 099981173084 Wire Harness Clip 1 85 099981173085 Fuel Line Clip (9.5 1 6 RYOBI PRESSURE WASHER − ITEM NO. NUMBER DESCRIPTION QTY 1 099981173001 Crankcase 1 2 099981173002 Ball Bearing 2 3 099981173003 Oil Seal 2 4 099981173004 Governor Assembly 1 5...
RY80588A The model number will be found on a label attached to the engine. PARTS LIST KEY PART NO. Always mention the model number in all correspondence regarding your PRESSURE WASHER or when ordering replacement parts. NUMBER DESCRIPTION QTY 30...82 099981173082 Bolt (M6 x 28 mm 1 83 099981173083 Breather Tube 1 84 099981173084 Wire Harness Clip 1 85 099981173085 Fuel Line Clip (9.5 1 6 RYOBI PRESSURE WASHER − ITEM NO. NUMBER DESCRIPTION QTY 1 099981173001 Crankcase 1 2 099981173002 Ball Bearing 2 3 099981173003 Oil Seal 2 4 099981173004 Governor Assembly 1 5...


