
User Manual
Page 4
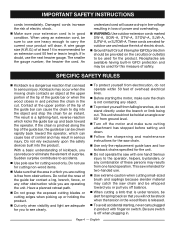
...cutting attachment has stopped before setting unit down. Follow the sharpening and maintenance instructions for the saw chain. Use only the replacement guide bars and low kickback chains specified for the unit. Do not operate the saw for two-handed use. Use... Ground Fault Circuit Interrupter (GFCI) protection should not be held at least 14 is a dangerous reaction that you can cause the chain to the operator, helpers, bystanders, or any object. To protect yourself from electrocution, do not stand directly under tension, be ...
...cutting attachment has stopped before setting unit down. Follow the sharpening and maintenance instructions for the saw chain. Use only the replacement guide bars and low kickback chains specified for the unit. Do not operate the saw for two-handed use. Use... Ground Fault Circuit Interrupter (GFCI) protection should not be held at least 14 is a dangerous reaction that you can cause the chain to the operator, helpers, bystanders, or any object. To protect yourself from electrocution, do not stand directly under tension, be ...

User Manual
Page 16
... 12. always wear protective gloves when performing maintenance to tension the chain. Make sure the guide bar nut is snug, but it can be performed by their use only identical replacement parts. n Chain must be damaged by competent chain saw service personnel. (For example, if improper tool is no ...the clutch, structural damage to do so could create a hazard or cause product damage. All chain saw chain is running. Refer to stop the motor, wait for all moving parts to Replacing the Bar and Chain for additional information. Use of the bar groove, as shown in . Fig. 11 WARNING...
... 12. always wear protective gloves when performing maintenance to tension the chain. Make sure the guide bar nut is snug, but it can be performed by their use only identical replacement parts. n Chain must be damaged by competent chain saw service personnel. (For example, if improper tool is no ...the clutch, structural damage to do so could create a hazard or cause product damage. All chain saw chain is running. Refer to stop the motor, wait for all moving parts to Replacing the Bar and Chain for additional information. Use of the bar groove, as shown in . Fig. 11 WARNING...
User Manual
Page 17
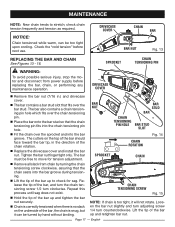
...the bar nut securely. The bar must be free to stretch; CHAIN TENSIONING SCREW Fig. 15 NOTE: If chain is no slack on the top of the bar up and retighten bar nut. CHAIN ROTATION Fig. 14 n Replace the drivecase cover and install the bar nut. n Hold the ...the chain rotation. check chain tension frequently and tension as required. CHAIN TENSIONING PIN HOLE BAR STUD BAR BAR STUD SLOT n Fit the chain over the sprocket and into the chain tensioning pin hole. DRIVECASE COVER CHAIN BAR BAR NUT Fig. 13 REPLACING THE BAR AND CHAIN See Figures 13 - 16. NOTICE: Chain ...
...the bar nut securely. The bar must be free to stretch; CHAIN TENSIONING SCREW Fig. 15 NOTE: If chain is no slack on the top of the bar up and retighten bar nut. CHAIN ROTATION Fig. 14 n Replace the drivecase cover and install the bar nut. n Hold the ...the chain rotation. check chain tension frequently and tension as required. CHAIN TENSIONING PIN HOLE BAR STUD BAR BAR STUD SLOT n Fit the chain over the sprocket and into the chain tensioning pin hole. DRIVECASE COVER CHAIN BAR BAR NUT Fig. 13 REPLACING THE BAR AND CHAIN See Figures 13 - 16. NOTICE: Chain ...
User Manual
Page 18
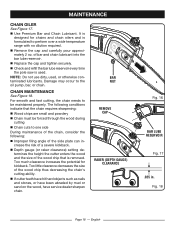
... NUT REMOVE CAP RAKER (DEPTH GAUGE) CLEARANCE Fig. 16 BAR LUBE RESERVOIR Fig. 17 .025 in. n Use Premium Bar and Chain Lubricant. n Replace the cap and tighten securely. n If cutter teeth have hit hard objects such as nails and stones, or have been abraded by mud... or sand on the wood, have service dealer sharpen chain. n Remove the cap and carefully pour approximately 2 oz. of the wood chip thus decreasing the chain's cutting ...
... NUT REMOVE CAP RAKER (DEPTH GAUGE) CLEARANCE Fig. 16 BAR LUBE RESERVOIR Fig. 17 .025 in. n Use Premium Bar and Chain Lubricant. n Replace the cap and tighten securely. n If cutter teeth have hit hard objects such as nails and stones, or have been abraded by mud... or sand on the wood, have service dealer sharpen chain. n Remove the cap and carefully pour approximately 2 oz. of the wood chip thus decreasing the chain's cutting ...

User Manual
Page 19
... wire brush. TOP PLATE RIVET HOLE PARTS OF A CUTTER CUTTING CORNER SIDE PLATE DEPTH GAUGE HEEL GULLET TOE Fig. 19 Fig. 20 WARNING: Improper chain sharpening increases the potential of the tooth. Be careful to file all cutters to the specified angles and to the same length, as fast cutting...Fig. 22 Do all of your filing at the midpoint of the tooth. n Use a 5/32 in severe motor damage. Then move to replace or repair damaged chain can cause excessive motor speed during cutting which may result in . MAINTENANCE HOW TO SHARPEN THE CUTTERS See Figures 19 - 22. LEFT HAND CUTTERS...
... wire brush. TOP PLATE RIVET HOLE PARTS OF A CUTTER CUTTING CORNER SIDE PLATE DEPTH GAUGE HEEL GULLET TOE Fig. 19 Fig. 20 WARNING: Improper chain sharpening increases the potential of the tooth. Be careful to file all cutters to the specified angles and to the same length, as fast cutting...Fig. 22 Do all of your filing at the midpoint of the tooth. n Use a 5/32 in severe motor damage. Then move to replace or repair damaged chain can cause excessive motor speed during cutting which may result in . MAINTENANCE HOW TO SHARPEN THE CUTTERS See Figures 19 - 22. LEFT HAND CUTTERS...

User Manual
Page 20
... empty Chain tension too tight. Retention chain. Refer to Replacing the Bar and Chain earlier in this manual. Page 20 - This is best done by grasping the scabbard at one end, in a dry, well-ventilated area that is inaccessible to ensure your product, call the Ryobi® Help Line...! Your product has been fully tested prior to shipment to children. MAINTENANCE STORING THE PRODUCT See Figure 23. Clean all foreign material from corrosive agents such as shown. SCABBARD Fig. 23 NOTE: The saw chain. The scabbard is ...
... empty Chain tension too tight. Retention chain. Refer to Replacing the Bar and Chain earlier in this manual. Page 20 - This is best done by grasping the scabbard at one end, in a dry, well-ventilated area that is inaccessible to ensure your product, call the Ryobi® Help Line...! Your product has been fully tested prior to shipment to children. MAINTENANCE STORING THE PRODUCT See Figure 23. Clean all foreign material from corrosive agents such as shown. SCABBARD Fig. 23 NOTE: The saw chain. The scabbard is ...
User Manual
Page 21
...Blades, Blower Fans, Blower and Vacuum Tubes, Vacuum Bag and Straps, Guide Bars, Saw Chains Techtronic Industries North America, Inc., reserves the right to change or improve the design of any RYOBI® brand outdoor product without charge for parts and labor by the owner. TECHTRONIC INDUSTRIES NORTH...required by or for cancellation or rescission of the contract of sale of purchase will be repaired or replaced without assuming any obligation to the service center for any RYOBI® brand outdoor product that has been altered or modified. This warranty does not cover any product...
...Blades, Blower Fans, Blower and Vacuum Tubes, Vacuum Bag and Straps, Guide Bars, Saw Chains Techtronic Industries North America, Inc., reserves the right to change or improve the design of any RYOBI® brand outdoor product without charge for parts and labor by the owner. TECHTRONIC INDUSTRIES NORTH...required by or for cancellation or rescission of the contract of sale of purchase will be repaired or replaced without assuming any obligation to the service center for any RYOBI® brand outdoor product that has been altered or modified. This warranty does not cover any product...

Parts List
Page 1
... Washer...1 4 33902102-1G Sprocket...1 5 34117152-3G Oil Cap...1 6 32901152G Hex Nut (M6)...1 7 31308152G Chain Cover Assembly 1 8 32909152-2G Bar...1 9 31307152G Chain Adjustment Assembly 1 Not Shown 34161152G Scabbard...1 988000750 Operator's Manual...1 NOTE: The assembly shown represents an important part... The model number will be performed by your ELECTRIC POLE SAW or when ordering replacement parts. Always mention the model number in all correspondence regarding your nearest Ryobi Authorized Service Center. RY43160 - RYOBI ELECTRIC POLE SAW MODEL NO.
... Washer...1 4 33902102-1G Sprocket...1 5 34117152-3G Oil Cap...1 6 32901152G Hex Nut (M6)...1 7 31308152G Chain Cover Assembly 1 8 32909152-2G Bar...1 9 31307152G Chain Adjustment Assembly 1 Not Shown 34161152G Scabbard...1 988000750 Operator's Manual...1 NOTE: The assembly shown represents an important part... The model number will be performed by your ELECTRIC POLE SAW or when ordering replacement parts. Always mention the model number in all correspondence regarding your nearest Ryobi Authorized Service Center. RY43160 - RYOBI ELECTRIC POLE SAW MODEL NO.


