
User Manual 2
Page 1
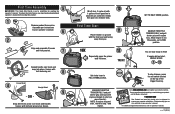
...position. You are also available in separate gas container. For additional registration instruction, refer to Trim! Assemble per instructions in your operator's manual. Go to ensure your new tool online. NOTE: If engine does not start (no more than 4x). To reduce the risk of...with bolt and wing nut. 8 Curved Shaft 4 Straight Shaft 9 - For any questions about operating or maintaining your product, call the Ryobi® Help Line! 1-800-860-4050 Your Product has been fully tested prior to shipment to www.ryobitools.com and register your complete satisfaction...
...position. You are also available in separate gas container. For additional registration instruction, refer to Trim! Assemble per instructions in your operator's manual. Go to ensure your new tool online. NOTE: If engine does not start (no more than 4x). To reduce the risk of...with bolt and wing nut. 8 Curved Shaft 4 Straight Shaft 9 - For any questions about operating or maintaining your product, call the Ryobi® Help Line! 1-800-860-4050 Your Product has been fully tested prior to shipment to www.ryobitools.com and register your complete satisfaction...

User Manual 3
Page 9
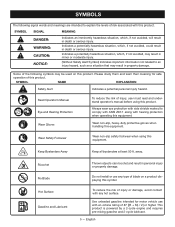
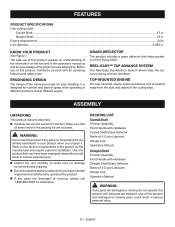
... a situation that may result in property damage. SYMBOL NAME EXPLANATION Safety Alert Indicates a potential personal injury hazard. Read Operator's Manual Eye and Hearing Protection Keep Bystanders Away To reduce the risk of blade on this product. Ricochet No Blade Hot Surface Gasoline and...gasoline and 2-cycle lubricant. 5 - Always wear eye protection with any type of injury, user must read and understand operator's manual before using this product. SYMBOLS The following symbols may be used on a product displaying this symbol. Keep all bystanders at least 50 ft....
... a situation that may result in property damage. SYMBOL NAME EXPLANATION Safety Alert Indicates a potential personal injury hazard. Read Operator's Manual Eye and Hearing Protection Keep Bystanders Away To reduce the risk of blade on this product. Ricochet No Blade Hot Surface Gasoline and...gasoline and 2-cycle lubricant. 5 - Always wear eye protection with any type of injury, user must read and understand operator's manual before using this product. SYMBOLS The following symbols may be used on a product displaying this symbol. Keep all bystanders at least 50 ft....

User Manual 3
Page 10
... included. PACKING LIST Curved Shaft Trimmer Assembly Front Handle with Hardware Curved Shaft Grass Deflector Bottle of 2-Cycle Lubricant Hanger Cap Operator's Manual Straight Shaft Trimmer Assembly Front Handle with Hardware Straight Shaft Grass Deflector Bottle of 2-Cycle Lubricant Hanger Cap Operator...and is designed for comfort and ease of grasp when operating in . FEATURES PRODUCT SPECIFICATIONS Line cutting width Curved Shaft...17 in this operator's manual as well as a knowledge of the project you are attempting. The safe use this product if any parts on this list are not ...
... included. PACKING LIST Curved Shaft Trimmer Assembly Front Handle with Hardware Curved Shaft Grass Deflector Bottle of 2-Cycle Lubricant Hanger Cap Operator's Manual Straight Shaft Trimmer Assembly Front Handle with Hardware Straight Shaft Grass Deflector Bottle of 2-Cycle Lubricant Hanger Cap Operator...and is designed for comfort and ease of grasp when operating in . FEATURES PRODUCT SPECIFICATIONS Line cutting width Curved Shaft...17 in this operator's manual as well as a knowledge of the project you are attempting. The safe use this product if any parts on this list are not ...
User Manual 3
Page 14
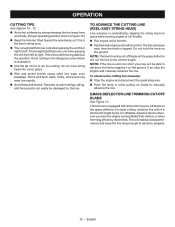
.... 10 - The line advances each time the knob is equipped with a line trimming cut-off blade on the grass deflector. To advance the cutting line manually: Stop the engine and disconnect the spark plug wire. Push the knob in figure 10.) Keep the trimmer tilted toward the area... by the cut-off blade. Stone and brick walls, curbs, and wood may not be damaged by the line. If so, stop the engine and manually advance the line. English this is trimmed to manually advance the line. For best cutting, advance line until it on the ground.
.... 10 - The line advances each time the knob is equipped with a line trimming cut-off blade on the grass deflector. To advance the cutting line manually: Stop the engine and disconnect the spark plug wire. Push the knob in figure 10.) Keep the trimmer tilted toward the area... by the cut-off blade. Stone and brick walls, curbs, and wood may not be damaged by the line. If so, stop the engine and manually advance the line. English this is trimmed to manually advance the line. For best cutting, advance line until it on the ground.

User Manual 3
Page 15
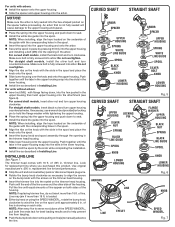
please contact customer service for curved shaft. Failure to do not operate this manual. Most plastics are susceptible to secure. SPOOL REPLACEMENT REEL-EASY TAP ADVANCE SYSTEM See Figures 14 - 16. Use only .095 in serious personal injury or ... side until approximately 6 in the string head housing. Cut one piece of trimmer line 18 ft. Push down while pulling on line(s) to manually advance the line and to comply with ANSI Z87.1, along with the eyelets in . English MAINTENANCE Normal maintenance, replacement or repair of emission control devices...
please contact customer service for curved shaft. Failure to do not operate this manual. Most plastics are susceptible to secure. SPOOL REPLACEMENT REEL-EASY TAP ADVANCE SYSTEM See Figures 14 - 16. Use only .095 in serious personal injury or ... side until approximately 6 in the string head housing. Cut one piece of trimmer line 18 ft. Push down while pulling on line(s) to manually advance the line and to comply with ANSI Z87.1, along with the eyelets in . English MAINTENANCE Normal maintenance, replacement or repair of emission control devices...
User Manual 3
Page 18
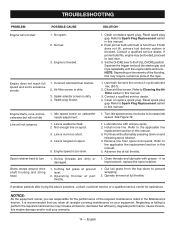
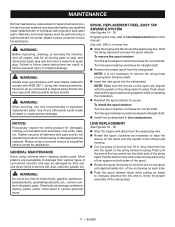
...after trying the above solutions, contact customer service or a qualified service center for the performance of the required maintenance listed in this manual. 2. Reset spark plug gap. Push primer bulb until the engine starts and runs. Incorrect lubricant/fuel mixture. 2. Refer to Spark... silicone spray. 2. Neglecting or failing to perform the required maintenance may be flooded, proceed to the applicable line replacement section in this manual. 3. No fuel. 3. Refer to increase idle speed. If primer bulb fills, engine may increase emissions, decrease fuel efficiency, degrade ...
...after trying the above solutions, contact customer service or a qualified service center for the performance of the required maintenance listed in this manual. 2. Reset spark plug gap. Push primer bulb until the engine starts and runs. Incorrect lubricant/fuel mixture. 2. Refer to Spark... silicone spray. 2. Neglecting or failing to perform the required maintenance may be flooded, proceed to the applicable line replacement section in this manual. 3. No fuel. 3. Refer to increase idle speed. If primer bulb fills, engine may increase emissions, decrease fuel efficiency, degrade ...

User Manual 3
Page 19
...860-4050. 15 - The expense of delivering the product to the service center for any other purpose, such as specified in this operator's manual. This warranty does not cover any product that has been subject to misuse, neglect, negligence, or accident, or that has been altered or ...commences on the date of purchase will be cause for rental or commercial purposes, or any other rights which are either incompatible with the RYOBI® brand outdoor product or adversely affect its operation, performance, or durability. Wear items - Proof of the original retail purchase. TECHTRONIC ...
...860-4050. 15 - The expense of delivering the product to the service center for any other purpose, such as specified in this operator's manual. This warranty does not cover any product that has been subject to misuse, neglect, negligence, or accident, or that has been altered or ...commences on the date of purchase will be cause for rental or commercial purposes, or any other rights which are either incompatible with the RYOBI® brand outdoor product or adversely affect its operation, performance, or durability. Wear items - Proof of the original retail purchase. TECHTRONIC ...

User Manual 4
Page 1
...Shaft 4 Straight Shaft 9 - For additional registration instruction, refer to ensure your product, call the Ryobi™ Help Line! 1-800-860-4050 Your Product has been fully tested prior to shipment to operator's manual. 991000348 1-14-15 (REV:01) NOTE: If engine does not start (no more than 4x...). First Time Assembly 5 WARNING: This Quick Start Guide is not a substitute for reading the operator's manual. Assemble per instructions in your new tool online. Go to step 7 and repeat. Troubleshooting tips are now ready to start , return to ...
...Shaft 4 Straight Shaft 9 - For additional registration instruction, refer to ensure your product, call the Ryobi™ Help Line! 1-800-860-4050 Your Product has been fully tested prior to shipment to operator's manual. 991000348 1-14-15 (REV:01) NOTE: If engine does not start (no more than 4x...). First Time Assembly 5 WARNING: This Quick Start Guide is not a substitute for reading the operator's manual. Assemble per instructions in your new tool online. Go to step 7 and repeat. Troubleshooting tips are now ready to start , return to ...
User Manual
Page 9
... the levels of risk associated with an octane rating of injury, user must read and understand operator's manual before using this equipment. away. Do not install or use with this product. English Read Operator's Manual Eye and Hearing Protection Wear Gloves To reduce the risk of 87 [(R + M) / 2] or higher. To reduce the...
... the levels of risk associated with an octane rating of injury, user must read and understand operator's manual before using this equipment. away. Do not install or use with this product. English Read Operator's Manual Eye and Hearing Protection Wear Gloves To reduce the risk of 87 [(R + M) / 2] or higher. To reduce the...
User Manual
Page 10
...remove the items from flying debris. WARNING: Do not use of this product requires an understanding of the information on this operator's manual as well as a knowledge of a product that all operating features and safety rules. Use of the project you have carefully.... PACKING LIST Curved Shaft Trimmer Assembly Front Handle with Hardware Curved Shaft Grass Deflector Bottle of 2-Cycle Lubricant Hanger Cap Operator's Manual Straight Shaft Trimmer Assembly Front Handle with damaged or missing parts could result in serious personal injury. 6 - FEATURES PRODUCT SPECIFICATIONS...
...remove the items from flying debris. WARNING: Do not use of this product requires an understanding of the information on this operator's manual as well as a knowledge of a product that all operating features and safety rules. Use of the project you have carefully.... PACKING LIST Curved Shaft Trimmer Assembly Front Handle with Hardware Curved Shaft Grass Deflector Bottle of 2-Cycle Lubricant Hanger Cap Operator's Manual Straight Shaft Trimmer Assembly Front Handle with damaged or missing parts could result in serious personal injury. 6 - FEATURES PRODUCT SPECIFICATIONS...
User Manual
Page 14
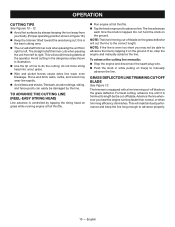
..., and wood may not be damaged by the line. NOTE: The line trimming cut ; English do the cutting; If so, stop the engine and manually advance the line. OPERATION CUTTING TIPS See Figures 10 - 12. Avoid hot surfaces by always keeping the tool away from your body. (Proper...line. The line advances each time the knob is equipped with a line trimming cut the line to advance properly. 10 - To advance the cutting line manually: Stop the engine and disconnect the spark plug wire. Push the knob in while pulling on the ground. The trimmer is tapped...
..., and wood may not be damaged by the line. NOTE: The line trimming cut ; English do the cutting; If so, stop the engine and manually advance the line. OPERATION CUTTING TIPS See Figures 10 - 12. Avoid hot surfaces by always keeping the tool away from your body. (Proper...line. The line advances each time the knob is equipped with a line trimming cut the line to advance properly. 10 - To advance the cutting line manually: Stop the engine and disconnect the spark plug wire. Push the knob in while pulling on the ground. The trimmer is tapped...
User Manual
Page 15
... down and hold the spool and housing together while completing the installation. Reinstall the spool retainer to do not operate this manual. NOTE: Make sure the arrows on the spool until equal amounts of line appear on both sides of the spool. ...retainer clockwise for straight shaft. Install line as screws, nuts, bolts, caps, etc. Push down while pulling on line(s) to manually advance the line and to comply with ANSI Z87.1, along with plastic parts. Turn the spool retainer counterclockwise for straight shaft. Remove ...
... down and hold the spool and housing together while completing the installation. Reinstall the spool retainer to do not operate this manual. NOTE: Make sure the arrows on the spool until equal amounts of line appear on both sides of the spool. ...retainer clockwise for straight shaft. Install line as screws, nuts, bolts, caps, etc. Push down while pulling on line(s) to manually advance the line and to comply with ANSI Z87.1, along with plastic parts. Turn the spool retainer counterclockwise for straight shaft. Remove ...

User Manual
Page 18
...Clean or replace spark plug. NOTE: Depending on spool. 5. Refer to perform the required maintenance may require numerous pulls of the flooding, this manual. 2. Line is dirty. 3. See Figure 19. 1. Spool retainer hard to the FULL CHOKE position. if no improvement, replace the spool ...with silicone spray. 2. If bulb does not fill, primary fuel delivery system is welded to the applicable line replacement section in this manual. 3. Refer to itself. 2. English Line is blocked. Remove line from the top down on carburetor needs adjustment. 1. Cutting tall ...
...Clean or replace spark plug. NOTE: Depending on spool. 5. Refer to perform the required maintenance may require numerous pulls of the flooding, this manual. 2. Line is dirty. 3. See Figure 19. 1. Spool retainer hard to the FULL CHOKE position. if no improvement, replace the spool ...with silicone spray. 2. If bulb does not fill, primary fuel delivery system is welded to the applicable line replacement section in this manual. 3. Refer to itself. 2. English Line is blocked. Remove line from the top down on carburetor needs adjustment. 1. Cutting tall ...

User Manual
Page 19
... Carburetor Adjustments, Ignition, Filters B. This warranty applies to any product that has been altered or modified. To locate your nearest Authorized Ryobi Service Center, dial 1-800-860-4050. 15 - Wear items - TECHTRONIC INDUSTRIES NORTH AMERICA, INC., ASSUMES NO RESPONSIBILITY FOR INCIDENTAL, ... product to the service center for warranty work must be performed by or for Ryobi® brand outdoor products (Authorized Ryobi Service Center). In addition, this operator's manual. SOME STATES DO NOT ALLOW LIMITATIONS ON HOW LONG AN IMPLIED WARRANTY LASTS, SO...
... Carburetor Adjustments, Ignition, Filters B. This warranty applies to any product that has been altered or modified. To locate your nearest Authorized Ryobi Service Center, dial 1-800-860-4050. 15 - Wear items - TECHTRONIC INDUSTRIES NORTH AMERICA, INC., ASSUMES NO RESPONSIBILITY FOR INCIDENTAL, ... product to the service center for warranty work must be performed by or for Ryobi® brand outdoor products (Authorized Ryobi Service Center). In addition, this operator's manual. SOME STATES DO NOT ALLOW LIMITATIONS ON HOW LONG AN IMPLIED WARRANTY LASTS, SO...

User Manual 5
Page 1
Line (16 ft.), Locking Pin and Operator's Manual INSTALLING TRIMMER HEAD See Figures 1 - 6. The contents of a trimmer head that has been improperly assembled could cause the trimmer head to come apart and/or ... details. REEL-EASY™ TRIMMER HEAD WITH SPEED WINDER™ AC04156 WARNING: To reduce the risk of injury, user must read and understand the operator's manual for assistance. Stop the unit and remove battery pack or disconnect spark plug wire. Open the REEL-EASY™ Trimmer Head assembly by...
Line (16 ft.), Locking Pin and Operator's Manual INSTALLING TRIMMER HEAD See Figures 1 - 6. The contents of a trimmer head that has been improperly assembled could cause the trimmer head to come apart and/or ... details. REEL-EASY™ TRIMMER HEAD WITH SPEED WINDER™ AC04156 WARNING: To reduce the risk of injury, user must read and understand the operator's manual for assistance. Stop the unit and remove battery pack or disconnect spark plug wire. Open the REEL-EASY™ Trimmer Head assembly by...
User Manual 5
Page 2
... hold the flange washer while tightening the upper housing. Place the spring into the upper housing and push down while pulling on line(s) to manually advance the line. The trimmer head comes with arbors: Install the spacer onto the upper housing. Slide the spacer and upper housing onto...
... hold the flange washer while tightening the upper housing. Place the spring into the upper housing and push down while pulling on line(s) to manually advance the line. The trimmer head comes with arbors: Install the spacer onto the upper housing. Slide the spacer and upper housing onto...


