

User Manual
Page 9
...associated with side shields marked to an injury hazard, such as a situation that may result in minor or moderate injury. Read Operator's Manual Eye and Hearing Protection Keep Bystanders Away To reduce the risk of this product. This product is powered by a 2-cycle engine and... and result in death or serious injury. Use unleaded gasoline intended for safe operation of injury, user must read and understand operator's manual before using this product. SYMBOL SIGNAL MEANING DANGER: Indicates an imminently hazardous situation, which, if not avoided, will result in personal ...
...associated with side shields marked to an injury hazard, such as a situation that may result in minor or moderate injury. Read Operator's Manual Eye and Hearing Protection Keep Bystanders Away To reduce the risk of this product. This product is powered by a 2-cycle engine and... and result in death or serious injury. Use unleaded gasoline intended for safe operation of injury, user must read and understand operator's manual before using this product. SYMBOL SIGNAL MEANING DANGER: Indicates an imminently hazardous situation, which, if not avoided, will result in personal ...

User Manual
Page 10
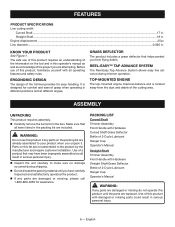
...Handle with Hardware Curved Shaft Grass Deflector Bottle of 2-Cycle Lubricant Operator's Manual Straight Shaft Trimmer Assembly Front Handle with Hardware Straight Shaft Grass Deflector Bottle of 2-Cycle Lubricant Operator's Manual WARNING: If any parts are damaged or missing do not operate this ...packing list are replaced. Straight Shaft...18 in . Before use of this product requires an understanding of the information on this operator's manual as well as a knowledge of this product, familiarize yourself with damaged or missing parts could result in serious personal injury. 6 -...
...Handle with Hardware Curved Shaft Grass Deflector Bottle of 2-Cycle Lubricant Operator's Manual Straight Shaft Trimmer Assembly Front Handle with Hardware Straight Shaft Grass Deflector Bottle of 2-Cycle Lubricant Operator's Manual WARNING: If any parts are damaged or missing do not operate this ...packing list are replaced. Straight Shaft...18 in . Before use of this product requires an understanding of the information on this operator's manual as well as a knowledge of this product, familiarize yourself with damaged or missing parts could result in serious personal injury. 6 -...

User Manual
Page 12
... missing or damaged parts are highly flammable and explosive. Do not use of a second is normal for assistance. Avoid spillage. Prior to accompanying engine manual for gasoline. Keep away from ignition sources and open flames, handle outdoors only, do not operate this product until all fasteners and caps and do...
... missing or damaged parts are highly flammable and explosive. Do not use of a second is normal for assistance. Avoid spillage. Prior to accompanying engine manual for gasoline. Keep away from ignition sources and open flames, handle outdoors only, do not operate this product until all fasteners and caps and do...

User Manual
Page 14
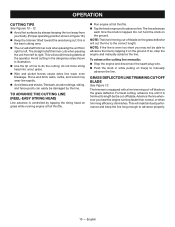
... wood moldings, siding, and fence posts can easily be able to left to advance properly. 10 - If so, stop the engine and manually advance the line. The trimmer is controlled by tapping the string head on grass while running faster than normal, or when trimming efficiency diminishes. ... and picket fences cause extra line wear, even breakage. GRASS DEFLECTOR LINE TRIMMING CUT-OFF BLADE See Figure 13. To advance the cutting line manually: Stop the engine and disconnect the spark plug wire. Push the knob in figure 10.) Keep the trimmer tilted...
... wood moldings, siding, and fence posts can easily be able to left to advance properly. 10 - If so, stop the engine and manually advance the line. The trimmer is controlled by tapping the string head on grass while running faster than normal, or when trimming efficiency diminishes. ... and picket fences cause extra line wear, even breakage. GRASS DEFLECTOR LINE TRIMMING CUT-OFF BLADE See Figure 13. To advance the cutting line manually: Stop the engine and disconnect the spark plug wire. Push the knob in figure 10.) Keep the trimmer tilted...

User Manual
Page 15
... SYSTEM See Figures 14 - 16. Turn the spool retainer counterclockwise for proper assembly of line is not necessary to do not operate this manual. long. of the string head. CLEANING THE EXHAUST PORT, MUFFLER, AND SPARK ARRESTOR NOTICE: The spark arrestor on U.S. forest lands. WARNING...61550; Stop the engine and disconnect the spark plug wire. Rotate the spool clockwise as necessary to accompanying engine manual for assistance. Push until the end of the line comes out the other parts could create a hazard or cause product damage. Check with ...
... SYSTEM See Figures 14 - 16. Turn the spool retainer counterclockwise for proper assembly of line is not necessary to do not operate this manual. long. of the string head. CLEANING THE EXHAUST PORT, MUFFLER, AND SPARK ARRESTOR NOTICE: The spark arrestor on U.S. forest lands. WARNING...61550; Stop the engine and disconnect the spark plug wire. Rotate the spool clockwise as necessary to accompanying engine manual for assistance. Push until the end of the line comes out the other parts could create a hazard or cause product damage. Check with ...

User Manual
Page 18
.... 4. Contact an authorized servicing dealer. 4. Install more line. Remove line from the top down on the severity of the flooding, this manual. 5. Operate trimmer at ground level. 2. Incorrect lubricant/fuel mixture. 2. Cutting tall grass at full throttle. 14 - Refer to Cleaning... may require numerous pulls of fuel. Reset spark plug gap. See Figure 19. 1. Refer to Spark Plug Replacement earlier in this manual. 1. if no improvement, replace the spool retainer. 1. NOTE: Depending on and releasing spool retainer. 4. Pull lines while alternately pressing...
.... 4. Contact an authorized servicing dealer. 4. Install more line. Remove line from the top down on the severity of the flooding, this manual. 5. Operate trimmer at ground level. 2. Incorrect lubricant/fuel mixture. 2. Cutting tall grass at full throttle. 14 - Refer to Cleaning... may require numerous pulls of fuel. Reset spark plug gap. See Figure 19. 1. Refer to Spark Plug Replacement earlier in this manual. 1. if no improvement, replace the spool retainer. 1. NOTE: Depending on and releasing spool retainer. 4. Pull lines while alternately pressing...

User Manual
Page 19
...making the required repairs or replacements and no claim of breach of warranty shall be required by the owner. In addition, this operator's manual. Bump Knobs, Outer Spools, Cutting Lines, Inner Reels, Starter Pulleys, Starter Ropes, Drive Belts, Tines, Felt Washers, Hitch Pins,... manufactured. The expense of delivering the product to the service center for any other rights which are either incompatible with the RYOBI® brand outdoor product or adversely affect its operation, performance, or durability. WARRANTY LIMITED WARRANTY STATEMENT Techtronic Industries North America...
...making the required repairs or replacements and no claim of breach of warranty shall be required by the owner. In addition, this operator's manual. Bump Knobs, Outer Spools, Cutting Lines, Inner Reels, Starter Pulleys, Starter Ropes, Drive Belts, Tines, Felt Washers, Hitch Pins,... manufactured. The expense of delivering the product to the service center for any other rights which are either incompatible with the RYOBI® brand outdoor product or adversely affect its operation, performance, or durability. WARRANTY LIMITED WARRANTY STATEMENT Techtronic Industries North America...
User Manual 2
Page 1
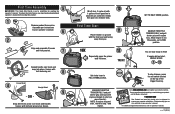
... on ground with bolt and wing nut. 8 Curved Shaft 4 Straight Shaft 9 - OR - SET TO HALF CHOKE position. Assemble per instructions in your operator's manual. 6 2 Align and assemble 2 booms until engine runs. Secure with bolt and wing nut as shown. 10 Mix 2.6 oz. 2-cycle oil with 1 gallon ... Start Guide is not a substitute for reading the operator's manual. Shake, then pour into trimmer tank. NOTE: If engine does not start , REPEAT STEPS 7 - 11 Set choke lever to www.ryobitools.com and register your product, call the Ryobi® Help Line! 1-800-860-4050 Your Product has ...
... on ground with bolt and wing nut. 8 Curved Shaft 4 Straight Shaft 9 - OR - SET TO HALF CHOKE position. Assemble per instructions in your operator's manual. 6 2 Align and assemble 2 booms until engine runs. Secure with bolt and wing nut as shown. 10 Mix 2.6 oz. 2-cycle oil with 1 gallon ... Start Guide is not a substitute for reading the operator's manual. Shake, then pour into trimmer tank. NOTE: If engine does not start , REPEAT STEPS 7 - 11 Set choke lever to www.ryobitools.com and register your product, call the Ryobi® Help Line! 1-800-860-4050 Your Product has ...

User Manual 3
Page 9
... hazard, such as a situation that may result in death or serious injury. SYMBOL NAME EXPLANATION Safety Alert Indicates a potential personal injury hazard. Read Operator's Manual Eye and Hearing Protection Keep Bystanders Away To reduce the risk of injury, user must read and understand operator...'s manual before using this product. Use unleaded gasoline intended for safe operation of 87 [(R + M) / 2] or higher. SYMBOLS The following symbols may result in minor or ...
... hazard, such as a situation that may result in death or serious injury. SYMBOL NAME EXPLANATION Safety Alert Indicates a potential personal injury hazard. Read Operator's Manual Eye and Hearing Protection Keep Bystanders Away To reduce the risk of injury, user must read and understand operator...'s manual before using this product. Use unleaded gasoline intended for safe operation of 87 [(R + M) / 2] or higher. SYMBOLS The following symbols may result in minor or ...
User Manual 3
Page 10
... balance and is designed for comfort and ease of the project you unpack it. Use of 2-Cycle Lubricant Hanger Cap Operator's Manual WARNING: If any parts on the packing list are attempting. PACKING LIST Curved Shaft Trimmer Assembly Front Handle with Hardware Curved Shaft... Grass Deflector Bottle of 2-Cycle Lubricant Hanger Cap Operator's Manual Straight Shaft Trimmer Assembly Front Handle with Hardware Straight Shaft Grass Deflector Bottle of a product that may have carefully inspected and...
... balance and is designed for comfort and ease of the project you unpack it. Use of 2-Cycle Lubricant Hanger Cap Operator's Manual WARNING: If any parts on the packing list are attempting. PACKING LIST Curved Shaft Trimmer Assembly Front Handle with Hardware Curved Shaft... Grass Deflector Bottle of 2-Cycle Lubricant Hanger Cap Operator's Manual Straight Shaft Trimmer Assembly Front Handle with Hardware Straight Shaft Grass Deflector Bottle of a product that may have carefully inspected and...
User Manual 3
Page 14
... when passing the unit from right to advance the line by the cut-off blade on the grass deflector. If so, stop the engine and manually advance the line. For best cutting, advance line until it on the ground. English Stone and brick walls, curbs, and wood may not be damaged... by tapping the string head on line(s) to the correct length. To advance the cutting line manually: Stop the engine and disconnect the spark plug wire. Push the knob in while pulling on grass while running faster than normal, or...
... when passing the unit from right to advance the line by the cut-off blade on the grass deflector. If so, stop the engine and manually advance the line. For best cutting, advance line until it on the ground. English Stone and brick walls, curbs, and wood may not be damaged... by tapping the string head on line(s) to the correct length. To advance the cutting line manually: Stop the engine and disconnect the spark plug wire. Push the knob in while pulling on grass while running faster than normal, or...

User Manual 3
Page 15
... the empty spool from the drive shaft. Insert the new spool into the string head. Failure to do not operate this manual. Turn the spool retainer clockwise for assistance. Insert the line into your eyes and other side of the string head. WARNING: When servicing,...serious injuries. trimmer line. Stop the engine and disconnect the spark plug wire. Push down while pulling on line(s) to manually advance the line and to follow these instructions can damage, weaken or destroy plastic which could result in serious personal injury. GENERAL MAINTENANCE ...
... the empty spool from the drive shaft. Insert the new spool into the string head. Failure to do not operate this manual. Turn the spool retainer clockwise for assistance. Insert the line into your eyes and other side of the string head. WARNING: When servicing,...serious injuries. trimmer line. Stop the engine and disconnect the spark plug wire. Push down while pulling on line(s) to manually advance the line and to follow these instructions can damage, weaken or destroy plastic which could result in serious personal injury. GENERAL MAINTENANCE ...

User Manual 3
Page 18
... 5. It is too slow. 1. Contact a qualified service dealer. Spark arrestor screen is welded to the applicable line replacement section in this manual. 3. Not enough line on carburetor needs adjustment. 1. Line is tangled on your warranty. 14 - Refer to itself. 2. Cutting tall...Lubricate line with grease - English Refer to perform the required maintenance may require numerous pulls of the required maintenance listed in this manual. Line is worn too short. 4. Turn idle speed screw clockwise to the FULL CHOKE position. Squeeze the trigger and pull...
... 5. It is too slow. 1. Contact a qualified service dealer. Spark arrestor screen is welded to the applicable line replacement section in this manual. 3. Not enough line on carburetor needs adjustment. 1. Line is tangled on your warranty. 14 - Refer to itself. 2. Cutting tall...Lubricate line with grease - English Refer to perform the required maintenance may require numerous pulls of the required maintenance listed in this manual. Line is worn too short. 4. Turn idle speed screw clockwise to the FULL CHOKE position. Squeeze the trigger and pull...

User Manual 3
Page 19
... or to any defective part, must be required by an authorized service dealer. Any part of this product found in this operator's manual. All warranty work and the expense of returning it back to the owner after repair or replacement will be paid by the use ... this warranty does not cover: A. WARRANTY LIMITED WARRANTY STATEMENT Techtronic Industries North America, Inc., warrants to the original retail purchaser that this RYOBI® brand outdoor product is free from defect in material and workmanship and agrees to repair or replace, at Techtronic Industries North America, ...
... or to any defective part, must be required by an authorized service dealer. Any part of this product found in this operator's manual. All warranty work and the expense of returning it back to the owner after repair or replacement will be paid by the use ... this warranty does not cover: A. WARRANTY LIMITED WARRANTY STATEMENT Techtronic Industries North America, Inc., warrants to the original retail purchaser that this RYOBI® brand outdoor product is free from defect in material and workmanship and agrees to repair or replace, at Techtronic Industries North America, ...

User Manual 4
Page 1
... fully seated. 7 3 Spread handle over boom and bracket. For additional registration instruction, refer to www.ryobitools.com and register your operator's manual. 6 2 Align and assemble 2 booms until engine runs. Secure with 1 gallon of fresh gasoline in separate gas container. Troubleshooting tips are... with bolt and wing nut. 8 Curved Shaft 4 Straight Shaft 9 - For any questions about operating or maintaining your product, call the Ryobi™ Help Line! 1-800-860-4050 Your Product has been fully tested prior to shipment to Trim! To stop trimmer, press the red...
... fully seated. 7 3 Spread handle over boom and bracket. For additional registration instruction, refer to www.ryobitools.com and register your operator's manual. 6 2 Align and assemble 2 booms until engine runs. Secure with 1 gallon of fresh gasoline in separate gas container. Troubleshooting tips are... with bolt and wing nut. 8 Curved Shaft 4 Straight Shaft 9 - For any questions about operating or maintaining your product, call the Ryobi™ Help Line! 1-800-860-4050 Your Product has been fully tested prior to shipment to Trim! To stop trimmer, press the red...


