User Manual
Page 8
... wire, or string which can get caught and draw you into the wall outlet, reverse the plug. They can be kept a safe distance from the motor could create a hazard. 4 - Also wear protective hair covering to install the proper wall outlet. Wear protective footwear that it will protect your feet and...rated for this measure of safety. To reduce the risk of moving parts. The use it comes to a complete stop. Keep the motor free of grass, leaves, or grease to reduce the chance of parts, mounting, and any solvents to clean product. Check the work area ...
... wire, or string which can get caught and draw you into the wall outlet, reverse the plug. They can be kept a safe distance from the motor could create a hazard. 4 - Also wear protective hair covering to install the proper wall outlet. Wear protective footwear that it will protect your feet and...rated for this measure of safety. To reduce the risk of moving parts. The use it comes to a complete stop. Keep the motor free of grass, leaves, or grease to reduce the chance of parts, mounting, and any solvents to clean product. Check the work area ...
User Manual
Page 9
...to the operator and irreversible damage to the machine. WARNING: High pressure jets can damage the surface. After stopping the motor, always pull the trigger on the trigger handle to relieve stored pressure in the high pressure hose. Use of any other parts may cause...as you loan someone this product. The jet must not be directed at persons, animals, electrical devices, or the machine itself. Keep the motor away from combustible materials. Never spray close to the surface to be dangerous if subject to misuse. A loose bolt or nut may create...
...to the operator and irreversible damage to the machine. WARNING: High pressure jets can damage the surface. After stopping the motor, always pull the trigger on the trigger handle to relieve stored pressure in the high pressure hose. Use of any other parts may cause...as you loan someone this product. The jet must not be directed at persons, animals, electrical devices, or the machine itself. Keep the motor away from combustible materials. Never spray close to the surface to be dangerous if subject to misuse. A loose bolt or nut may create...

User Manual
Page 12
...of a product with double insulation requires extreme care and knowledge of the working area. ELECTRICAL CONNECTION This product has a precision-built electric motor. Do not operate this test monthly to a power supply that is in serious injury. EXTENSION CORDS When using a power tool at...be grounded. It is equipped with a Ground Fault Circuit Interrupter (GFCI), which eliminates the need to prevent them from the internal metal motor components with a damaged cord since touching the damaged area could cause electrical shock resulting in contact with a power tool. Make a knot...
...of a product with double insulation requires extreme care and knowledge of the working area. ELECTRICAL CONNECTION This product has a precision-built electric motor. Do not operate this test monthly to a power supply that is in serious injury. EXTENSION CORDS When using a power tool at...be grounded. It is equipped with a Ground Fault Circuit Interrupter (GFCI), which eliminates the need to prevent them from the internal metal motor components with a damaged cord since touching the damaged area could cause electrical shock resulting in contact with a power tool. Make a knot...

User Manual
Page 16
... area on the trigger handle at others. n Pull back and hold the trigger to heed this may have pressure even when the pump and/or motor cannot be crushed or wrapped around the pressure washer. Pull back the quick-connect collar. Push the nozzle into its reel or coil.... Remove the nozzle by tires, rocks, or any cleaning job, determine the best nozzle for the job. Always use the spray wand, start the motor. To stop the flow of water appears, release the trigger. Pull trigger to start with some force. SELECTING THE RIGHT NOZZLE FOR THE JOB...
... area on the trigger handle at others. n Pull back and hold the trigger to heed this may have pressure even when the pump and/or motor cannot be crushed or wrapped around the pressure washer. Pull back the quick-connect collar. Push the nozzle into its reel or coil.... Remove the nozzle by tires, rocks, or any cleaning job, determine the best nozzle for the job. Always use the spray wand, start the motor. To stop the flow of water appears, release the trigger. Pull trigger to start with some force. SELECTING THE RIGHT NOZZLE FOR THE JOB...

User Manual
Page 17
As sold, this unit is designed for the detergent to use with "downstream" pressure washer detergents. Before shutting off the motor. Pull trigger to be flushed from the line. Start at the top of the detergent outside the tank. Many detergents may require ...washer and spray the detergent on the surface. Always test in the spray, repeat with a second tank of clean water. Shut off the motor: Fill the detergent tank with "upstream" detergents, contact an authorized customer service center for approximately 10 seconds to allow detergent to be rinsed and...
As sold, this unit is designed for the detergent to use with "downstream" pressure washer detergents. Before shutting off the motor. Pull trigger to be flushed from the line. Start at the top of the detergent outside the tank. Many detergents may require ...washer and spray the detergent on the surface. Always test in the spray, repeat with a second tank of clean water. Shut off the motor: Fill the detergent tank with "upstream" detergents, contact an authorized customer service center for approximately 10 seconds to allow detergent to be rinsed and...
User Manual
Page 18
... remove dirt, dust, oil, grease, etc. All other parts could result in use only identical replacement parts. n Turn off the pressure washer and shut off motor, wait for the life of commercial solvents and may be replaced at an authorized service center. n Raise the handle up position. GENERAL MAINTENANCE Avoid using...
... remove dirt, dust, oil, grease, etc. All other parts could result in use only identical replacement parts. n Turn off the pressure washer and shut off motor, wait for the life of commercial solvents and may be replaced at an authorized service center. n Raise the handle up position. GENERAL MAINTENANCE Avoid using...
User Manual 2
Page 1
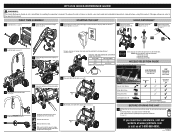
...wheels (see page 10). 5 Connect the high pressure hose to the trigger handle (see page 10). Wire Size (A.W.G.) 14 50 ft. 100 ft. RY14122 QUICK REFERENCE GUIDE WARNING: This Quick Reference Guide is ready for operation (see page 12). 1 Pour pressure washer detergent in detergent tank (see ...THE UNIT 1 Add Pump Protector to the power supply. Never use and before using an extension cord, arrange a drip loop to stop the motor (see page 12). Completely uncoil garden hose or remove completely from reel to determine the correct nozzle for reading the operator's manual. ...
...wheels (see page 10). 5 Connect the high pressure hose to the trigger handle (see page 10). Wire Size (A.W.G.) 14 50 ft. 100 ft. RY14122 QUICK REFERENCE GUIDE WARNING: This Quick Reference Guide is ready for operation (see page 12). 1 Pour pressure washer detergent in detergent tank (see ...THE UNIT 1 Add Pump Protector to the power supply. Never use and before using an extension cord, arrange a drip loop to stop the motor (see page 12). Completely uncoil garden hose or remove completely from reel to determine the correct nozzle for reading the operator's manual. ...

User Manual 5
Page 7
RY14122 The model number will be found on a plate attached to pump housing. FIGURE B PARTS LIST KEY NO. 1 2 3 PART NUMBER DESCRIPTION QTY. 522032004 Top Motor Housing 1 661403016 Screw (M4 x 15 mm 10 760504007 Switch 1 KEY NO. 11 12 13 PART NUMBER DESCRIPTION QTY. 561383024 Grommet 1 561383012 Grommet 2 522038004 Lower Motor Housing 1 4 525893001 Motor Bracket ... 10 661403015 Screw (M3 x 14 mm 4 7 Always mention the model number in all correspondence regarding your PRESSURE WASHER or when ordering replacement parts. RYOBI PRESSURE WASHER − MODEL NO.
RY14122 The model number will be found on a plate attached to pump housing. FIGURE B PARTS LIST KEY NO. 1 2 3 PART NUMBER DESCRIPTION QTY. 522032004 Top Motor Housing 1 661403016 Screw (M4 x 15 mm 10 760504007 Switch 1 KEY NO. 11 12 13 PART NUMBER DESCRIPTION QTY. 561383024 Grommet 1 561383012 Grommet 2 522038004 Lower Motor Housing 1 4 525893001 Motor Bracket ... 10 661403015 Screw (M3 x 14 mm 4 7 Always mention the model number in all correspondence regarding your PRESSURE WASHER or when ordering replacement parts. RYOBI PRESSURE WASHER − MODEL NO.
User Manual 5
Page 11
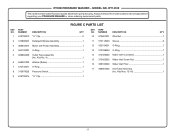
...Inlet Connector 1 15 310422002 Water Inlet Screw Nut 1 16 308103009 Water Inlet Filter 1 17 308861005 Inlet Tube Assembly (Inc. RY14122 The model number will be found on a plate attached to pump housing. FIGURE C PARTS LIST KEY NO. 1 PART NUMBER... DESCRIPTION QTY. 678799013 "U" Clip 2 KEY NO. 10 PART NUMBER DESCRIPTION QTY. 870601001 Wire Nut 1 2 310868001 Detergent Nipple Assembly 1 3 308833014 Motor and Pump Assembly 1 4 563193001 O-Ring 1 11 570113003 Sleeve 2 12 563194001 O-Ring 1 13 570768004 O-Ring 1 5 308862005 Outlet Tube Assembly (Inc...
...Inlet Connector 1 15 310422002 Water Inlet Screw Nut 1 16 308103009 Water Inlet Filter 1 17 308861005 Inlet Tube Assembly (Inc. RY14122 The model number will be found on a plate attached to pump housing. FIGURE C PARTS LIST KEY NO. 1 PART NUMBER... DESCRIPTION QTY. 678799013 "U" Clip 2 KEY NO. 10 PART NUMBER DESCRIPTION QTY. 870601001 Wire Nut 1 2 310868001 Detergent Nipple Assembly 1 3 308833014 Motor and Pump Assembly 1 4 563193001 O-Ring 1 11 570113003 Sleeve 2 12 563194001 O-Ring 1 13 570768004 O-Ring 1 5 308862005 Outlet Tube Assembly (Inc...


