
Trilingual (P206)
Page 1
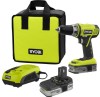
24 5 20 OPERATOR'S MANUAL 1/2 in./18 VOLT DRILL-DRIVER 2-SPEED P206 ACCEPTS ALL ONE+ BATTERY PACKS BATTERIES AND CHARGERS SOLD SEPARATELY Your drill-driver has been engineered and manufactured to our high standard for dependability, ease of rugged, trouble-free performance. SAVE THIS MANUAL FOR FUTURE REFERENCE Thank you for , it will give you years of operation, and operator safety. When properly cared for your purchase. WARNING: To reduce the risk of injury, the user must read and understand the operator's manual before using this product.
24 5 20 OPERATOR'S MANUAL 1/2 in./18 VOLT DRILL-DRIVER 2-SPEED P206 ACCEPTS ALL ONE+ BATTERY PACKS BATTERIES AND CHARGERS SOLD SEPARATELY Your drill-driver has been engineered and manufactured to our high standard for dependability, ease of rugged, trouble-free performance. SAVE THIS MANUAL FOR FUTURE REFERENCE Thank you for , it will give you years of operation, and operator safety. When properly cared for your purchase. WARNING: To reduce the risk of injury, the user must read and understand the operator's manual before using this product.
Trilingual (P206)
Page 7
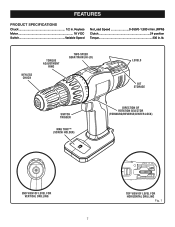
FEATURES PRODUCT SPECIFICATIONS Chuck 1/2 in .lb. KEYLESS CHUCK TORQUE ADJUSTMENT RING TWO-SPEED GEAR TRAIN (HI-LO) 24 LEVELS BIT STORAGE 5 20 SWITCH TRIGGER MAG TRAY™ (SCREW HOLDER) DIRECTION OF ROTATION SELECTOR (FORWARD/REVERSE/CENTER LOCK) END VIEW OF LEVEL FOR VERTICAL DRILLING 7 TOP VIEW OF LEVEL FOR HORIZONTAL DRILLING Fig. 1 Keyless Motor 18 V DC Switch Variable Speed No Load Speed 0-350/0-1,300 r/min. (RPM) Clutch 24 position Torque 330 in .
FEATURES PRODUCT SPECIFICATIONS Chuck 1/2 in .lb. KEYLESS CHUCK TORQUE ADJUSTMENT RING TWO-SPEED GEAR TRAIN (HI-LO) 24 LEVELS BIT STORAGE 5 20 SWITCH TRIGGER MAG TRAY™ (SCREW HOLDER) DIRECTION OF ROTATION SELECTOR (FORWARD/REVERSE/CENTER LOCK) END VIEW OF LEVEL FOR VERTICAL DRILLING 7 TOP VIEW OF LEVEL FOR HORIZONTAL DRILLING Fig. 1 Keyless Motor 18 V DC Switch Variable Speed No Load Speed 0-350/0-1,300 r/min. (RPM) Clutch 24 position Torque 330 in .
Trilingual (P206)
Page 8
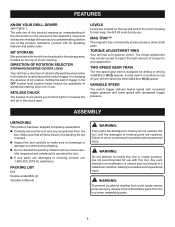
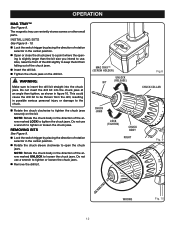
... not recommended for selecting either LO (1) or HI (2) speed. n Inspect the tool carefully to hand-tighten or release the drill bit in the packing list are included. WARNING: To prevent accidental starting when not in possible serious personal injury. DIRECTION OF ROTATION... SELECTOR (FORWARD/REVERSE/CENTER LOCK) Your drill has a direction of rotation (forward/reverse/center lock) selector located above the switch trigger for changing the direction of accidental starting...
... not recommended for selecting either LO (1) or HI (2) speed. n Inspect the tool carefully to hand-tighten or release the drill bit in the packing list are included. WARNING: To prevent accidental starting when not in possible serious personal injury. DIRECTION OF ROTATION... SELECTOR (FORWARD/REVERSE/CENTER LOCK) Your drill has a direction of rotation (forward/reverse/center lock) selector located above the switch trigger for changing the direction of accidental starting...
Trilingual (P206)
Page 9
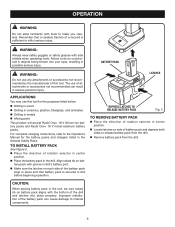
... place properly. Failure to make you careless. Align raised rib on side of the drill and latches into your eyes, resulting in metals Mixing paint This product will accept Ryobi One+ 18 V lithium-ion battery packs and Ryobi One+ 18 V nickel-cadmium battery packs. BATTERY PACK WARNING: Do not use this tool...
... place properly. Failure to make you careless. Align raised rib on side of the drill and latches into your eyes, resulting in metals Mixing paint This product will accept Ryobi One+ 18 V lithium-ion battery packs and Ryobi One+ 18 V nickel-cadmium battery packs. BATTERY PACK WARNING: Do not use this tool...

Trilingual (P206)
Page 10
...contact with one hand. CAUTION: To prevent gear damage, always allow the chuck to come to LOCK (tighten) or UNLOCK (release) the drill bit. Avoid running it OFF, release the switch trigger. The chuck body could cause an accident resulting in your hand, or your other hand...of the chuck with decreased trigger pressure. This could slip in serious personal injury. 10 Grasp and hold the chuck body with the rotating drill bit. Therefore, switch should be positioned to a complete stop. VARIABLE SPEED The switch trigger delivers higher speed and torque with increased trigger...
...contact with one hand. CAUTION: To prevent gear damage, always allow the chuck to come to LOCK (tighten) or UNLOCK (release) the drill bit. Avoid running it OFF, release the switch trigger. The chuck body could cause an accident resulting in your hand, or your other hand...of the chuck with decreased trigger pressure. This could slip in serious personal injury. 10 Grasp and hold the chuck body with the rotating drill bit. Therefore, switch should be positioned to a complete stop. VARIABLE SPEED The switch trigger delivers higher speed and torque with increased trigger...

Trilingual (P206)
Page 11
... be placed in the storage area located on the top of screw you are twenty-four torque indicator settings located on the front of the drill. Rotate adjustment ring to select either LO (1) or HI (2) speed. ADJUSTABLE TORQUE CLUTCH This product is located on the type of ... in the LO (1) speed range, speed will decrease and unit will have more power and torque. When using drill in use, bits provided with an adjustable torque clutch for driving different types of the drill to the desired setting. • 1 - 4 For driving small screws • 5 - 8 For driving screws into ...
... be placed in the storage area located on the top of screw you are twenty-four torque indicator settings located on the front of the drill. Rotate adjustment ring to select either LO (1) or HI (2) speed. ADJUSTABLE TORQUE CLUTCH This product is located on the type of ... in the LO (1) speed range, speed will decrease and unit will have more power and torque. When using drill in use, bits provided with an adjustable torque clutch for driving different types of the drill to the desired setting. • 1 - 4 For driving small screws • 5 - 8 For driving screws into ...
Trilingual (P206)
Page 12
...in possible serious personal injury or damage to the chuck. Rotate the chuck clockwise to loosen the chuck jaws. This could cause the drill bit to be thrown from falling out of rotation selector in the center position. Rotate the chuck sleeve clockwise to a point where ... open the chuck jaws. REMOVING BITS See Figure 9. Lock the switch trigger by placing the direction of the chuck jaws. Insert the drill bit. Tighten the chuck jaws on the bit. INSTALLING BITS See Figure 9 - 10. Lock the switch trigger by placing the direction...
...in possible serious personal injury or damage to the chuck. Rotate the chuck clockwise to loosen the chuck jaws. This could cause the drill bit to be thrown from falling out of rotation selector in the center position. Rotate the chuck sleeve clockwise to a point where ... open the chuck jaws. REMOVING BITS See Figure 9. Lock the switch trigger by placing the direction of the chuck jaws. Insert the drill bit. Tighten the chuck jaws on the bit. INSTALLING BITS See Figure 9 - 10. Lock the switch trigger by placing the direction...
Trilingual (P206)
Page 13
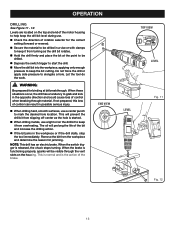
...the work. This is normal and is released, the chuck stops turning. If not prepared, this loss of rotation selector for jamming. NOTE: This drill has an electric brake. END VIEW 20 20 15 TOP VIEW LEVEL LEVEL Fig. 11 Fig. 12 13 Remove the bit from turning as the... hole is functioning properly, sparks will be drilled. Depress the switch trigger to start the drill. Move the drill bit into the workpiece, applying only enough pressure to mark the desired hole location. When the switch trigger ...
...the work. This is normal and is released, the chuck stops turning. If not prepared, this loss of rotation selector for jamming. NOTE: This drill has an electric brake. END VIEW 20 20 15 TOP VIEW LEVEL LEVEL Fig. 11 Fig. 12 13 Remove the bit from turning as the... hole is functioning properly, sparks will be drilled. Depress the switch trigger to start the drill. Move the drill bit into the workpiece, applying only enough pressure to mark the desired hole location. When the switch trigger ...
Trilingual (P206)
Page 15
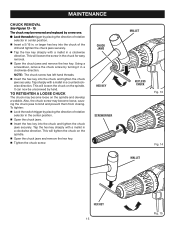
The chuck may be unscrewed by placing the direction of the drill and tighten the chuck jaws securely. Tap the hex key sharply with a mallet in a clockwise direction. Using a screwdriver, remove the chuck screw by placing ...
The chuck may be unscrewed by placing the direction of the drill and tighten the chuck jaws securely. Tap the hex key sharply with a mallet in a clockwise direction. Using a screwdriver, remove the chuck screw by placing ...
Trilingual (P206)
Page 16
...those dust masks that are : • lead from lead-based paints, • crystalline silica from bricks and cement and other reproductive harm. RYOBI® is a registered trademark of our Authorized Service Centers. • HOW TO LOCATE AN AUTHORIZED SERVICE CENTER: Authorized Service Centers can be... TECHNICAL SUPPORT: To obtain Customer or Technical Support please contact us at www.ryobitools.com or by power sanding, sawing, grinding, drilling, and other construction activities contains chemicals known to these exposures varies, depending on how often you do this type of work. Your...
...those dust masks that are : • lead from lead-based paints, • crystalline silica from bricks and cement and other reproductive harm. RYOBI® is a registered trademark of our Authorized Service Centers. • HOW TO LOCATE AN AUTHORIZED SERVICE CENTER: Authorized Service Centers can be... TECHNICAL SUPPORT: To obtain Customer or Technical Support please contact us at www.ryobitools.com or by power sanding, sawing, grinding, drilling, and other construction activities contains chemicals known to these exposures varies, depending on how often you do this type of work. Your...

Trilingual (P501)
Page 5
... excessive friction, blade binding and KICKBACK. Blade depth and bevel adjusting locking levers must be properly repaired or replaced by power sanding, sawing, grinding, drilling, and other construction activities may occur. Wear hearing protection during extended periods of cord location.
... excessive friction, blade binding and KICKBACK. Blade depth and bevel adjusting locking levers must be properly repaired or replaced by power sanding, sawing, grinding, drilling, and other construction activities may occur. Wear hearing protection during extended periods of cord location.


