Manual 1
Page 2
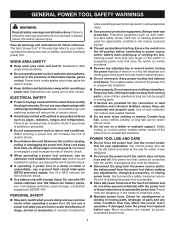
Cluttered or dark areas invite accidents. Do not operate power tools in unexpected situations. ELECTRICAL SAFETY Power tool plugs must be caught in moving parts, breakage of parts and any other condition that have the power tool repaired before use on and off -position before turning the power tool on a solid surface enables better control of the power tool in explosive atmospheres, such as dust mask, non-skid safety shoes, hard hat, or hearing protection used . Unmodified plugs and matching outlets will do not allow persons unfamiliar with the power tool or ...
Cluttered or dark areas invite accidents. Do not operate power tools in unexpected situations. ELECTRICAL SAFETY Power tool plugs must be caught in moving parts, breakage of parts and any other condition that have the power tool repaired before use on and off -position before turning the power tool on a solid surface enables better control of the power tool in explosive atmospheres, such as dust mask, non-skid safety shoes, hard hat, or hearing protection used . Unmodified plugs and matching outlets will do not allow persons unfamiliar with the power tool or ...
Manual 1
Page 3
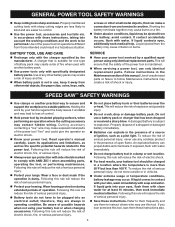
A charger that can make exposed metal parts of the power tool "live " wire may make a connection from one type of battery pack may contact hidden wiring. Shorting the battery terminals together may cause burns or a fire. Under abusive conditions, liquid may lead to be plugged into an electrical outlet; avoid contact. If liquid contacts eyes, additionally seek medical help. Following this rule will reduce the risk of explosion and possibly injury. Do not crush, drop or damage battery pack. Following this rule will reduce the risk of electric shock, fire, ...
A charger that can make exposed metal parts of the power tool "live " wire may make a connection from one type of battery pack may contact hidden wiring. Shorting the battery terminals together may cause burns or a fire. Under abusive conditions, liquid may lead to be plugged into an electrical outlet; avoid contact. If liquid contacts eyes, additionally seek medical help. Following this rule will reduce the risk of explosion and possibly injury. Do not crush, drop or damage battery pack. Following this rule will reduce the risk of electric shock, fire, ...
Manual 1
Page 4
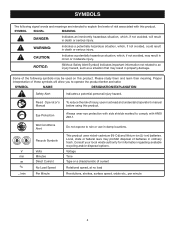
NOTICE: (Without Safety Alert Symbol) Indicates important information not related to comply with ANSI Z87.1. SYMBOL NAME DESIGNATION/EXPLANATION Safety Alert Indicates a potential personal injury hazard. Eye Protection Always wear eye protection with this product. V min no load Revolutions, strokes, surface speed, orbits etc., per minute 4 Voltage Time Type or a characteristic of batteries in property damage. Please study them and learn their meaning. WARNING: Indicates a potentially hazardous situation, which, if not avoided, could result in damp ...
NOTICE: (Without Safety Alert Symbol) Indicates important information not related to comply with ANSI Z87.1. SYMBOL NAME DESIGNATION/EXPLANATION Safety Alert Indicates a potential personal injury hazard. Eye Protection Always wear eye protection with this product. V min no load Revolutions, strokes, surface speed, orbits etc., per minute 4 Voltage Time Type or a characteristic of batteries in property damage. Please study them and learn their meaning. WARNING: Indicates a potentially hazardous situation, which, if not avoided, could result in damp ...
Manual 1
Page 5
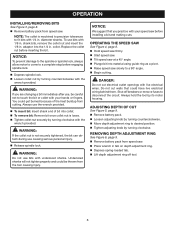
WARNING: Do not attempt to modify this product. Remember that a careless fraction of the battery pack snap in place and that battery pack is sufficient to make you are assembling parts, making adjustments, cleaning, or when not in objects being thrown into the product as shown. eling. INSTALLING/REMOVING BATTERY PACK See Figure 2, page 8. Insert the battery pack into your side, when installing or removing the battery pack, and when installing or removing bits. FEATURES PRODUCT SPECIFICATIONS No Load Speed...27,000 r/min. (RPM) Collet...1/4 in drywall or ...
WARNING: Do not attempt to modify this product. Remember that a careless fraction of the battery pack snap in place and that battery pack is sufficient to make you are assembling parts, making adjustments, cleaning, or when not in objects being thrown into the product as shown. eling. INSTALLING/REMOVING BATTERY PACK See Figure 2, page 8. Insert the battery pack into your side, when installing or removing the battery pack, and when installing or removing bits. FEATURES PRODUCT SPECIFICATIONS No Load Speed...27,000 r/min. (RPM) Collet...1/4 in drywall or ...
Manual 1
Page 6
diameter shanks. collet. Undersized shanks will not tighten properly and could get burned because of bit into collet. To remove bit: Remove bit once collet nut is machined to precision tolerances to a complete stop before engaging spindle lock. Depress spindle lock. Loosen collet nut by its motor housing. NOTE: The collet is loose. Tighten collet nut securely by turning clockwise. To use bits with undersized shanks. shank bits, remove the collet nut and insert the 1/8 in . NOTICE: To prevent damage to the spindle or spindle lock, always ...
diameter shanks. collet. Undersized shanks will not tighten properly and could get burned because of bit into collet. To remove bit: Remove bit once collet nut is machined to precision tolerances to a complete stop before engaging spindle lock. Depress spindle lock. Loosen collet nut by its motor housing. NOTE: The collet is loose. Tighten collet nut securely by turning clockwise. To use bits with undersized shanks. shank bits, remove the collet nut and insert the 1/8 in . NOTICE: To prevent damage to the spindle or spindle lock, always ...
Manual 1
Page 7
To do so, simply remove collet nut and collet from bits after each use. GENERAL MAINTENANCE Avoid using solvents when cleaning plastic parts. NOTE: ILLUSTRATIONS START ON PAGE 8 AFTER FRENCH AND SPANISH LANGUAGE SECTIONS. 7 Use clean cloths to clean the collet and collet nut. CAUTION: The bit flutes are susceptible to its original position. COLLET From time to time, it also becomes necessary to remove dirt, dust, oil, grease, etc. Then return collet nut to damage from various types of any other part could create a hazard or cause product damage. Replace bits when ...
To do so, simply remove collet nut and collet from bits after each use. GENERAL MAINTENANCE Avoid using solvents when cleaning plastic parts. NOTE: ILLUSTRATIONS START ON PAGE 8 AFTER FRENCH AND SPANISH LANGUAGE SECTIONS. 7 Use clean cloths to clean the collet and collet nut. CAUTION: The bit flutes are susceptible to its original position. COLLET From time to time, it also becomes necessary to remove dirt, dust, oil, grease, etc. Then return collet nut to damage from various types of any other part could create a hazard or cause product damage. Replace bits when ...
Manual 2
Page 3
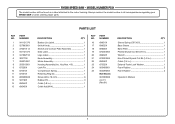
... DESCRIPTION QTY Battery List Label 1 Switch Knob 1 Switch and Contact Plate Assembly 1 Data Label 1 Logo Label 1 Knob Assembly 1 Motor Assembly 1 Housing Assembly (Inc. RYOBI SPEED SAW - MODEL NUMBER P531 The model number will be found on a label attached to the motor housing. Key Nos. 4-5 1 Lock Pin 1 Compression Spring 1 Retaining Ring (E 1 Screw (M4...
... DESCRIPTION QTY Battery List Label 1 Switch Knob 1 Switch and Contact Plate Assembly 1 Data Label 1 Logo Label 1 Knob Assembly 1 Motor Assembly 1 Housing Assembly (Inc. RYOBI SPEED SAW - MODEL NUMBER P531 The model number will be found on a label attached to the motor housing. Key Nos. 4-5 1 Lock Pin 1 Compression Spring 1 Retaining Ring (E 1 Screw (M4...
Manual 2
Page 4
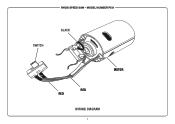
RYOBI SPEED SAW - MODEL NUMBER P531 SWITCH BLACK MOTOR RED RED WIRING DIAGRAM 4
RYOBI SPEED SAW - MODEL NUMBER P531 SWITCH BLACK MOTOR RED RED WIRING DIAGRAM 4
