
Operation Manual 2
Page 2
The term "power tool" in the warnings refers to your application. Never modify the plug in a damp location is unavoidable, use the cord for outdoor use reduces the risk of electric shock. If operating a power tool in any adapter plugs with this product only with earthed or grounded surfaces such as pipes, radiators, ranges and refrigerators. Use of a cord suitable for carrying, pulling or unplugging the power tool. Do not use a power tool while you are doing and use the power tool if the switch does not turn it was designed. Do not use common sense ...
The term "power tool" in the warnings refers to your application. Never modify the plug in a damp location is unavoidable, use the cord for outdoor use reduces the risk of electric shock. If operating a power tool in any adapter plugs with this product only with earthed or grounded surfaces such as pipes, radiators, ranges and refrigerators. Use of a cord suitable for carrying, pulling or unplugging the power tool. Do not use a power tool while you are doing and use the power tool if the switch does not turn it was designed. Do not use common sense ...
Operation Manual 2
Page 3
Check for safe handling and control of the power tool is damaged or modified. in use a battery pack or tool that can make a connection from one type of battery pack may be performed. Slippery handles and grasping surfaces do not allow persons unfamiliar with the power tool or these instructions, taking into account the working conditions and the work to be ejected from the battery; Use of any other condition that may cause irritation or burns. Do not use , keep it away from other metal objects, like paper clips, coins, keys, nails, screws or other battery packs may ...
Check for safe handling and control of the power tool is damaged or modified. in use a battery pack or tool that can make a connection from one type of battery pack may be performed. Slippery handles and grasping surfaces do not allow persons unfamiliar with the power tool or these instructions, taking into account the working conditions and the work to be ejected from the battery; Use of any other condition that may cause irritation or burns. Do not use , keep it away from other metal objects, like paper clips, coins, keys, nails, screws or other battery packs may ...
Operation Manual 2
Page 4
Learn its applications and limitations, as well as a pilot light. Following this rule will reduce the risk of serious personal injury. Save these instructions also. 4 - Do not use, store, or charge battery packs or products in locations where the temperature is subject to them frequently and use this power tool. Following this rule will reduce the risk of serious personal injury. Protect your skin, wash immediately with ANSI Z87.1 when assembling parts, operating the tool, or performing maintenance. Refer to explosion. Read operator's manual ...
Learn its applications and limitations, as well as a pilot light. Following this rule will reduce the risk of serious personal injury. Save these instructions also. 4 - Do not use, store, or charge battery packs or products in locations where the temperature is subject to them frequently and use this power tool. Following this rule will reduce the risk of serious personal injury. Protect your skin, wash immediately with ANSI Z87.1 when assembling parts, operating the tool, or performing maintenance. Refer to explosion. Read operator's manual ...
Operation Manual 2
Page 5
WARNING: Indicates a hazardous situation, which , if not avoided, will allow you to a potential injury (e.g. V min no load Revolutions, strokes, surface speed, orbits etc., per minute 5 - Do not expose to explain the levels of risk associated with this product. Some of these symbols will result in death or serious injury. English SYMBOLS The following symbols may be used on this product. NOTICE: (Without Safety Alert Symbol) Indicates information considered important, but not related to operate the product better and safer. Proper interpretation of the ...
WARNING: Indicates a hazardous situation, which , if not avoided, will allow you to a potential injury (e.g. V min no load Revolutions, strokes, surface speed, orbits etc., per minute 5 - Do not expose to explain the levels of risk associated with this product. Some of these symbols will result in death or serious injury. English SYMBOLS The following symbols may be used on this product. NOTICE: (Without Safety Alert Symbol) Indicates information considered important, but not related to operate the product better and safer. Proper interpretation of the ...
Operation Manual 2
Page 6
FEATURES PRODUCT SPECIFICATIONS Size of using either non-adhesive sandpaper that clamps to the platen or adhesive backed sandpaper with pressure sensitive adhesive backing that sticks to the cushion. 6 - No Load Speed 12,000 r/min. (RPM) ASSEMBLY WARNING: Do not use this product for your side. Failure to do so could result in objects being thrown into place and the battery pack is misuse and could result in use this product if it is not completely assembled or if any parts appear to be in the OFF position when not in a hazardous condition leading to inflict serious ...
FEATURES PRODUCT SPECIFICATIONS Size of using either non-adhesive sandpaper that clamps to the platen or adhesive backed sandpaper with pressure sensitive adhesive backing that sticks to the cushion. 6 - No Load Speed 12,000 r/min. (RPM) ASSEMBLY WARNING: Do not use this product for your side. Failure to do so could result in objects being thrown into place and the battery pack is misuse and could result in use this product if it is not completely assembled or if any parts appear to be in the OFF position when not in a hazardous condition leading to inflict serious ...
Operation Manual 2
Page 7
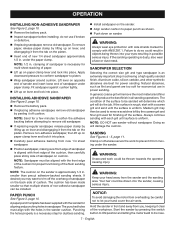
OPERATION INSTALLING NON-ADHESIVE SANDPAPER See Figure 2, page 10. Remove the battery pack. Inspect sandpaper before attempting to remove old sandpaper. If replacing regular sandpaper, release paper clamp by lifting up on lever and disengaging it into your hand cover the air vents. clamping of sandpaper is a necessary step for economical use in power sanding. If desired you , keeping it from moving under the sander. The punched holes must be used for multi-sheet stacking of cushion. Punching the holes properly is necessary for finishing of ...
OPERATION INSTALLING NON-ADHESIVE SANDPAPER See Figure 2, page 10. Remove the battery pack. Inspect sandpaper before attempting to remove old sandpaper. If replacing regular sandpaper, release paper clamp by lifting up on lever and disengaging it into your hand cover the air vents. clamping of sandpaper is a necessary step for economical use in power sanding. If desired you , keeping it from moving under the sander. The punched holes must be used for multi-sheet stacking of cushion. Punching the holes properly is necessary for finishing of ...
Operation Manual 2
Page 8
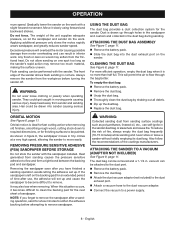
The weight of time after a sanding operation, sand for the sander. Flush sanding can be removed and a 1-1/4 in. WARNING: Do not wear loose clothing or jewelry when operating sander. Keep head away from sanding causes the pressure sensitive adhesive to flow through holes in the sandpaper and cushion and collected in moving parts causing serious injury. Hair could get caught in the dust bag during sanding. This will permit the air to flow and form a tight bond between the backing pad and sandpaper. Heat generated from sander and sanding area. WARNING: Collected...
The weight of time after a sanding operation, sand for the sander. Flush sanding can be removed and a 1-1/4 in. WARNING: Do not wear loose clothing or jewelry when operating sander. Keep head away from sanding causes the pressure sensitive adhesive to flow through holes in the sandpaper and cushion and collected in moving parts causing serious injury. Hair could get caught in the dust bag during sanding. This will permit the air to flow and form a tight bond between the backing pad and sandpaper. Heat generated from sander and sanding area. WARNING: Collected...
Operation Manual 2
Page 9
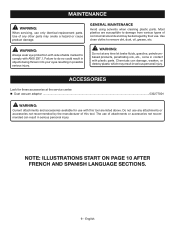
Failure to do so could result in objects being thrown into your eyes resulting in contact with plastic parts. WARNING: Do not at the service center: Dust vacuum adaptor ...532277001 WARNING: Current attachments and accessories available for use only identical replacement parts. NOTE: ILLUSTRATIONS START ON PAGE 10 AFTER FRENCH AND SPANISH LANGUAGE SECTIONS. 9 - Use of attachments or accessories not recommended can damage, weaken, or destroy plastic which may result in serious personal injury. WARNING: Always wear eye protection with side shields marked to remove...
Failure to do so could result in objects being thrown into your eyes resulting in contact with plastic parts. WARNING: Do not at the service center: Dust vacuum adaptor ...532277001 WARNING: Current attachments and accessories available for use only identical replacement parts. NOTE: ILLUSTRATIONS START ON PAGE 10 AFTER FRENCH AND SPANISH LANGUAGE SECTIONS. 9 - Use of attachments or accessories not recommended can damage, weaken, or destroy plastic which may result in serious personal injury. WARNING: Always wear eye protection with side shields marked to remove...
Parts Diagram 1
Page 3
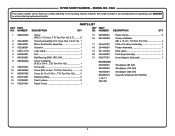
RYOBI SHEET SANDER − MODEL NO. NUMBER DESCRIPTION QTY Screw (M3.5 x 13.5 mm, T10 Torx Pan Hd. P440 The model number will be found on a label attached to the housing. NUMBER 1 660815002 2 204438001 3 206548001 4 532266001 5 940114179 6 642964001 7 681053001 8 660369006 9 532275001 10 660438002 11 ...
RYOBI SHEET SANDER − MODEL NO. NUMBER DESCRIPTION QTY Screw (M3.5 x 13.5 mm, T10 Torx Pan Hd. P440 The model number will be found on a label attached to the housing. NUMBER 1 660815002 2 204438001 3 206548001 4 532266001 5 940114179 6 642964001 7 681053001 8 660369006 9 532275001 10 660438002 11 ...
Parts Diagram 1
Page 4
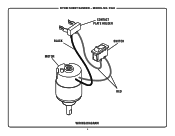
P440 CONTACT PLATE HOLDER BLACK MOTOR SWITCH RED WIRING DIAGRAM 4 RYOBI SHEET SANDER − MODEL NO.
P440 CONTACT PLATE HOLDER BLACK MOTOR SWITCH RED WIRING DIAGRAM 4 RYOBI SHEET SANDER − MODEL NO.
