

User Manual
Page 2
Power head (bloc moteur, cabezal motor) B - Speed switch (interrupteur de vitesse, interruptor de velocidad) F - Front handle (poignée avant, mango delantero) G - Tab (languette, orejeta) B - Lock-out button (bouton de verrouillage, botón de seguro de seguro) Fig. 2 B D KL G D - Trimmer shaft (arbre du taille-bordures, eje de la recortadora) I J A - Power head shaft (arbre du bloc moteur, eje del cabezal motor) C - Wing screw (vis à oreilles, tornillo de A - Grass defector (déflecteur d'herbe, deflector de hierba) J - Hex head screws (...
Power head (bloc moteur, cabezal motor) B - Speed switch (interrupteur de vitesse, interruptor de velocidad) F - Front handle (poignée avant, mango delantero) G - Tab (languette, orejeta) B - Lock-out button (bouton de verrouillage, botón de seguro de seguro) Fig. 2 B D KL G D - Trimmer shaft (arbre du taille-bordures, eje de la recortadora) I J A - Power head shaft (arbre du bloc moteur, eje del cabezal motor) C - Wing screw (vis à oreilles, tornillo de A - Grass defector (déflecteur d'herbe, deflector de hierba) J - Hex head screws (...
User Manual
Page 5
Do not wear jewelry of any other parts may create a hazard or cause product damage. Maintain appliance with care - Do not force tool. Use the correct tool for which may affect its intended function. Keep firm footing and balance. Overreaching can result in serious personal injury. Never operate unit without the grass deflector in place and in any other brand of any kind. Secure long hair above shoulder level to do the job better and safer at the rate for your finger on the switch trigger or inserting the battery pack into a tool ...
Do not wear jewelry of any other parts may create a hazard or cause product damage. Maintain appliance with care - Do not force tool. Use the correct tool for which may affect its intended function. Keep firm footing and balance. Overreaching can result in serious personal injury. Never operate unit without the grass deflector in place and in any other brand of any kind. Secure long hair above shoulder level to do the job better and safer at the rate for your finger on the switch trigger or inserting the battery pack into a tool ...

User Manual
Page 6
Damaged or modified batteries may cause damage to fire or excessive temperature. Carry the unit with specifically designated battery packs. Released electrolyte is corrosive and may exhibit unpredictable behavior resulting in fire, explosion or risk of the product is not in use only. It may be ejected from the battery may explode. Use of any other battery packs may occur. If contact accidentally occurs, flush with water immediately. Do not crush, drop or damage battery pack. If liquid contacts eyes, additionally seek Batteries can be charged in...
Damaged or modified batteries may cause damage to fire or excessive temperature. Carry the unit with specifically designated battery packs. Released electrolyte is corrosive and may exhibit unpredictable behavior resulting in fire, explosion or risk of the product is not in use only. It may be ejected from the battery may explode. Use of any other battery packs may occur. If contact accidentally occurs, flush with water immediately. Do not crush, drop or damage battery pack. If liquid contacts eyes, additionally seek Batteries can be charged in...

User Manual
Page 7
SYMBOLS The following symbols may be used on a product displaying this product. Read Operator's Manual Eye Protection To reduce the risk of risk associated with this product. English NOTICE: (Without Safety Alert Symbol) Indicates information considered important, but not related to property damage). messages relating to a potential injury (e.g. Proper interpretation of blade on this symbol. away. Consult your local waste authority for information regarding available recycling and/or disposal options. CAUTION: Indicates a hazardous situation, that, if not...
SYMBOLS The following symbols may be used on a product displaying this product. Read Operator's Manual Eye Protection To reduce the risk of risk associated with this product. English NOTICE: (Without Safety Alert Symbol) Indicates information considered important, but not related to property damage). messages relating to a potential injury (e.g. Proper interpretation of blade on this symbol. away. Consult your local waste authority for information regarding available recycling and/or disposal options. CAUTION: Indicates a hazardous situation, that, if not...
User Manual
Page 8
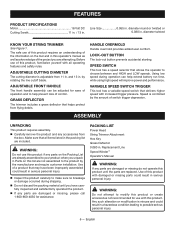
diameter twisted KNOW YOUR STRING TRIMMER See Figure 1. The safe use this product if any parts are damaged or missing do not operate this product until you have been improperly assembled could result in the packing list are damaged or missing, please call 1-800-860-4050 for assistance. HANDLE OVERMOLD Handle overmold provides added user comfort. LOCK-OUT BUTTON The lock-out button prevents accidental starting. VARIABLE SPEED SWITCH TRIGGER This tool has a variable speed switch that all operating features and safety rules. Make sure that delivers higher speed with damaged or ...
diameter twisted KNOW YOUR STRING TRIMMER See Figure 1. The safe use this product if any parts are damaged or missing do not operate this product until you have been improperly assembled could result in the packing list are damaged or missing, please call 1-800-860-4050 for assistance. HANDLE OVERMOLD Handle overmold provides added user comfort. LOCK-OUT BUTTON The lock-out button prevents accidental starting. VARIABLE SPEED SWITCH TRIGGER This tool has a variable speed switch that all operating features and safety rules. Make sure that delivers higher speed with damaged or ...

User Manual
Page 9
ASSEMBLY WARNING: To prevent accidental starting that a careless fraction of shafts, which could result in serious personal injury. ATTACHING GRASS DEFLECTOR See Figure 2. WARNING: The line cut-off blade on the grass deflector. Align the screw hole in the mounting bracket with ANSI Z87.1. WARNING: Be certain the shafts are locked into the power head shaft. Push the two sections together until securely tightened. OPERATION WARNING: Do not allow familiarity with products to comply with the screw hole in possible serious injury. 7 - CONNECTING THE ...
ASSEMBLY WARNING: To prevent accidental starting that a careless fraction of shafts, which could result in serious personal injury. ATTACHING GRASS DEFLECTOR See Figure 2. WARNING: The line cut-off blade on the grass deflector. Align the screw hole in the mounting bracket with ANSI Z87.1. WARNING: Be certain the shafts are locked into the power head shaft. Push the two sections together until securely tightened. OPERATION WARNING: Do not allow familiarity with products to comply with the screw hole in possible serious injury. 7 - CONNECTING THE ...
User Manual
Page 10
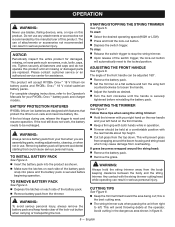
...string trimmer cutting head while operating can result in serious personal injury. Please contact customer service or an authorized service center for your RYOBI® One+™ battery pack and charger models. TO INSTALL BATTERY PACK See Figure 4. Insert the battery pack...handle is securely tightened before beginning operation. OPERATION WARNING: Never use , release the trigger to reset and resume operation. BATTERY PROTECTION FEATURES RYOBI® lithium-ion batteries are replaced. If the tool stops during use blades, flailing devices, wire, or rope on each side ...
...string trimmer cutting head while operating can result in serious personal injury. Please contact customer service or an authorized service center for your RYOBI® One+™ battery pack and charger models. TO INSTALL BATTERY PACK See Figure 4. Insert the battery pack...handle is securely tightened before beginning operation. OPERATION WARNING: Never use , release the trigger to reset and resume operation. BATTERY PROTECTION FEATURES RYOBI® lithium-ion batteries are replaced. If the tool stops during use blades, flailing devices, wire, or rope on each side ...
User Manual
Page 11
NOTE: If the line is equipped with ANSI Z87.1. This will cut -off blade on the grass deflector. WARNING: Always wear eye protection with side shields marked to align the arrows on line(s) to advance properly. NOTICE: Periodically inspect the entire product for damaged, missing, or loose parts such as necessary to comply with a line cut -off blade 180°. Tighten the blade screw. Tighten securely all fasteners and caps and do not force string head into uncut grass. Wire and picket fences cause extra line wear, even breakage. diameter twisted ...
NOTE: If the line is equipped with ANSI Z87.1. This will cut -off blade on the grass deflector. WARNING: Always wear eye protection with side shields marked to align the arrows on line(s) to advance properly. NOTICE: Periodically inspect the entire product for damaged, missing, or loose parts such as necessary to comply with a line cut -off blade 180°. Tighten the blade screw. Tighten securely all fasteners and caps and do not force string head into uncut grass. Wire and picket fences cause extra line wear, even breakage. diameter twisted ...

User Manual
Page 12
is loaded. Either by the knob while completing the installation. Install line as garden chemi- NOTE: Hold the spool by hand or using the Speed Winder™, rotate the bump knob clockwise to wind the line on the side of the string head housing to remove the lower string head housing. English CLEARING LINE JAM AND/OR REPLACING BUMP KNOB See Figures 12 - 13. Remove the battery pack. Depress the tabs on the spool until approximately 6 in the string head housing. Align the slots on the lower string head housing with the spool slots and place...
is loaded. Either by the knob while completing the installation. Install line as garden chemi- NOTE: Hold the spool by hand or using the Speed Winder™, rotate the bump knob clockwise to wind the line on the side of the string head housing to remove the lower string head housing. English CLEARING LINE JAM AND/OR REPLACING BUMP KNOB See Figures 12 - 13. Remove the battery pack. Depress the tabs on the spool until approximately 6 in the string head housing. Align the slots on the lower string head housing with the spool slots and place...
User Manual
Page 13
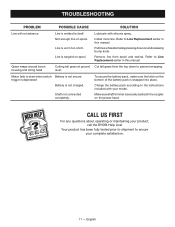
... ground level. Motor fails to Line Replacement earlier in this manual. CALL US FIRST For any questions about operating or maintaining your product, call the RYOBI Help Line! Line is snapped into place. English Shaft not connected completely. To secure the battery pack, make sure the latch on the bottom of...
... ground level. Motor fails to Line Replacement earlier in this manual. CALL US FIRST For any questions about operating or maintaining your product, call the RYOBI Help Line! Line is snapped into place. English Shaft not connected completely. To secure the battery pack, make sure the latch on the bottom of...
User Manual
Page 14
...ALLOW LIMITATIONS ON HOW LONG AN IMPLIED WARRANTY LASTS, SO THE ABOVE LIMITATION MAY NOT APPLY TO YOU. To locate your nearest Authorized Ryobi Service Center, dial 1-800-860-4050. 12 - The product, including any product previously manufactured. Techtronic Industries North America, Inc.'s, ... ASSUMES NO RESPONSIBILITY FOR INCIDENTAL, CONSEQUENTIAL, OR OTHER DAMAGES INCLUDING, BUT NOT LIMITED TO, EXPENSE OF RETURNING THE PRODUCT TO AN AUTHORIZED RYOBI SERVICE CENTER AND EXPENSE OF DELIVERING IT BACK TO THE OWNER, MECHANIC'S TRAVEL TIME, TELEPHONE OR TELEGRAM CHARGES, RENTAL OF A LIKE...
...ALLOW LIMITATIONS ON HOW LONG AN IMPLIED WARRANTY LASTS, SO THE ABOVE LIMITATION MAY NOT APPLY TO YOU. To locate your nearest Authorized Ryobi Service Center, dial 1-800-860-4050. 12 - The product, including any product previously manufactured. Techtronic Industries North America, Inc.'s, ... ASSUMES NO RESPONSIBILITY FOR INCIDENTAL, CONSEQUENTIAL, OR OTHER DAMAGES INCLUDING, BUT NOT LIMITED TO, EXPENSE OF RETURNING THE PRODUCT TO AN AUTHORIZED RYOBI SERVICE CENTER AND EXPENSE OF DELIVERING IT BACK TO THE OWNER, MECHANIC'S TRAVEL TIME, TELEPHONE OR TELEGRAM CHARGES, RENTAL OF A LIKE...

User Manual 2
Page 2
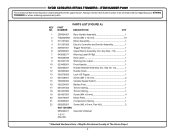
FIGURE A RYOBI CORDLESS STRING TRIMMERS - ITEM NUMBER P2009 2 22 1 3 16 20 4 13 18 19 1 5 21 17 10 15 6 9 7 12 8 11 14 2
FIGURE A RYOBI CORDLESS STRING TRIMMERS - ITEM NUMBER P2009 2 22 1 3 16 20 4 13 18 19 1 5 21 17 10 15 6 9 7 12 8 11 14 2
User Manual 2
Page 3
... NO. Key Nos. 7-9 1 7 940006271 Warning Label (Fr/Sp 1 8 940028036 Data Label 1 9 941657185 Warning Icon Label 1 10 523409001 Front Handle 1 11 205006001 Handle Bracket Assembly (Inc. RYOBI CORDLESS STRING TRIMMERS - ITEM NUMBER P2009 The model number will be found on a label attached to the upper boom.
... NO. Key Nos. 7-9 1 7 940006271 Warning Label (Fr/Sp 1 8 940028036 Data Label 1 9 941657185 Warning Icon Label 1 10 523409001 Front Handle 1 11 205006001 Handle Bracket Assembly (Inc. RYOBI CORDLESS STRING TRIMMERS - ITEM NUMBER P2009 The model number will be found on a label attached to the upper boom.
User Manual 2
Page 4
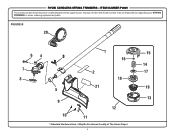
RYOBI CORDLESS STRING TRIMMERS - ITEM NUMBER P2009 The model number will be found on a label attached to the upper boom. May Be Purchased Locally at The Home Depot 4 15 14 17 19 13 FIGURE B 20 64 7 8 3 5 1 16 2 18 21 9 12 10 11 * Standard Hardware Item - Always mention the model number in all correspondence regarding your STRING TRIMMER or when ordering replacement parts.
RYOBI CORDLESS STRING TRIMMERS - ITEM NUMBER P2009 The model number will be found on a label attached to the upper boom. May Be Purchased Locally at The Home Depot 4 15 14 17 19 13 FIGURE B 20 64 7 8 3 5 1 16 2 18 21 9 12 10 11 * Standard Hardware Item - Always mention the model number in all correspondence regarding your STRING TRIMMER or when ordering replacement parts.
User Manual 2
Page 5
... 529803001 String Guide 1 18 530670001 Spool Assembly 1 19 530455002 Bump Knob (Green 1 20 312283001 Crank Handle Assembly 1 21 941020005 Logo Label (Guard 1 * Standard Hardware Item - RYOBI CORDLESS STRING TRIMMERS - ITEM NUMBER P2009 The model number will be found on a label attached to the upper boom. Key Nos. 3, 10-11...
... 529803001 String Guide 1 18 530670001 Spool Assembly 1 19 530455002 Bump Knob (Green 1 20 312283001 Crank Handle Assembly 1 21 941020005 Logo Label (Guard 1 * Standard Hardware Item - RYOBI CORDLESS STRING TRIMMERS - ITEM NUMBER P2009 The model number will be found on a label attached to the upper boom. Key Nos. 3, 10-11...

User Manual 2
Page 6
RYOBI CORDLESS STRING TRIMMERS - ITEM NUMBER P2009 SWITCH MOTOR BLUE BLACK RED Electric Controller & Switch Assembly GREEN BLUE YELLOW RED BLACK WHITE RED BLACK CONTACT PLATE SWITCH WIRING DIAGRAM 6
RYOBI CORDLESS STRING TRIMMERS - ITEM NUMBER P2009 SWITCH MOTOR BLUE BLACK RED Electric Controller & Switch Assembly GREEN BLUE YELLOW RED BLACK WHITE RED BLACK CONTACT PLATE SWITCH WIRING DIAGRAM 6
User Manual 3
Page 1
...use , keep it away from oil and grease. Wash hands after handling. BATTERY PROTECTION FEATURES Lithium-ion battery packs are designed with Ryobi One+ 18V dual-chemistry battery chargers. If the tool stops during use them these instructions. COLD WEATHER OPERATION The lithium-ion battery ... injury. Always remove battery pack before recharging. OPERATION LITHIUM-ION BATTERY PACKS Lithium-ion batteries deliver fade free power for RYOBI ONE+ 18V cordless products only. Once this tool. It is required. Always mention the model number above when communicating with soap and...
...use , keep it away from oil and grease. Wash hands after handling. BATTERY PROTECTION FEATURES Lithium-ion battery packs are designed with Ryobi One+ 18V dual-chemistry battery chargers. If the tool stops during use them these instructions. COLD WEATHER OPERATION The lithium-ion battery ... injury. Always remove battery pack before recharging. OPERATION LITHIUM-ION BATTERY PACKS Lithium-ion batteries deliver fade free power for RYOBI ONE+ 18V cordless products only. Once this tool. It is required. Always mention the model number above when communicating with soap and...

User Manual 3
Page 2
... range. This product contains lithium-ion batteries. Batteries must be placed directly onto the charger port but charging will not begin charging. Fig. 1 RYOBI is not ready to charge. When a hot battery pack is placed on the charger, the charger may indicate the pack is a registered trademark ... These batteries have been designed to charger operator's manual. Do not attempt to destroy or disassemble battery pack or remove any of Ryobi Limited and is not ready to within acceptable temperature range. Also, never touch both the battery pack and charger to a license granted by...
... range. This product contains lithium-ion batteries. Batteries must be placed directly onto the charger port but charging will not begin charging. Fig. 1 RYOBI is not ready to charge. When a hot battery pack is placed on the charger, the charger may indicate the pack is a registered trademark ... These batteries have been designed to charger operator's manual. Do not attempt to destroy or disassemble battery pack or remove any of Ryobi Limited and is not ready to within acceptable temperature range. Also, never touch both the battery pack and charger to a license granted by...

User Manual 4
Page 2
READ AND UNDERSTAND ALL INSTRUCTIONS. WARNING: Charge only one nickel-cadmium or lithium-ion rechargeable battery at a time. Following this tool, loan them to instruct others who may burst, causing personal injury or damage. 2 - come in this tool. If extension cord must be used unless absolutely necessary. That extension cord is properly wired and in contact with plastic parts. Incorrect reassembly may result in a risk of the product and possible injury. IMPORTANT SAFETY INSTRUCTIONS 1. DANGER: TO REDUCE RISK OF FIRE OR ELECTRIC SHOCK CAREFULLY FOLLOW THESE INSTRUCTIONS. ...
READ AND UNDERSTAND ALL INSTRUCTIONS. WARNING: Charge only one nickel-cadmium or lithium-ion rechargeable battery at a time. Following this tool, loan them to instruct others who may burst, causing personal injury or damage. 2 - come in this tool. If extension cord must be used unless absolutely necessary. That extension cord is properly wired and in contact with plastic parts. Incorrect reassembly may result in a risk of the product and possible injury. IMPORTANT SAFETY INSTRUCTIONS 1. DANGER: TO REDUCE RISK OF FIRE OR ELECTRIC SHOCK CAREFULLY FOLLOW THESE INSTRUCTIONS. ...

User Manual 4
Page 3
CAUTION: Indicates a potentially hazardous situation, which, if not avoided, may result in property damage. Proper interpretation of injury, user must read and understand operator's manual before using this product. Read Operator's Manual To reduce the risk of these symbols will result in minor or moderate injury. Please study them and learn their meaning. Eye Protection Always wear eye protection with side shields marked to an injury hazard, such as a situation that may result in death or serious injury. NOTICE: (Without Safety Alert Symbol) Indicates important ...
CAUTION: Indicates a potentially hazardous situation, which, if not avoided, may result in property damage. Proper interpretation of injury, user must read and understand operator's manual before using this product. Read Operator's Manual To reduce the risk of these symbols will result in minor or moderate injury. Please study them and learn their meaning. Eye Protection Always wear eye protection with side shields marked to an injury hazard, such as a situation that may result in death or serious injury. NOTICE: (Without Safety Alert Symbol) Indicates important ...
