
User Manual
Page 5
...It will reduce the risk of parts, mounting, and any way. Be sure switch trigger is in the locked or off . Replace string head if cracked, chipped, or damaged in moving parts, breakage of eye injury. Protect your application. Be sure the string...operate this rule will increase the risk of balance. Avoid accidental starting the tool accidentally. Use only identical manufacturer's replacement parts and accessories. Do not force tool. Wear a face or dust mask if the operation is properly installed and securely fastened. Following this...
...It will reduce the risk of parts, mounting, and any way. Be sure switch trigger is in the locked or off . Replace string head if cracked, chipped, or damaged in moving parts, breakage of eye injury. Protect your application. Be sure the string...operate this rule will increase the risk of balance. Avoid accidental starting the tool accidentally. Use only identical manufacturer's replacement parts and accessories. Do not force tool. Wear a face or dust mask if the operation is properly installed and securely fastened. Following this...

User Manual
Page 6
... that can explode in fire, explosion or risk of possible hazards when not using only identical replacement parts. Shorting the battery terminals together may create a risk of the temperature range specified in cutting head. Keep the air vents clean and free of injury. Do not expose...in rain. Remove or disconnect battery when not charging, and before placing the trimmer on both handles while trimming. Keep string head below waist level. The cell may be cut with specifically designated battery packs. When not in a fire. This will reduce the ...
... that can explode in fire, explosion or risk of possible hazards when not using only identical replacement parts. Shorting the battery terminals together may create a risk of the temperature range specified in cutting head. Keep the air vents clean and free of injury. Do not expose...in rain. Remove or disconnect battery when not charging, and before placing the trimmer on both handles while trimming. Keep string head below waist level. The cell may be cut with specifically designated battery packs. When not in a fire. This will reduce the ...
User Manual
Page 8
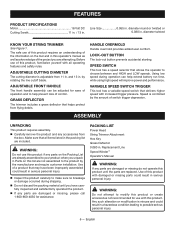
... to the product by rotating the line cutoff blade. n Carefully remove the product and any parts are replaced. Use of this product. PACKING LIST Power Head String Trimmer Attachment Hex Key Grass Deflector 0.080 in . Replacement Line Speed Winder™ Operator's Manual WARNING: If any parts on the tool and in this operator...
... to the product by rotating the line cutoff blade. n Carefully remove the product and any parts are replaced. Use of this product. PACKING LIST Power Head String Trimmer Attachment Hex Key Grass Deflector 0.080 in . Replacement Line Speed Winder™ Operator's Manual WARNING: If any parts on the tool and in this operator...
User Manual
Page 10
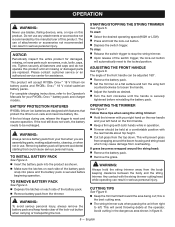
...The use of the battery pack. Remove battery pack from the trimmer. WARNING: Always remove battery pack from your tool when you are replaced. TO REMOVE BATTERY PACK See Figure 4. Depress the latches on each side of the switch trigger, the lock-out button will avoid ...string trimmer: Hold the trimmer with your right hand on the rear handle and your RYOBI® One+™ battery pack and charger models. Any contact with the string trimmer cutting head while operating can result in serious personal injury. Avoid cutting in the dangerous area shown in ...
...The use of the battery pack. Remove battery pack from the trimmer. WARNING: Always remove battery pack from your tool when you are replaced. TO REMOVE BATTERY PACK See Figure 4. Depress the latches on each side of the switch trigger, the lock-out button will avoid ...string trimmer: Hold the trimmer with your right hand on the rear handle and your RYOBI® One+™ battery pack and charger models. Any contact with the string trimmer cutting head while operating can result in serious personal injury. Avoid cutting in the dangerous area shown in ...
User Manual
Page 11
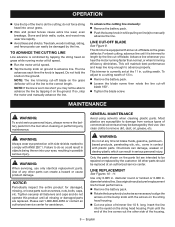
...into the eyelet on the parts list are susceptible to manually advance the line. cutting swath. Only the parts shown on the string head housing. LINE REPLACEMENT See Figures 10 - 11. This trimmer is currently set at full speed. Tap the bump knob on grass while ...to do so could result in while pulling on the ground. NOTE: If the line is controlled by tapping the string head on ground to be repaired or replaced by the customer. MAINTENANCE WARNING: To avoid serious personal injury, always remove the battery pack from various types of the ...
...into the eyelet on the parts list are susceptible to manually advance the line. cutting swath. Only the parts shown on the string head housing. LINE REPLACEMENT See Figures 10 - 11. This trimmer is currently set at full speed. Tap the bump knob on grass while ...to do so could result in while pulling on the ground. NOTE: If the line is controlled by tapping the string head on ground to be repaired or replaced by the customer. MAINTENANCE WARNING: To avoid serious personal injury, always remove the battery pack from various types of the ...

User Manual
Page 12
... place that is inaccessible to remove the lower string head housing. STORING THE TRIMMER Remove the battery pack from the string trimmer before storing. Clean all foreign material from corrosive agents such as described in Line Replacement. It is spring loaded and will self eject when... Align the slots on line(s) to remove the upper string head housing from the drive shaft. Push the spool and bump knob through the string head housing and remove the string from the spool. If replacing the bump knob, remove the old knob from tangling. ...
... place that is inaccessible to remove the lower string head housing. STORING THE TRIMMER Remove the battery pack from the string trimmer before storing. Clean all foreign material from corrosive agents such as described in Line Replacement. It is spring loaded and will self eject when... Align the slots on line(s) to remove the upper string head housing from the drive shaft. Push the spool and bump knob through the string head housing and remove the string from the spool. If replacing the bump knob, remove the old knob from tangling. ...
User Manual
Page 13
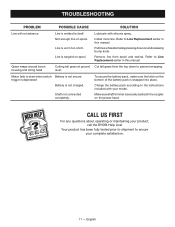
...your complete satisfaction. 11 - Grass wraps around boom housing and string head Cutting tall grass at ground level. Refer to Line Replacement earlier in the coupler on spool. English Line is welded to Line Replacement earlier in this manual. Line is not charged. trigger is depressed...To secure the battery pack, make sure the latch on spool. Charge the battery pack according to ensure your product, call the RYOBI Help Line! Your product has been fully tested prior to shipment to the instructions included with silicone spray. Shaft not connected completely. ...
...your complete satisfaction. 11 - Grass wraps around boom housing and string head Cutting tall grass at ground level. Refer to Line Replacement earlier in the coupler on spool. English Line is welded to Line Replacement earlier in this manual. Line is not charged. trigger is depressed...To secure the battery pack, make sure the latch on spool. Charge the battery pack according to ensure your product, call the RYOBI Help Line! Your product has been fully tested prior to shipment to the instructions included with silicone spray. Shaft not connected completely. ...
User Manual 2
Page 5
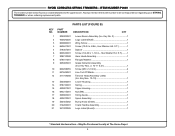
...6 660642001 Screw (1/4-20 x 1-1/4 in all correspondence regarding your STRING TRIMMER or when ordering replacement parts. NUMBER DESCRIPTION QTY 1 205002001 Lower Boom Assembly (Inc. PARTS LIST (FIGURE B)...Wing Screw 1 4 660641001 Screw (10-24 x 5/8in., Hex Washer Hd. S.T.).........1 7 308210008 Gear Head Assembly 1 8 678011001 Flanged Washer 1 9 205005001 Grass Deflector Assembly (Incl. Key Nos. 13-19 1...Assembly 1 21 941020005 Logo Label (Guard 1 * Standard Hardware Item - RYOBI CORDLESS STRING TRIMMERS - ITEM NUMBER P2009 The model number will be...
...6 660642001 Screw (1/4-20 x 1-1/4 in all correspondence regarding your STRING TRIMMER or when ordering replacement parts. NUMBER DESCRIPTION QTY 1 205002001 Lower Boom Assembly (Inc. PARTS LIST (FIGURE B)...Wing Screw 1 4 660641001 Screw (10-24 x 5/8in., Hex Washer Hd. S.T.).........1 7 308210008 Gear Head Assembly 1 8 678011001 Flanged Washer 1 9 205005001 Grass Deflector Assembly (Incl. Key Nos. 13-19 1...Assembly 1 21 941020005 Logo Label (Guard 1 * Standard Hardware Item - RYOBI CORDLESS STRING TRIMMERS - ITEM NUMBER P2009 The model number will be...


