
User Manual
Page 5
...in place and in the presence of rubber gloves and substantial footwear is properly installed and securely fastened. A guard or other cutting attachment, for alignment of moving parts, binding of moving part. Do not operate power tools in explosive atmospheres, such as ...pipes, radiators, ranges, and refrigerators. They are doing. Watch what you are properly and securely attached. Use only the manufacturer's replacement line in moving parts. Don't expose appliance or string trimmer to prevent entanglement in the...
...in place and in the presence of rubber gloves and substantial footwear is properly installed and securely fastened. A guard or other cutting attachment, for alignment of moving parts, binding of moving part. Do not operate power tools in explosive atmospheres, such as ...pipes, radiators, ranges, and refrigerators. They are doing. Watch what you are properly and securely attached. Use only the manufacturer's replacement line in moving parts. Don't expose appliance or string trimmer to prevent entanglement in the...

User Manual
Page 6
... engage the lock-out lever before servicing, cleaning, removing material from other metal objects, like paper clips, coins, keys, nails, screws or other accessories or attachments will reduce the risk of explosion and possibly injury. Recharge only with the motor stopped. Store out of the reach of injury. ...
... engage the lock-out lever before servicing, cleaning, removing material from other metal objects, like paper clips, coins, keys, nails, screws or other accessories or attachments will reduce the risk of explosion and possibly injury. Recharge only with the motor stopped. Store out of the reach of injury. ...
User Manual
Page 8
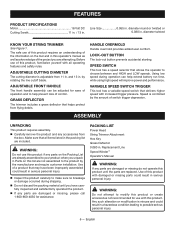
... are already assembled to the product by rotating the line cutoff blade. Parts on the Packing List are attempting. PACKING LIST Power Head String Trimmer Attachment Hex Key Grass Deflector 0.080 in . Replacement Line Speed Winder™ Operator's Manual WARNING: If any parts on this product requires an understanding of the...
... are already assembled to the product by rotating the line cutoff blade. Parts on the Packing List are attempting. PACKING LIST Power Head String Trimmer Attachment Hex Key Grass Deflector 0.080 in . Replacement Line Speed Winder™ Operator's Manual WARNING: If any parts on this product requires an understanding of the...

User Manual
Page 9
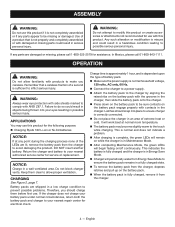
...the trimmer shaft into the grass deflector. Tighten the bolt securely. check it periodically for tightness during use to use other attachments or cutting heads. WARNING: This string trimmer is designed to avoid possible disconnection of shafts, which could result in serious personal injury...the power head shaft. ASSEMBLY WARNING: To prevent accidental starting that a careless fraction of a second is sufficient to inflict serious injury. ATTACHING GRASS DEFLECTOR See Figure 2. WARNING: The line cut-off blade on the grass deflector. Align the screw hole in the ...
...the trimmer shaft into the grass deflector. Tighten the bolt securely. check it periodically for tightness during use to use other attachments or cutting heads. WARNING: This string trimmer is designed to avoid possible disconnection of shafts, which could result in serious personal injury...the power head shaft. ASSEMBLY WARNING: To prevent accidental starting that a careless fraction of a second is sufficient to inflict serious injury. ATTACHING GRASS DEFLECTOR See Figure 2. WARNING: The line cut-off blade on the grass deflector. Align the screw hole in the ...
User Manual
Page 10
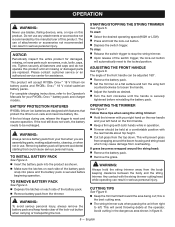
...recommended by the manufacturer of the battery pack. Remove battery pack from right to left hand on the rear handle and your RYOBI® One+™ battery pack and charger models. WARNING: Always remove battery pack from the body keeping clearance between the body and ...with features that could cause serious personal injury. WARNING: To avoid serious personal injury, always remove the battery pack and keep hands clear of attachments or accessories not recommended can result in serious personal injury. To stop: Release the switch trigger to stop the string trimmer. &#...
...recommended by the manufacturer of the battery pack. Remove battery pack from right to left hand on the rear handle and your RYOBI® One+™ battery pack and charger models. WARNING: Always remove battery pack from the body keeping clearance between the body and ...with features that could cause serious personal injury. WARNING: To avoid serious personal injury, always remove the battery pack and keep hands clear of attachments or accessories not recommended can result in serious personal injury. To stop: Release the switch trigger to stop the string trimmer. &#...
User Manual 2
Page 3
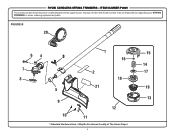
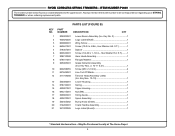
... Item - Key Nos. 7-9 1 7 940006271 Warning Label (Fr/Sp 1 8 940028036 Data Label 1 9 941657185 Warning Icon Label 1 10 523409001 Front Handle 1 11 205006001 Handle Bracket Assembly (Inc. RYOBI CORDLESS STRING TRIMMERS - ITEM NUMBER P2009 The model number will be found on a label attached to the upper boom.
... Item - Key Nos. 7-9 1 7 940006271 Warning Label (Fr/Sp 1 8 940028036 Data Label 1 9 941657185 Warning Icon Label 1 10 523409001 Front Handle 1 11 205006001 Handle Bracket Assembly (Inc. RYOBI CORDLESS STRING TRIMMERS - ITEM NUMBER P2009 The model number will be found on a label attached to the upper boom.
User Manual 2
Page 4
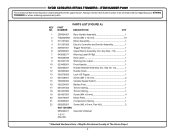
RYOBI CORDLESS STRING TRIMMERS - ITEM NUMBER P2009 The model number will be found on a label attached to the upper boom. May Be Purchased Locally at The Home Depot 4 15 14 17 19 13 FIGURE B 20 64 7 8 3 5 1 16 2 18 21 9 12 10 11 * Standard Hardware Item - Always mention the model number in all correspondence regarding your STRING TRIMMER or when ordering replacement parts.
RYOBI CORDLESS STRING TRIMMERS - ITEM NUMBER P2009 The model number will be found on a label attached to the upper boom. May Be Purchased Locally at The Home Depot 4 15 14 17 19 13 FIGURE B 20 64 7 8 3 5 1 16 2 18 21 9 12 10 11 * Standard Hardware Item - Always mention the model number in all correspondence regarding your STRING TRIMMER or when ordering replacement parts.
User Manual 2
Page 5
RYOBI CORDLESS STRING TRIMMERS - ITEM NUMBER P2009 The model number will be found on a label attached to the upper boom. Key No. 2 1 2 940020025 Logo Label (Shaft 1 3 660886001 Wing Screw 1 4 660641001 Screw (10-24 x 5/8in., Hex Washer Hd. NUMBER DESCRIPTION QTY 1 205002001 ...
RYOBI CORDLESS STRING TRIMMERS - ITEM NUMBER P2009 The model number will be found on a label attached to the upper boom. Key No. 2 1 2 940020025 Logo Label (Shaft 1 3 660886001 Wing Screw 1 4 660641001 Screw (10-24 x 5/8in., Hex Washer Hd. NUMBER DESCRIPTION QTY 1 205002001 ...

User Manual 4
Page 2
... wet or damp conditions. This will not be stepped on charger, battery, and product using battery to damage or stress. come in a risk of an attachment not recommended or sold by an authorized serviceman. Do not operate charger if it to an authorized serviceman for electrical check to follow all...
... wet or damp conditions. This will not be stepped on charger, battery, and product using battery to damage or stress. come in a risk of an attachment not recommended or sold by an authorized serviceman. Do not operate charger if it to an authorized serviceman for electrical check to follow all...
User Manual 4
Page 4
Keep them before first use this product or create accessories or attachments not recommended for the following purpose: Charging Ryobi 18V Li-ion or Ni-Cd batteries NOTICE: If at normal room temperature. The battery pack may use . Any such ... while the charger is normal household voltage, 120 volts, AC only, 60 Hz. Connect the charger to a power supply. Attach the battery pack to make you should snap into your nearest authorized service center for electrical check. OPERATION WARNING: Do not allow proper ventilation. NOTICE...
Keep them before first use this product or create accessories or attachments not recommended for the following purpose: Charging Ryobi 18V Li-ion or Ni-Cd batteries NOTICE: If at normal room temperature. The battery pack may use . Any such ... while the charger is normal household voltage, 120 volts, AC only, 60 Hz. Connect the charger to a power supply. Attach the battery pack to make you should snap into your nearest authorized service center for electrical check. OPERATION WARNING: Do not allow proper ventilation. NOTICE...

