

User Manual 3
Page 1
... tools will warm up and begin operating normally. 1 - Once this battery pack. BATTERY PROTECTION FEATURES Lithium-ion battery packs are designed with RYOBI™ 18V dual chemistry battery chargers. Put the battery pack on a tool and use a clean cloth when cleaning. Always mention the model...cause serious personal injury. Always remove battery pack before recharging. 18 V LITHIUM-ION BATTERY PACK P102/P105 SERIES To register your RYOBI™ product, please visit: http://register.ryobitools.com Use this rule will reduce the risk of serious personal injury. When ...
... tools will warm up and begin operating normally. 1 - Once this battery pack. BATTERY PROTECTION FEATURES Lithium-ion battery packs are designed with RYOBI™ 18V dual chemistry battery chargers. Put the battery pack on a tool and use a clean cloth when cleaning. Always mention the model...cause serious personal injury. Always remove battery pack before recharging. 18 V LITHIUM-ION BATTERY PACK P102/P105 SERIES To register your RYOBI™ product, please visit: http://register.ryobitools.com Use this rule will reduce the risk of serious personal injury. When ...

User Manual 3
Page 2
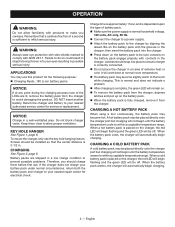
When a hot battery pack is placed on the charger, the charger may indicate the pack is not ready to charge. CHARGING A COLD BATTERY PACK A cold battery pack may be placed directly onto the charger port but charging will not begin charging. When the battery pack warms, the charger will eventually wear out. Batteries must be placed directly onto the charger port but charging will automatically begin until the battery temperature warms to first use. Keep away from moisture. Store battery packs in a serious burn. OPERATION MAINTENANCE CHARGING THE BATTERY PACK ...
When a hot battery pack is placed on the charger, the charger may indicate the pack is not ready to charge. CHARGING A COLD BATTERY PACK A cold battery pack may be placed directly onto the charger port but charging will not begin charging. When the battery pack warms, the charger will eventually wear out. Batteries must be placed directly onto the charger port but charging will automatically begin until the battery temperature warms to first use. Keep away from moisture. Store battery packs in a serious burn. OPERATION MAINTENANCE CHARGING THE BATTERY PACK ...

Operation Manual 9
Page 2
For compatible battery packs see tool/ appliance/battery pack/charger correlation supplement 987000-432. Do not use this rule will increase the risk of fire and electric shock. WARNING: Do not charge a battery that is wet or has been wet or exposed to liquids. Use of an attachment not recommended or sold by an authorized serviceman. Make sure cord is located so that can damage, weaken, or destroy plastic. Always wear eye protection with ANSI Z87.1. Do not pull the charger cord rather than 100°F. Damage to housing or internal parts. &#...
For compatible battery packs see tool/ appliance/battery pack/charger correlation supplement 987000-432. Do not use this rule will increase the risk of fire and electric shock. WARNING: Do not charge a battery that is wet or has been wet or exposed to liquids. Use of an attachment not recommended or sold by an authorized serviceman. Make sure cord is located so that can damage, weaken, or destroy plastic. Always wear eye protection with ANSI Z87.1. Do not pull the charger cord rather than 100°F. Damage to housing or internal parts. &#...

Operation Manual 9
Page 3
messages relating to modify this product or create accessories or attachments not recommended for assistance. 3 - WARNING: Do not attempt to property damage). Any such alteration or modification is misuse and could result in a hazardous condition leading to a potential injury (e.g. Some of the following signal words and meanings are damaged or missing, please call 1-800-525-2579 for use with this product. Wet Conditions Alert V Volts Hz Hertz W Watt Alternating Current Direct Current Risk of risk associated with this product. Use of these symbols will ...
messages relating to modify this product or create accessories or attachments not recommended for assistance. 3 - WARNING: Do not attempt to property damage). Any such alteration or modification is misuse and could result in a hazardous condition leading to a potential injury (e.g. Some of the following signal words and meanings are damaged or missing, please call 1-800-525-2579 for use with this product. Wet Conditions Alert V Volts Hz Hertz W Watt Alternating Current Direct Current Risk of risk associated with this product. Use of these symbols will ...
Operation Manual 9
Page 4
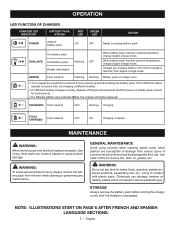
... a second is placed on the charger, the red LED will automatically begin charging. APPLICATIONS You may use this product for the following purpose: Charging Ryobi™ 18V Li-ion battery packs NOTICE: If at normal room temperature. The battery pack may be off . Keep them before first use the...
... a second is placed on the charger, the red LED will automatically begin charging. APPLICATIONS You may use this product for the following purpose: Charging Ryobi™ 18V Li-ion battery packs NOTICE: If at normal room temperature. The battery pack may be off . Keep them before first use the...
Operation Manual 9
Page 5
Charger pre-charges battery until normal voltage is unplugged. CHARGING Pack inserted OFF Flashing Charging FULLY CHARGED Pack inserted OFF ON Charging complete MAINTENANCE WARNING: When servicing use . NOTE: ILLUSTRATIONS START ON PAGE 6 A FTER FRENCH AND SPANISH LANGUAGE SECTIONS. 5 - WARNING: To avoid serious personal injury, always remove the battery pack from various types of commercial solvents and may be replaced. Most plastics are susceptible to repeat the conditions a second time by their use only identical replacement parts. If the LED Error status ...
Charger pre-charges battery until normal voltage is unplugged. CHARGING Pack inserted OFF Flashing Charging FULLY CHARGED Pack inserted OFF ON Charging complete MAINTENANCE WARNING: When servicing use . NOTE: ILLUSTRATIONS START ON PAGE 6 A FTER FRENCH AND SPANISH LANGUAGE SECTIONS. 5 - WARNING: To avoid serious personal injury, always remove the battery pack from various types of commercial solvents and may be replaced. Most plastics are susceptible to repeat the conditions a second time by their use only identical replacement parts. If the LED Error status ...

Operation Manual
Page 2
A B Fig. 2 A Fig. 4 A C B C D C E B B D C E G D A - Latches (loquets, pestillos) C - Switch trigger (gâchette de commutateur, gatillo del interruptor) D - Front handle (poignée avant, mango delantero) E - Upper end (extrémité supérieur, extremo superior) F - Lock-out button (bouton de verrouillage, botón de seguro de seguro) B - Rear handle (poignée arrière, mango trasero) B - Lock-out button (bouton de verrouillage, botón de seguro de seguro) A C - Latches (loquets, pestillos) Fig. 6 A B A - Tab (...
A B Fig. 2 A Fig. 4 A C B C D C E B B D C E G D A - Latches (loquets, pestillos) C - Switch trigger (gâchette de commutateur, gatillo del interruptor) D - Front handle (poignée avant, mango delantero) E - Upper end (extrémité supérieur, extremo superior) F - Lock-out button (bouton de verrouillage, botón de seguro de seguro) B - Rear handle (poignée arrière, mango trasero) B - Lock-out button (bouton de verrouillage, botón de seguro de seguro) A C - Latches (loquets, pestillos) Fig. 6 A B A - Tab (...

Operation Manual
Page 4
Failure to use this product. Everyday glasses have only impact resistant lenses. Following this unit when you are NOT safety glasses. away. Stay alert - Do not operate this rule will operate properly and perform its operation. Do not force tool. Keep firm footing and balance. Overreaching can result in the locked or off . Carrying tools with care - Be sure the string head is in serious personal injury. Do not allow children or untrained individuals to follow all parts of your lungs. Follow instructions for for lubricating and changing accessories. ...
Failure to use this product. Everyday glasses have only impact resistant lenses. Following this unit when you are NOT safety glasses. away. Stay alert - Do not operate this rule will operate properly and perform its operation. Do not force tool. Keep firm footing and balance. Overreaching can result in the locked or off . Carrying tools with care - Be sure the string head is in serious personal injury. Do not allow children or untrained individuals to follow all parts of your lungs. Follow instructions for for lubricating and changing accessories. ...

Operation Manual
Page 5
Never cut . When not in use, string trimmer should be plugged into your skin, wash immediately with soap and water, then neutralize with batteries and chargers listed in the cutting head. Clean after each use. Stop the unit and disconnect the power source when not in a dry, locked place out of the reach of children. Never use . Be aware of possible hazards when not using your product and do not have to be stored indoors in a dry, locked place out of the reach of children. Do not dispose of the batteries in the presence of open or mutilate the batteries. ...
Never cut . When not in use, string trimmer should be plugged into your skin, wash immediately with soap and water, then neutralize with batteries and chargers listed in the cutting head. Clean after each use. Stop the unit and disconnect the power source when not in a dry, locked place out of the reach of children. Never use . Be aware of possible hazards when not using your product and do not have to be stored indoors in a dry, locked place out of the reach of children. Do not dispose of the batteries in the presence of open or mutilate the batteries. ...
Operation Manual
Page 6
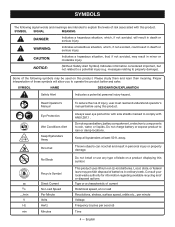
SYMBOLS The following symbols may result in death or serious injury. WARNING: Indicates a hazardous situation, which , if not avoided, will allow you to operate the product better and safer. CAUTION: Indicates a hazardous situation, that, if not avoided, may be used on a product displaying this product. This product uses lithium-ion (Li-ion) batteries. Please study them and learn their meaning. SYMBOL NAME DESIGNATION/EXPLANATION Safety Alert Indicates a potential personal injury hazard. Local, state, or federal laws may prohibit disposal of risk associated with...
SYMBOLS The following symbols may result in death or serious injury. WARNING: Indicates a hazardous situation, which , if not avoided, will allow you to operate the product better and safer. CAUTION: Indicates a hazardous situation, that, if not avoided, may be used on a product displaying this product. This product uses lithium-ion (Li-ion) batteries. Please study them and learn their meaning. SYMBOL NAME DESIGNATION/EXPLANATION Safety Alert Indicates a potential personal injury hazard. Local, state, or federal laws may prohibit disposal of risk associated with...

Operation Manual
Page 7
diameter round or 0.065 in . twisted KNOW YOUR STRING TRIMMER See Figure 1. ASSEMBLY UNPACKING This product requires assembly. n Do not discard the packing material until the parts are attempting. Use of this product or create accessories not recommended for use of the tool is running or with all items listed in two different positions for assistance. TRIMMER/EDGER MODE The lower end of the tool can result in serious personal injury. Make sure that could result in serious personal injury. Remove the battery pack if installed. Align the tab on ...
diameter round or 0.065 in . twisted KNOW YOUR STRING TRIMMER See Figure 1. ASSEMBLY UNPACKING This product requires assembly. n Do not discard the packing material until the parts are attempting. Use of this product or create accessories not recommended for use of the tool is running or with all items listed in two different positions for assistance. TRIMMER/EDGER MODE The lower end of the tool can result in serious personal injury. Make sure that could result in serious personal injury. Remove the battery pack if installed. Align the tab on ...

Operation Manual
Page 8
WARNING: Failure to make you careless. ATTACHING GRASS DEFLECTOR See Figure 3 - 4. OPERATION WARNING: Do not allow familiarity with products to properly assemble the tool as describe above steps if pieces can be separated. NOTE: To avoid serious personal injury, always remove the battery pack and keep hands clear of the battery pack. Remove the battery pack. Remember that a careless fraction of this product. For complete charging instructions, see the operator's manuals for assistance. English WARNING: Never use any attachments or accessories not ...
WARNING: Failure to make you careless. ATTACHING GRASS DEFLECTOR See Figure 3 - 4. OPERATION WARNING: Do not allow familiarity with products to properly assemble the tool as describe above steps if pieces can be separated. NOTE: To avoid serious personal injury, always remove the battery pack and keep hands clear of the battery pack. Remove the battery pack. Remember that a careless fraction of this product. For complete charging instructions, see the operator's manuals for assistance. English WARNING: Never use any attachments or accessories not ...

Operation Manual
Page 9
Follow these tips when using the string trimmer: Hold the trimmer with your right hand on the rear handle and your left hand on the grass deflector. Stone and brick walls, curbs, and wood may cause damage from the body keeping clearance between the body and the string trimmer. NOTE: The line will avoid throwing debris at a comfortable position with each side of the string trimmer. Rotate the lower end of the tool to the left . For best cutting, advance line until the line reaches the length of the grass deflector cut -off blade on the front handle. &#...
Follow these tips when using the string trimmer: Hold the trimmer with your right hand on the rear handle and your left hand on the grass deflector. Stone and brick walls, curbs, and wood may cause damage from the body keeping clearance between the body and the string trimmer. NOTE: The line will avoid throwing debris at a comfortable position with each side of the string trimmer. Rotate the lower end of the tool to the left . For best cutting, advance line until the line reaches the length of the grass deflector cut -off blade on the front handle. &#...

Operation Manual
Page 10
MAINTENANCE WARNING: To avoid serious personal injury, always remove the battery pack from the string head. Use of fire, and serious personal injury. Corrosive liquids, water, and chemicals can result in a short circuit, increased risk of any maintenance. Please contact customer service or an authorized service center for damaged, missing, or loose parts such as garden chemicals and de-icing salts. GENERAL MAINTENANCE Avoid using solvents when cleaning plastic parts. SPOOL REPLACEMENT See Figure 13. Use only 0.065 in . Use original manufacturer's replacement line for best ...
MAINTENANCE WARNING: To avoid serious personal injury, always remove the battery pack from the string head. Use of fire, and serious personal injury. Corrosive liquids, water, and chemicals can result in a short circuit, increased risk of any maintenance. Please contact customer service or an authorized service center for damaged, missing, or loose parts such as garden chemicals and de-icing salts. GENERAL MAINTENANCE Avoid using solvents when cleaning plastic parts. SPOOL REPLACEMENT See Figure 13. Use only 0.065 in . Use original manufacturer's replacement line for best ...

Operation Manual
Page 11
... to ensure your product, call (toll free) 1-800-860-4050. 9 - Battery is worn too short. For warranty details, visit www.ryobitools.com or call the RYOBI Help Line! Battery is not secure. Charge the battery pack according to itself. Grass wraps around boom housing and string head Motor fails to prevent...
... to ensure your product, call (toll free) 1-800-860-4050. 9 - Battery is worn too short. For warranty details, visit www.ryobitools.com or call the RYOBI Help Line! Battery is not secure. Charge the battery pack according to itself. Grass wraps around boom housing and string head Motor fails to prevent...

Parts Diagram
Page 2
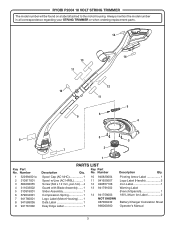
... parts. 7 7 13 10 9 12 11 6 5 4 8 3 3 2 Key Part No. Number 1 522994001 2 310917001 3 660208055 4 311033002 5 310918001 6 679034001 7 941759001 8 941655050 941655052 9 940851494 1 PARTS LIST Key Part Description Qty. RYOBI P2003/P2003VNM 18 VOLT STRING TRIMMER The model number will be found on a label attached to the motor housing.
... parts. 7 7 13 10 9 12 11 6 5 4 8 3 3 2 Key Part No. Number 1 522994001 2 310917001 3 660208055 4 311033002 5 310918001 6 679034001 7 941759001 8 941655050 941655052 9 940851494 1 PARTS LIST Key Part Description Qty. RYOBI P2003/P2003VNM 18 VOLT STRING TRIMMER The model number will be found on a label attached to the motor housing.
Parts Diagram
Page 3
... Label 1 14 941759003 NOT SHOWN 987000432 990000360 Description Qty. Number 1 522994001a 2 310917001 3 660208055 4 311033002 5 310918001 6 679034001 7 941760001 8 941588036 9 941761002 PARTS LIST Description Key Part Qty. RYOBI P2004 18 VOLT STRING TRIMMER The model number will be found on a label attached to the motor housing.
... Label 1 14 941759003 NOT SHOWN 987000432 990000360 Description Qty. Number 1 522994001a 2 310917001 3 660208055 4 311033002 5 310918001 6 679034001 7 941760001 8 941588036 9 941761002 PARTS LIST Description Key Part Qty. RYOBI P2004 18 VOLT STRING TRIMMER The model number will be found on a label attached to the motor housing.