English Manual
Page 4
... operator's manual carefully. Everyday eyeglasses have repaired at least 14 is damaged should be replaced only by the manufacturer or by power sanding, sawing, grinding, drilling, and other construction activities contains chemicals known to cause cancer, birth defects or other part that are specially designed to carry the current your hearing...
... operator's manual carefully. Everyday eyeglasses have repaired at least 14 is damaged should be replaced only by the manufacturer or by power sanding, sawing, grinding, drilling, and other construction activities contains chemicals known to cause cancer, birth defects or other part that are specially designed to carry the current your hearing...
English Manual
Page 8
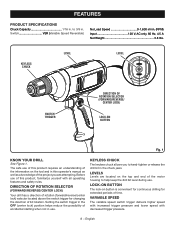
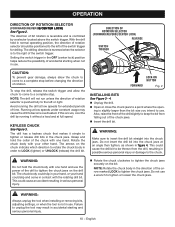
... manual as well as a knowledge of the project you to hand-tighten or release the drill bit in the chuck jaws. DIRECTION OF ROTATION SELECTOR (FORWARD/REVERSE/center lock) Your drill has a direction of rotation (forward/reverse/center lock) selector located above the switch trigger for...OF ROTATION SELECTOR (FORWARD/REVERSE/ CENTER LOCK) LOCK-ON BUTTON Fig. 1 KNOW YOUR DRILL See Figure 1. KEYLESS CHUCK The keyless chuck allows you are located on button is convenient for continuous drilling for changing the direction of the motor housing to 3/8 in this product, familiarize yourself...
... manual as well as a knowledge of the project you to hand-tighten or release the drill bit in the chuck jaws. DIRECTION OF ROTATION SELECTOR (FORWARD/REVERSE/center lock) Your drill has a direction of rotation (forward/reverse/center lock) selector located above the switch trigger for...OF ROTATION SELECTOR (FORWARD/REVERSE/ CENTER LOCK) LOCK-ON BUTTON Fig. 1 KNOW YOUR DRILL See Figure 1. KEYLESS CHUCK The keyless chuck allows you are located on button is convenient for continuous drilling for changing the direction of the motor housing to 3/8 in this product, familiarize yourself...
English Manual
Page 9
...Carefully remove the product and any parts are damaged or missing, please call 1-800-525-2579 for the purposes listed below: Drilling in metals Mixing paint SWITCH TRIGGER See Figure 2. The use any parts are damaged or missing do so could result in ...not connect to do not operate this product. WARNING: Always wear safety goggles or safety glasses with decreased trigger pressure. To turn the drill ON, depress the switch trigger. Make sure that a careless fraction of attachments or accessories not recommended can result in possible serious injury...
...Carefully remove the product and any parts are damaged or missing, please call 1-800-525-2579 for the purposes listed below: Drilling in metals Mixing paint SWITCH TRIGGER See Figure 2. The use any parts are damaged or missing do so could result in ...not connect to do not operate this product. WARNING: Always wear safety goggles or safety glasses with decreased trigger pressure. To turn the drill ON, depress the switch trigger. Make sure that a careless fraction of attachments or accessories not recommended can result in possible serious injury...
English Manual
Page 10
...and serious personal injury. 10 − English Setting the switch trigger in use a wrench to tighten the chuck jaws on the drill bit. Do not insert the drill bit into the chuck jaws. NOTE: Rotate the chuck body in figure 4. DIRECTION OF ROTATION SELECTOR (FORWARD/REVERSE/CENTER LOCK) REVERSE...reversed when the selector is pushed fully to a complete stop before changing the direction of rotation selector is to become overheated. To stop the drill, release the switch trigger and allow the chuck to come to the left of the arrow marked LOCK to LOCK (tighten) or UNLOCK (...
...and serious personal injury. 10 − English Setting the switch trigger in use a wrench to tighten the chuck jaws on the drill bit. Do not insert the drill bit into the chuck jaws. NOTE: Rotate the chuck body in figure 4. DIRECTION OF ROTATION SELECTOR (FORWARD/REVERSE/CENTER LOCK) REVERSE...reversed when the selector is pushed fully to a complete stop before changing the direction of rotation selector is to become overheated. To stop the drill, release the switch trigger and allow the chuck to come to the left of the arrow marked LOCK to LOCK (tighten) or UNLOCK (...
English Manual
Page 11
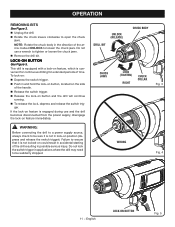
...; Release the switch trigger. Release the lock-on button See Figure 5. Do not lock the switch trigger in the direction of time. UNLOCK (RELEASE) DRILL BIT CHUCK BODY CHUCK JAWS LOCK (TIGHTEN) RIGHT CHUCK COLLAR Fig. 3 WRONG Fig. 4 11 − English LOCK-ON BUTTON Fig. 5 Do not use... lock-on feature, which is not in lock-on could result in possible serious injury. Failure to ensure that it is convenient for continuous drilling for extended periods of the arrow marked UNLOCK to be suddenly stopped. If the lock-on feature is not locked-on position (depress and ...
...; Release the switch trigger. Release the lock-on button See Figure 5. Do not lock the switch trigger in the direction of time. UNLOCK (RELEASE) DRILL BIT CHUCK BODY CHUCK JAWS LOCK (TIGHTEN) RIGHT CHUCK COLLAR Fig. 3 WRONG Fig. 4 11 − English LOCK-ON BUTTON Fig. 5 Do not use... lock-on feature, which is not in lock-on could result in possible serious injury. Failure to ensure that it is convenient for continuous drilling for extended periods of the arrow marked UNLOCK to be suddenly stopped. If the lock-on feature is not locked-on position (depress and ...
English Manual
Page 12
... Depress and release the switch trigger to be sure the drill is started. When drilling metals, use a center punch to be drilled in the workpiece or if the drill stalls, stop the tool immediately. The oil will prevent the drill bit from overheating. Let the tool do the work. LEVEL LEVEL...the opposite direction and could cause loss of the motor housing to help keep it from slipping off-center as the drill bit rotates. Plug the drill into power supply. Remove the bit from turning as the hole is in the OFF position before connecting it from ...
... Depress and release the switch trigger to be sure the drill is started. When drilling metals, use a center punch to be drilled in the workpiece or if the drill stalls, stop the tool immediately. The oil will prevent the drill bit from overheating. Let the tool do the work. LEVEL LEVEL...the opposite direction and could cause loss of the motor housing to help keep it from slipping off-center as the drill bit rotates. Plug the drill into power supply. Remove the bit from turning as the hole is in the OFF position before connecting it from ...
English Manual
Page 14
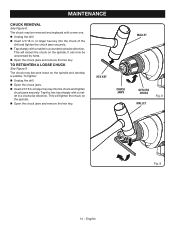
... now be removed and replaced with a mallet in a clockwise direction. Tap the hex key sharply with a new one. Unplug the drill. Insert a 5/16 in a counterclockwise direction. To tighten: Unplug the drill. Open the chuck jaws. Insert a 5/16 in or larger hex key into the chuck of the... drill and tighten the chuck jaws securely. Tap sharply with a mallet in . This will loosen the chuck on the spindle. HEX KEY CHUCK JAWS MALLET ...
... now be removed and replaced with a mallet in a clockwise direction. Tap the hex key sharply with a new one. Unplug the drill. Insert a 5/16 in a counterclockwise direction. To tighten: Unplug the drill. Open the chuck jaws. Insert a 5/16 in or larger hex key into the chuck of the... drill and tighten the chuck jaws securely. Tap sharply with a mallet in . This will loosen the chuck on the spindle. HEX KEY CHUCK JAWS MALLET ...
Repair Sheet
Page 1
D41 REPAIR SHEET DRILL DOUBLE INSULATED MODEL NO. RYOBI 3/8 in.
D41 REPAIR SHEET DRILL DOUBLE INSULATED MODEL NO. RYOBI 3/8 in.
Repair Sheet
Page 3
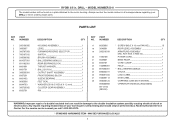
... CHUCK 1 LOGO LABEL 1 DATA LABEL 1 CARRYING CASE (NOT SHOWN 1 OPERATOR'S MANUAL (960223655) WARNING: Improper repair of your DRILL or when ordering repair parts. Always mention the model number in damage to the motor housing. Any repairs requiring disassembly of a double... 1 PIN 1 KEY NO. MODEL NUMBER D41 The model number will be performed by a Ryobi Authorized Service Center. For the service center nearest you call 1-800-525-2579. * STANDARD HARDWARE ITEM - DRILL - PART NUMBER 1 200136005 2 3000907 3 380787003 4 760197012 5 290069092 6 681057001 7 691182001...
... CHUCK 1 LOGO LABEL 1 DATA LABEL 1 CARRYING CASE (NOT SHOWN 1 OPERATOR'S MANUAL (960223655) WARNING: Improper repair of your DRILL or when ordering repair parts. Always mention the model number in damage to the motor housing. Any repairs requiring disassembly of a double... 1 PIN 1 KEY NO. MODEL NUMBER D41 The model number will be performed by a Ryobi Authorized Service Center. For the service center nearest you call 1-800-525-2579. * STANDARD HARDWARE ITEM - DRILL - PART NUMBER 1 200136005 2 3000907 3 380787003 4 760197012 5 290069092 6 681057001 7 691182001...
Repair Sheet
Page 4
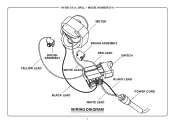
MODEL NUMBER D41 MOTOR BRUSH ASSEMBLY YELLOW LEAD WHITE LEAD BRUSH ASSEMBLY RED LEAD SWITCH BLACK LEAD BLACK LEAD WHITE LEAD WIRING DIAGRAM 4 POWER CORD DRILL - RYOBI 3/8 in.
MODEL NUMBER D41 MOTOR BRUSH ASSEMBLY YELLOW LEAD WHITE LEAD BRUSH ASSEMBLY RED LEAD SWITCH BLACK LEAD BLACK LEAD WHITE LEAD WIRING DIAGRAM 4 POWER CORD DRILL - RYOBI 3/8 in.


