
User Manual (English)
Page 2
This kit offers a backup function, allowing you to a computer using either a USB 2.0 or eSATA port. Rocketfish RF-AHD25 2.5" Hard Drive Enclosure Kit Contents Introduction 2 Safety information 3 Features 3 Using the hard drive enclosure 6 Troubleshooting 26 Specifications 27 Legal notices 28 Français 30 Español 64 Introduction Congratulations on your data. 2 You can install a high-speed SATA hard drive into this enclosure and connect it to backup, restore, and synchronize your purchase of the Rocketfish RF-AHD25 SATA Hard Drive Enclosure Kit.
This kit offers a backup function, allowing you to a computer using either a USB 2.0 or eSATA port. Rocketfish RF-AHD25 2.5" Hard Drive Enclosure Kit Contents Introduction 2 Safety information 3 Features 3 Using the hard drive enclosure 6 Troubleshooting 26 Specifications 27 Legal notices 28 Français 30 Español 64 Introduction Congratulations on your data. 2 You can install a high-speed SATA hard drive into this enclosure and connect it to backup, restore, and synchronize your purchase of the Rocketfish RF-AHD25 SATA Hard Drive Enclosure Kit.
User Manual (English)
Page 3
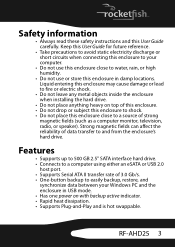
...; Has one power on top of this enclosure. • Do not drop or subject this enclosure to shock. • Do not place this enclosure to water, rain, or high humidity. • Do not use this enclosure close to a source of data transfer to and from the enclosure's hard drive. RF-AHD25 3 Keep this User Guide for future...
...; Has one power on top of this enclosure. • Do not drop or subject this enclosure to shock. • Do not place this enclosure to water, rain, or high humidity. • Do not use this enclosure close to a source of data transfer to and from the enclosure's hard drive. RF-AHD25 3 Keep this User Guide for future...

User Manual (English)
Page 4
Package contents • 2.5" SATA hard drive enclosure • Five-pin mini USB cable • eSATA cable • Two Utility CDs • User Guide • 5 Volt/1 amp AC adapter • An extra swappable cover plate • Carrying bag • Accessories: • Screwdriver • 4 screws System requirements • PC or Macintosh with an available USB 2.0 port or eSATA port • Microsoft Windows 2000, Windows XP, or Windows Vista operating system or Mac OS X version 10.3.x or higher operating system • 2.5" SATA hard drive 4
Package contents • 2.5" SATA hard drive enclosure • Five-pin mini USB cable • eSATA cable • Two Utility CDs • User Guide • 5 Volt/1 amp AC adapter • An extra swappable cover plate • Carrying bag • Accessories: • Screwdriver • 4 screws System requirements • PC or Macintosh with an available USB 2.0 port or eSATA port • Microsoft Windows 2000, Windows XP, or Windows Vista operating system or Mac OS X version 10.3.x or higher operating system • 2.5" SATA hard drive 4
User Manual (English)
Page 6
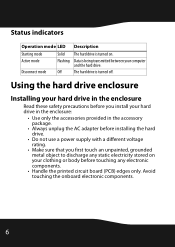
... discharge any electronic components. • Handle the printed circuit board (PCB) edges only. The hard drive is being transmitted between your hard drive in the enclosure: • Use only the accessories provided in the accessory package. • Always unplug the AC adapter before touching any static electricity stored on . Using the...
... discharge any electronic components. • Handle the printed circuit board (PCB) edges only. The hard drive is being transmitted between your hard drive in the enclosure: • Use only the accessories provided in the accessory package. • Always unplug the AC adapter before touching any static electricity stored on . Using the...
User Manual (English)
Page 7
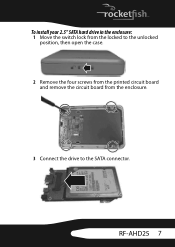
RF-AHD25 7 To install your 2.5" SATA hard drive in the enclosure: 1 Move the switch lock from the locked to the unlocked position, then open the case. 2 Remove the four screws from the printed circuit board and remove the circuit board from the enclosure. 3 Connect the drive to the SATA connector.
RF-AHD25 7 To install your 2.5" SATA hard drive in the enclosure: 1 Move the switch lock from the locked to the unlocked position, then open the case. 2 Remove the four screws from the printed circuit board and remove the circuit board from the enclosure. 3 Connect the drive to the SATA connector.
User Manual (English)
Page 8
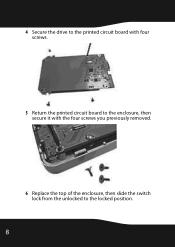
4 Secure the drive to the printed circuit board with four screws. 5 Return the printed circuit board to the enclosure, then secure it with the four screws you previously removed. 6 Replace the top of the enclosure, then slide the switch lock from the unlocked to the locked position. 8
4 Secure the drive to the printed circuit board with four screws. 5 Return the printed circuit board to the enclosure, then secure it with the four screws you previously removed. 6 Replace the top of the enclosure, then slide the switch lock from the unlocked to the locked position. 8
User Manual (English)
Page 9
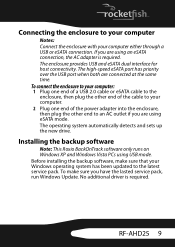
...either through a USB or eSATA connection. The operating system automatically detects and sets up the new drive. The enclosure provides USB and eSATA dual interface for host connectivity. RF-AHD25 9 Installing the backup software Note: This Roxio BackOnTrack software only runs on Windows XP and Windows Vista PCs ... To make sure that your Windows operating system has been updated to your computer Notes: Connect the enclosure with your computer. 2 Plug one end of the power adapter into the enclosure, then plug the other end to an AC outlet if you are connected at the same time...
...either through a USB or eSATA connection. The operating system automatically detects and sets up the new drive. The enclosure provides USB and eSATA dual interface for host connectivity. RF-AHD25 9 Installing the backup software Note: This Roxio BackOnTrack software only runs on Windows XP and Windows Vista PCs ... To make sure that your Windows operating system has been updated to your computer Notes: Connect the enclosure with your computer. 2 Plug one end of the power adapter into the enclosure, then plug the other end to an AC outlet if you are connected at the same time...

User Manual (English)
Page 13
... BACKUP button on a regular basis, or click the action button to archive. A Back Up Files project can choose to run on the front of files. RF-AHD25 13 Large backups are available. Backing up files The Back Up Files project lets you would like to begin recording now. You can be scheduled...
... BACKUP button on a regular basis, or click the action button to archive. A Back Up Files project can choose to run on the front of files. RF-AHD25 13 Large backups are available. Backing up files The Back Up Files project lets you would like to begin recording now. You can be scheduled...
User Manual (English)
Page 26
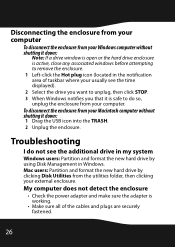
... the new hard drive by clicking Disk Utilities from your Macintosh computer without shutting it down : 1 Drag the USB icon into the TRASH. 2 Unplug the enclosure. My computer does not detect the enclosure • Check the power adapter and make sure the adapter is safe to remove the... your Windows computer without shutting it down : Note: If a drive window is open or the hard drive enclosure is active, close any associated windows before attempting to do not see the additional drive in my system Windows users: Partition and format the new ...
... the new hard drive by clicking Disk Utilities from your Macintosh computer without shutting it down : 1 Drag the USB icon into the TRASH. 2 Unplug the enclosure. My computer does not detect the enclosure • Check the power adapter and make sure the adapter is safe to remove the... your Windows computer without shutting it down : Note: If a drive window is open or the hard drive enclosure is active, close any associated windows before attempting to do not see the additional drive in my system Windows users: Partition and format the new ...
User Manual (English)
Page 27
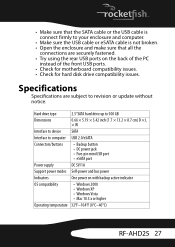
...3.42 inch (1.7 × 13.2 × 8.7 cm) D × L × W Interface to device SATA Interface to your enclosure and computer. • Make sure the USB cable or eSATA cable is connect firmly to computer USB 2.0/eSATA Connectors/buttons • Backup button... • Make sure that the SATA cable or the USB cable is not broken. • Open the enclosure and make sure that all the connections are subject to revision or update without notice. Specifications Specifications are securely ...Mac 10.3.x or higher Operating temperature 32°F~104°F (0°C~40°C) RF-AHD25 27
...3.42 inch (1.7 × 13.2 × 8.7 cm) D × L × W Interface to device SATA Interface to your enclosure and computer. • Make sure the USB cable or eSATA cable is connect firmly to computer USB 2.0/eSATA Connectors/buttons • Backup button... • Make sure that the SATA cable or the USB cable is not broken. • Open the enclosure and make sure that all the connections are subject to revision or update without notice. Specifications Specifications are securely ...Mac 10.3.x or higher Operating temperature 32°F~104°F (0°C~40°C) RF-AHD25 27