

Owners Manual
Page 1
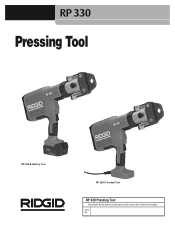
Read this Operator's Manual carefully before using this manual may result in electrical shock, fire and/or serious personal injury. • Français - 13 • Castellano - Failure to understand and follow the contents of this tool. pág. 27 RP 330 Manual Pressing Tool WARNING!
Read this Operator's Manual carefully before using this manual may result in electrical shock, fire and/or serious personal injury. • Français - 13 • Castellano - Failure to understand and follow the contents of this tool. pág. 27 RP 330 Manual Pressing Tool WARNING!
Owners Manual
Page 2
... ...5 Tool Inspection...5 Tool and Work Area Set-Up...6 Operating Instructions Preparing the Connection ...7 Pressing A Fitting With Typical Scissor Jaw Set ...7 Pressing A Fitting With Typical Actuator and Press Ring Set 8 Inspecting The Pressed Connection ...9 Maintenance Instructions Cleaning and Lubrication ...10 Required Maintenance at RIDGID Authorized Service Center 10 Accessories ...10 Storage ...10 Service and Repair ...10 Troubleshooting ...11 RP 330...
... ...5 Tool Inspection...5 Tool and Work Area Set-Up...6 Operating Instructions Preparing the Connection ...7 Pressing A Fitting With Typical Scissor Jaw Set ...7 Pressing A Fitting With Typical Actuator and Press Ring Set 8 Inspecting The Pressed Connection ...9 Maintenance Instructions Cleaning and Lubrication ...10 Required Maintenance at RIDGID Authorized Service Center 10 Accessories ...10 Storage ...10 Service and Repair ...10 Troubleshooting ...11 RP 330...
Owners Manual
Page 3
Serial No. RP 330 Pressing Tool RP 330-B Battery Tool RP 330-C Corded Tool RP 330 Pressing Tool Record Serial Number below and retain product serial number which is located on nameplate.
Serial No. RP 330 Pressing Tool RP 330-B Battery Tool RP 330-C Corded Tool RP 330 Pressing Tool Record Serial Number below and retain product serial number which is located on nameplate.
Owners Manual
Page 4
...or wet conditions. Keep cord away from the applicable UL/CSA 60745 standard. This is unavoidable, use the cord for many different types of power tools. DANGER DANGER indicates a hazardous situation which , if not avoided, could result in death or serious injury. Failure to communicate important safety information.... the General Safety Rule section of this manual is used to alert you to avoid possible injury or death. RP 330 Pressing Tool Safety Symbols In this operator's manual and on the safe and proper operation of the equipment. It is verbatim, as pipes, radiators, ...
...or wet conditions. Keep cord away from the applicable UL/CSA 60745 standard. This is unavoidable, use the cord for many different types of power tools. DANGER DANGER indicates a hazardous situation which , if not avoided, could result in death or serious injury. Failure to communicate important safety information.... the General Safety Rule section of this manual is used to alert you to avoid possible injury or death. RP 330 Pressing Tool Safety Symbols In this operator's manual and on the safe and proper operation of the equipment. It is verbatim, as pipes, radiators, ...
Owners Manual
Page 5
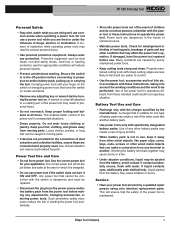
...account the working conditions and the work to a rotating part of the power tool may affect the power tool's operation. Battery Tool Use and Care • Recharge only with water. avoid contact. RP 330 Pressing Tool Personal Safety • Stay alert, watch what you are tired or under the... influence of drugs, alcohol, or medication. Ensure the switch is not in personal injury. • Do not overreach. Keep your power tool serviced by the manufacturer. ...
...account the working conditions and the work to a rotating part of the power tool may affect the power tool's operation. Battery Tool Use and Care • Recharge only with water. avoid contact. RP 330 Pressing Tool Personal Safety • Stay alert, watch what you are tired or under the... influence of drugs, alcohol, or medication. Ensure the switch is not in personal injury. • Do not overreach. Keep your power tool serviced by the manufacturer. ...
Owners Manual
Page 6
Read these components and any other attachment. Contact the Ridge Tool Company, Technical Service Department at (800) 519-3456 or TechServices@ridgid.com if you have any questions. Pressing Tool Safety • Use the RP 330 Pressing Tool only with appropriate jaw sets, is designed to mechanically press fittings onto tubing to create a water-tight and permanent seal. Other types...
Read these components and any other attachment. Contact the Ridge Tool Company, Technical Service Department at (800) 519-3456 or TechServices@ridgid.com if you have any questions. Pressing Tool Safety • Use the RP 330 Pressing Tool only with appropriate jaw sets, is designed to mechanically press fittings onto tubing to create a water-tight and permanent seal. Other types...
Owners Manual
Page 7
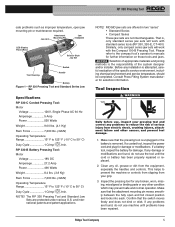
... work with the Compact 100-B Pressing Tool. Make sure that the switch moves freely and does not bind or stick. Confirm that the attachment mounting pin moves smoothly between the fully open jaw mounting pin or maintenance required. NOTE! RIDGID jaw sets are offered in two... missing, mis-aligned or binding parts or any problems to prevent the machine or controls from slipping from your pressing tool and correct any other causes, and prevent tool damage. 1. RP 330-B Battery Pressing Tool: Motor Voltage 18V DC Amperage 27.2 Amp Power 490 Watts Weight 8.4 lbs. (3.8 Kg) Ram Force 7,...
... work with the Compact 100-B Pressing Tool. Make sure that the switch moves freely and does not bind or stick. Confirm that the attachment mounting pin moves smoothly between the fully open jaw mounting pin or maintenance required. NOTE! RIDGID jaw sets are offered in two... missing, mis-aligned or binding parts or any problems to prevent the machine or controls from slipping from your pressing tool and correct any other causes, and prevent tool damage. 1. RP 330-B Battery Pressing Tool: Motor Voltage 18V DC Amperage 27.2 Amp Power 490 Watts Weight 8.4 lbs. (3.8 Kg) Ram Force 7,...
Owners Manual
Page 8
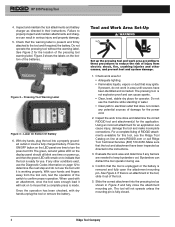
...; Clear, level, stable dry place for the power cord. 2. Bystanders can cause injury, damage the tool and make incomplete connections. RP 330 Pressing Tool 4. Check that the tool and attachment have been identified and corrected. Once the operation has been checked, with an attachment, once... grounded outlet or insert a fully charged battery. Do not operate the pressing tool without the warning label. Pressing Tool Warning Label Figure 3 - Figure 3 shows the labels on line at www.RIDGID.com or call Ridge Tool Technical Services (800) 519-3456. Figure 2 - For a complete listing...
...; Clear, level, stable dry place for the power cord. 2. Bystanders can cause injury, damage the tool and make incomplete connections. RP 330 Pressing Tool 4. Check that the tool and attachment have been identified and corrected. Once the operation has been checked, with an attachment, once... grounded outlet or insert a fully charged battery. Do not operate the pressing tool without the warning label. Pressing Tool Warning Label Figure 3 - Figure 3 shows the labels on line at www.RIDGID.com or call Ridge Tool Technical Services (800) 519-3456. Figure 2 - For a complete listing...
Owners Manual
Page 9
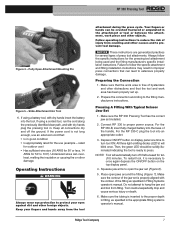
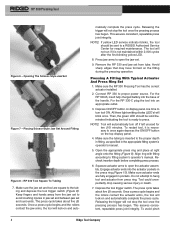
... ten (10) minutes. Operating Instructions WARNING Always wear eye protection to turn off the ground. Preparing the Connection 1. Make sure the RP 330 Pressing Tool has the correct jaw set is inserted to proper power source. Depress ON/OFF button on the top display panel. 4. All three...has been properly set up. 2. Squeeze jaw arms to press. RP 330 Pressing Tool Figure 4 - Your fingers or hands can be solidly illuminated indicating the tool is free of injury from crushing and other damage. Make sure that the tool and work area is ready to open jaws around the ...
... ten (10) minutes. Operating Instructions WARNING Always wear eye protection to turn off the ground. Preparing the Connection 1. Make sure the RP 330 Pressing Tool has the correct jaw set is inserted to proper power source. Depress ON/OFF button on the top display panel. 4. All three...has been properly set up. 2. Squeeze jaw arms to press. RP 330 Pressing Tool Figure 4 - Your fingers or hands can be solidly illuminated indicating the tool is free of injury from crushing and other damage. Make sure that the tool and work area is ready to open jaws around the ...
Owners Manual
Page 10
...jaw set and between jaw set from press ring. Make sure the RP 330 Pressing Tool has the correct actuator installed. 2. Depress ON/OFF button on and automatically complete the press cycle. To avoid pinch 8 Ridge Tool Company Connect RP 330 to fitting system's operator's manual. ...the tool should be sent to avoid crushing injuries in the appropriate fitting system's operator's manual. 5. Engage actuator ends into the actuator pockets in pockets. Keep fingers and hands away from the jaw set to a RIDGID Authorized Service Center for ten (10) minutes. RP 330 Pressing Tool ...
...jaw set and between jaw set from press ring. Make sure the RP 330 Pressing Tool has the correct actuator installed. 2. Depress ON/OFF button on and automatically complete the press cycle. To avoid pinch 8 Ridge Tool Company Connect RP 330 to fitting system's operator's manual. ...the tool should be sent to avoid crushing injuries in the appropriate fitting system's operator's manual. 5. Engage actuator ends into the actuator pockets in pockets. Keep fingers and hands away from the jaw set to a RIDGID Authorized Service Center for ten (10) minutes. RP 330 Pressing Tool ...

Owners Manual
Page 11
... by the manufacturer to a RIDGID Authorized Service Center for required maintenance. Control rings and label are not fully inserted into the fitting - Note that a slight amount of the green LED. Test system in the tool and the pressed connection should be repeated as ...will be prepared and pressed in its place. 2. Pressure Release Button Inspecting The Pressed Connection 1. Inspect the pressed fitting. If any of these problems are still aligned with the end of the tool. (Figure 11) Figure 11 - Ridge Tool Company 9 NOTICE The RP 330 Pressing Tool will not run if ...
... by the manufacturer to a RIDGID Authorized Service Center for required maintenance. Control rings and label are not fully inserted into the fitting - Note that a slight amount of the green LED. Test system in the tool and the pressed connection should be repeated as ...will be prepared and pressed in its place. 2. Pressure Release Button Inspecting The Pressed Connection 1. Inspect the pressed fitting. If any of these problems are still aligned with the end of the tool. (Figure 11) Figure 11 - Ridge Tool Company 9 NOTICE The RP 330 Pressing Tool will not run if ...
Owners Manual
Page 12
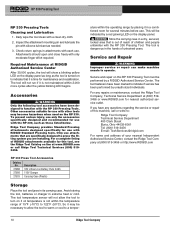
... operate. RP 330 Pressing Tool RP 330 Pressing Tools Cleaning and Lubrication 1. The tool temperature sensor will be indicated by placing it may become hazardous when used on the display panel. Inspect the attachment mounting pin and lubricate the pin with the RP 330 Pressing Tool. Check return springs in its carrying case. Attachments should open and close freely with RIDGID Standard Pressing tools. RP 330 Press Tool Accessories Catalog...
... operate. RP 330 Pressing Tool RP 330 Pressing Tools Cleaning and Lubrication 1. The tool temperature sensor will be indicated by placing it may become hazardous when used on the display panel. Inspect the attachment mounting pin and lubricate the pin with the RP 330 Pressing Tool. Check return springs in its carrying case. Attachments should open and close freely with RIDGID Standard Pressing tools. RP 330 Press Tool Accessories Catalog...
Owners Manual
Page 13
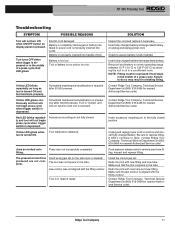
... and replug power cord or remove and reinsert fully charged battery. Inspect and repress fitting. Make sure that the tool is square to repress fitting. RP 330 Pressing Tool Troubleshooting SYMPTOM POSSIBLE REASONS SOLUTION Tool will not begin press cycle when trigger switch is depressed. Battery not properly inserted into outlet. Battery is mandatory after 30,000...
... and replug power cord or remove and reinsert fully charged battery. Inspect and repress fitting. Make sure that the tool is square to repress fitting. RP 330 Pressing Tool Troubleshooting SYMPTOM POSSIBLE REASONS SOLUTION Tool will not begin press cycle when trigger switch is depressed. Battery not properly inserted into outlet. Battery is mandatory after 30,000...
Owners Manual
Page 14
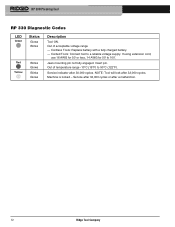
... 50°C (122°F). Jaws mounting pin not fully engaged. NOTE: Tool will lock after 30,000 cycles. Cordless Tools: Replace battery with a fully charged battery. - RP 330 Pressing Tool RP 330 Diagnostic Codes LED Green Status Glows Blinks Red Yellow Blinks Glows Blinks Glows Description Tool ON. Machine is locked - If using extension cord, use 16 AWG for... range -10°C (15°F) to a reliable voltage supply. Service indicator after 32,000 cycles. Service after 32,000 cycles or after a malfunction. 12 Ridge Tool Company Insert pin.
... 50°C (122°F). Jaws mounting pin not fully engaged. NOTE: Tool will lock after 30,000 cycles. Cordless Tools: Replace battery with a fully charged battery. - RP 330 Pressing Tool RP 330 Diagnostic Codes LED Green Status Glows Blinks Red Yellow Blinks Glows Blinks Glows Description Tool ON. Machine is locked - If using extension cord, use 16 AWG for... range -10°C (15°F) to a reliable voltage supply. Service indicator after 32,000 cycles. Service after 32,000 cycles or after a malfunction. 12 Ridge Tool Company Insert pin.


