Owners Manual
Page 3
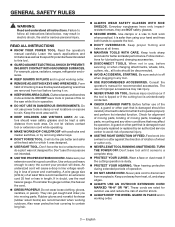
... clean for lubricating and changing accessories. DISCONNECT TOOLS. Before further use and reduce the risk of tile on . KEEP WORK AREA CLEAN. Check for a purpose not intended. USE THE ...MAINTAIN TOOLS WITH CARE. Don't leave tool until it will do a job it on the saw 's applications and limitations as well as the specific potential hazards related to this tool. ...safer than using your product will cause a drop in line voltage resulting in damp or wet locations or expose to see that keys and adjusting wrenches are recommended when working order....
... clean for lubricating and changing accessories. DISCONNECT TOOLS. Before further use and reduce the risk of tile on . KEEP WORK AREA CLEAN. Check for a purpose not intended. USE THE ...MAINTAIN TOOLS WITH CARE. Don't leave tool until it will do a job it on the saw 's applications and limitations as well as the specific potential hazards related to this tool. ...safer than using your product will cause a drop in line voltage resulting in damp or wet locations or expose to see that keys and adjusting wrenches are recommended when working order....
Owners Manual
Page 8
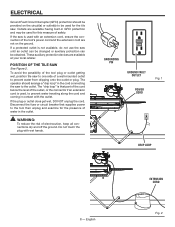
... wall-mounted outlet to prevent water from dripping onto the outlet or plug. WARNING: To reduce the risk of the tool plug or outlet getting wet, position tile saw See Figure 2. If a protected outlet is used , to one side of safety. Outlets are available having built-in contact with the outlet.... POSITION OF THE TILE saw to prevent water traveling along the cord and coming in GFCI protection and may be used for the presence of the tool's power cord and...
... wall-mounted outlet to prevent water from dripping onto the outlet or plug. WARNING: To reduce the risk of the tool plug or outlet getting wet, position tile saw See Figure 2. If a protected outlet is used , to one side of safety. Outlets are available having built-in contact with the outlet.... POSITION OF THE TILE saw to prevent water traveling along the cord and coming in GFCI protection and may be used for the presence of the tool's power cord and...
Owners Manual
Page 10
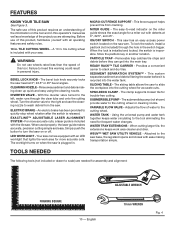
... miter guide shows the exact angle for trouble-free cutting. The easy-to heed this tool. SUBMERSIBLE PUMP - WSUV™ Wet Saw Utility Vehicle - ELECTRIC BRAKE - This fence support helps prevent tile from the saw head at 0°, 22.5°, and 45°. Store the padlock key in . PARTICLE TRAP - SEDIMENT SEPARATION SYSTEM™...
... miter guide shows the exact angle for trouble-free cutting. The easy-to heed this tool. SUBMERSIBLE PUMP - WSUV™ Wet Saw Utility Vehicle - ELECTRIC BRAKE - This fence support helps prevent tile from the saw head at 0°, 22.5°, and 45°. Store the padlock key in . PARTICLE TRAP - SEDIMENT SEPARATION SYSTEM™...
Owners Manual
Page 23
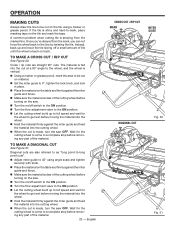
... against the miter guide and fence. Make sure the material is clear of the cutting wheel before turning on the saw. Turn the on/off a small amount of tile until the wheel is straying from the mark, you can not force the wheel back to a complete stop before removing any... the flow adjustment valve to the on position. Let the cutting wheel build up to full speed and wait for the wheel to get wet before moving the material into the wheel. Hold the material firmly against the miter guide and feed the material into the cutting wheel. ...
... against the miter guide and fence. Make sure the material is clear of the cutting wheel before turning on the saw. Turn the on/off a small amount of tile until the wheel is straying from the mark, you can not force the wheel back to a complete stop before removing any... the flow adjustment valve to the on position. Let the cutting wheel build up to full speed and wait for the wheel to get wet before moving the material into the wheel. Hold the material firmly against the miter guide and feed the material into the cutting wheel. ...
Owners Manual
Page 24
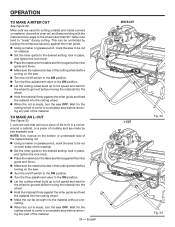
...61550; Let the cutting wheel build up to full speed and wait for the wheel to get wet before removing any angle to a complete stop before moving the material into the material without overcutting. ... When the cut is clear of molding and are made , turn the saw . Turn the on/off switch to the on position. Turn the flow adjustment valve ...61550; When the cut Fig. 32 Fig. 33 Miter cuts are cuts that remove a piece of tile to fit in place, and tighten the lock knob. Place the material on position. ...
...61550; Let the cutting wheel build up to full speed and wait for the wheel to get wet before removing any angle to a complete stop before moving the material into the material without overcutting. ... When the cut is clear of molding and are made , turn the saw . Turn the on/off switch to the on position. Turn the flow adjustment valve ...61550; When the cut Fig. 32 Fig. 33 Miter cuts are cuts that remove a piece of tile to fit in place, and tighten the lock knob. Place the material on position. ...


