
Operating Instructions
Page 5
... 1 Menu...105 Default Settings 2 Menu...107 USB Settings Menu...110 Settings...110 Display Status...111 Network Settings Menu...112 Wired LAN...112 Wireless LAN (RICOH PJ X3351N/WX3351N/WX4241N only 113 LAN Common...118 Projector ID...119 Setup Wizard...120 Display Status...120 Network Application Settings Menu...121 Administration Tools...121 3 Changing the...-Compatible Devices 80 Preparation...81 Projecting Images from DLNA-Compatible Devices 81 Projecting Images Stored on the DLNA Server 82 Projecting Images Using Smart Devices (RICOH PJ X3351N/WX3351N/WX4241N only 85 5.
... 1 Menu...105 Default Settings 2 Menu...107 USB Settings Menu...110 Settings...110 Display Status...111 Network Settings Menu...112 Wired LAN...112 Wireless LAN (RICOH PJ X3351N/WX3351N/WX4241N only 113 LAN Common...118 Projector ID...119 Setup Wizard...120 Display Status...120 Network Application Settings Menu...121 Administration Tools...121 3 Changing the...-Compatible Devices 80 Preparation...81 Projecting Images from DLNA-Compatible Devices 81 Projecting Images Stored on the DLNA Server 82 Projecting Images Using Smart Devices (RICOH PJ X3351N/WX3351N/WX4241N only 85 5.

Operating Instructions
Page 16
Miracast (RICOH PJ X3351N/WX3351N/WX4241N only) The projector is compatible with the projector and is provided with Miracast, which allows you to duplicate the screen of the projector because general ...
Miracast (RICOH PJ X3351N/WX3351N/WX4241N only) The projector is compatible with the projector and is provided with Miracast, which allows you to duplicate the screen of the projector because general ...

Operating Instructions
Page 19
Projector Parts and Their Functions Projector Parts and Their Functions Exterior The illustrations below depict the RICOH PJ X3351N/WX3351N. 1234 56 7 8 9 10 11 12 1. Illuminance sensor Measures the brightness of the projected image. 3. Exhaust vents Releases ... In socket For connecting the power cord set provided with the projector. 6. Zoom lever/Focus lever • Zoom lever (RICOH PJ X3351N/WX3351N) Adjusts the size of the projected image. • Focus lever (RICOH PJ X4241N/WX4241N) Adjusts the focus of the projecting location. 4. Lamp cover Remove to replace the lamp. 2.
Projector Parts and Their Functions Projector Parts and Their Functions Exterior The illustrations below depict the RICOH PJ X3351N/WX3351N. 1234 56 7 8 9 10 11 12 1. Illuminance sensor Measures the brightness of the projected image. 3. Exhaust vents Releases ... In socket For connecting the power cord set provided with the projector. 6. Zoom lever/Focus lever • Zoom lever (RICOH PJ X3351N/WX3351N) Adjusts the size of the projected image. • Focus lever (RICOH PJ X4241N/WX4241N) Adjusts the focus of the projecting location. 4. Lamp cover Remove to replace the lamp. 2.
Operating Instructions
Page 21
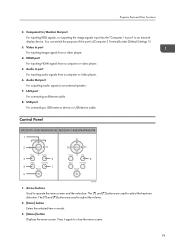
... port For inputting image signals from a computer or video player. 5. Audio Out port For outputting audio signals to an external display device. Control Panel RICOH PJ X3351N/WX3351N RICOH PJ X4241N/WX4241N 1 2 3 6 6 4 7 5 DHY100 1. The [ ] and [ ] buttons are used to adjust the keystone distortion. You can switch the purpose of this port in [Computer 2 Terminal] under...
... port For inputting image signals from a computer or video player. 5. Audio Out port For outputting audio signals to an external display device. Control Panel RICOH PJ X3351N/WX3351N RICOH PJ X4241N/WX4241N 1 2 3 6 6 4 7 5 DHY100 1. The [ ] and [ ] buttons are used to adjust the keystone distortion. You can switch the purpose of this port in [Computer 2 Terminal] under...

Operating Instructions
Page 22
... button Switches the signal input. Press it, and then adjust the focus using the [ ] and [ ] buttons. • [Eco] button (RICOH PJ X4241N/WX4241N) Displays the [Energy Saving Settings] screen. 1. For details about how to switch the input signal, see page 38 "Projecting an Image". 5. [...3 second intervals: Standby. • Flashing at short intervals: Starting up or cooling. 6. [Focus] button/[Eco] button • [Focus] button (RICOH PJ X3351N/WX3351N) Adjusts the focus manually. On the [Energy Saving Settings] screen, you can confirm the status of the projector with the indicator. •...
... button Switches the signal input. Press it, and then adjust the focus using the [ ] and [ ] buttons. • [Eco] button (RICOH PJ X4241N/WX4241N) Displays the [Energy Saving Settings] screen. 1. For details about how to switch the input signal, see page 38 "Projecting an Image". 5. [...3 second intervals: Standby. • Flashing at short intervals: Starting up or cooling. 6. [Focus] button/[Eco] button • [Focus] button (RICOH PJ X3351N/WX3351N) Adjusts the focus manually. On the [Energy Saving Settings] screen, you can confirm the status of the projector with the indicator. •...

Operating Instructions
Page 24
For details, see page 43 "Reducing the size of the projected image". 11. [Focus] button • RICOH PJ X3351N/WX3351N Adjusts the focus manually. On the [Energy Saving Settings] screen, you can specify the energy saving settings for Using the Projector 9....50 "Using the Presentation Timer". 15. [ID] button Registers the remote control ID. For details, see page 47 "Adjusting the Volume of RICOH PJ X3351N/WX3351N". • RICOH PJ X4241N/WX4241N This button is not used . 12. [Keystone] button Displays the keystone adjustment bars. For details, see page 49 "Specifying the Lamp Settings...
For details, see page 43 "Reducing the size of the projected image". 11. [Focus] button • RICOH PJ X3351N/WX3351N Adjusts the focus manually. On the [Energy Saving Settings] screen, you can specify the energy saving settings for Using the Projector 9....50 "Using the Presentation Timer". 15. [ID] button Registers the remote control ID. For details, see page 47 "Adjusting the Volume of RICOH PJ X3351N/WX3351N". • RICOH PJ X4241N/WX4241N This button is not used . 12. [Keystone] button Displays the keystone adjustment bars. For details, see page 49 "Specifying the Lamp Settings...

Operating Instructions
Page 33
Positioning the Projector Projection size 70 inches 80 inches 90 inches 100 inches 110 inches 120 inches RICOH PJ WX4241N Projection size 60 inches 70 inches 80 inches 90 inches 100 inches 110 inches 120 inches 140 inches a Projection distance 0.85 m (2.78 feet) 0.97 m (3.20 ...
Positioning the Projector Projection size 70 inches 80 inches 90 inches 100 inches 110 inches 120 inches RICOH PJ WX4241N Projection size 60 inches 70 inches 80 inches 90 inches 100 inches 110 inches 120 inches 140 inches a Projection distance 0.85 m (2.78 feet) 0.97 m (3.20 ...

Operating Instructions
Page 35
To use the projector via a network using a wireless LAN The RICOH PJ X3351N/WX3351N/WX4241N are equipped with a wireless connectivity function. CUD095 • Use an Ethernet cable that is shielded. Connecting via a network, you must specify settings such as the ...
To use the projector via a network using a wireless LAN The RICOH PJ X3351N/WX3351N/WX4241N are equipped with a wireless connectivity function. CUD095 • Use an Ethernet cable that is shielded. Connecting via a network, you must specify settings such as the ...
Operating Instructions
Page 41
While pressing and holding the [Fn] key, press the key, the key, or the LCD/VGA function key. RICOH PJ X3351N/WX3351N/WX4241N RICOH PJ X4241N • If [Auto Input Search] in the room changes or during the first 30 minutes after the projector is no signal being input. • ...
While pressing and holding the [Fn] key, press the key, the key, or the LCD/VGA function key. RICOH PJ X3351N/WX3351N/WX4241N RICOH PJ X4241N • If [Auto Input Search] in the room changes or during the first 30 minutes after the projector is no signal being input. • ...

Operating Instructions
Page 46
.... The automatic focus function works when you turn on the projection angle. Press the [Focus] button. 2. Adjusting the focus of RICOH PJ X3351N/WX3351N The focus is automatically adjusted by the automatic focus function. The shape of the projected image changes slightly when the focus lever... • The automatic focus function may not work correctly for some other reason, adjust the focus manually. 1. Adjusting the focus of RICOH PJ X4241N/WX4241N 1. Move the focus lever to 14.98 feet) When projecting an image beyond the effective range of the projected image. Projecting an ...
.... The automatic focus function works when you turn on the projection angle. Press the [Focus] button. 2. Adjusting the focus of RICOH PJ X3351N/WX3351N The focus is automatically adjusted by the automatic focus function. The shape of the projected image changes slightly when the focus lever... • The automatic focus function may not work correctly for some other reason, adjust the focus manually. 1. Adjusting the focus of RICOH PJ X4241N/WX4241N 1. Move the focus lever to 14.98 feet) When projecting an image beyond the effective range of the projected image. Projecting an ...

Operating Instructions
Page 69
...-T Ethernet interfaces. This chapter also explains the operations that might fall . For details about QuickProjection, see page 77 "Projecting a Computer's Screen via a network. RICOH PJ X3351N RICOH PJ WX3351N RICOH PJ X4241N RICOH PJ WX4241N Wired LAN Supported Supported Supported Supported Wireless LAN Supported Supported Not supported Supported The projector does not support the Windows Vista and Windows 7 Network...
...-T Ethernet interfaces. This chapter also explains the operations that might fall . For details about QuickProjection, see page 77 "Projecting a Computer's Screen via a network. RICOH PJ X3351N RICOH PJ WX3351N RICOH PJ X4241N RICOH PJ WX4241N Wired LAN Supported Supported Supported Supported Wireless LAN Supported Supported Not supported Supported The projector does not support the Windows Vista and Windows 7 Network...
Operating Instructions
Page 73
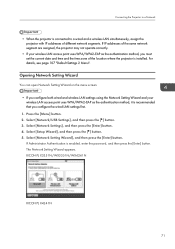
... access point uses WPA/WPA2-EAP as the authentication method, you configure the wired LAN settings first. 1. If IP addresses of different network segments. RICOH PJ X3351N/WX3351N/WX4241N RICOH PJ X4241N 71 Select [Network Settings], and then press the [Enter] button. 4. For details, see page 107 "Default Settings 2 Menu". Select [Network/USB Settings], and...
... access point uses WPA/WPA2-EAP as the authentication method, you configure the wired LAN settings first. 1. If IP addresses of different network segments. RICOH PJ X3351N/WX3351N/WX4241N RICOH PJ X4241N 71 Select [Network Settings], and then press the [Enter] button. 4. For details, see page 107 "Default Settings 2 Menu". Select [Network/USB Settings], and...

Operating Instructions
Page 74
Specify the subnet mask. 72 4. Select [Wired LAN] on Network Setting Wizard, and then press the [Enter] button. RICOH PJ X3351N/WX3351N/WX4241N RICOH PJ X4241N 2. Using the Projector via a Network Configuring the Wired LAN Settings Connect an Ethernet cable to Step 6. 3. Specify the projector's IP address. 4. Contact your network ...
Specify the subnet mask. 72 4. Select [Wired LAN] on Network Setting Wizard, and then press the [Enter] button. RICOH PJ X3351N/WX3351N/WX4241N RICOH PJ X4241N 2. Using the Projector via a Network Configuring the Wired LAN Settings Connect an Ethernet cable to Step 6. 3. Specify the projector's IP address. 4. Contact your network ...

Operating Instructions
Page 81
... projected. To quit the projection, click [ ], and then click [OK]. • For detailed QuickProjection operating methods, refer to the following: • RICOH PJ X3351N/X4241N: 1024 × 768 • RICOH PJ WX3351N/WX4241N: 1280 × 800 79 To pause the projection, click . Enter the identification code on the QuickProjection dialog. The computer's screen is better...
... projected. To quit the projection, click [ ], and then click [OK]. • For detailed QuickProjection operating methods, refer to the following: • RICOH PJ X3351N/X4241N: 1024 × 768 • RICOH PJ WX3351N/WX4241N: 1280 × 800 79 To pause the projection, click . Enter the identification code on the QuickProjection dialog. The computer's screen is better...

Operating Instructions
Page 87
... [Miracast] input appears. 3. If the PIN code method is selected as the destination device. 6. DHY106 4. Projecting Images Using Smart Devices (RICOH PJ X3351N/WX3351N/WX4241N only) Projecting Images Using Smart Devices (RICOH PJ X3351N/WX3351N/WX4241N only) The projector is projected. 85 The selected file is compatible with Miracast. On your smart device. 7. Using Miracast, the...
... [Miracast] input appears. 3. If the PIN code method is selected as the destination device. 6. DHY106 4. Projecting Images Using Smart Devices (RICOH PJ X3351N/WX3351N/WX4241N only) Projecting Images Using Smart Devices (RICOH PJ X3351N/WX3351N/WX4241N only) The projector is projected. 85 The selected file is compatible with Miracast. On your smart device. 7. Using Miracast, the...

Operating Instructions
Page 101
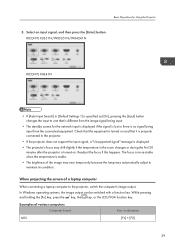
This function is 1920. • Zoom (RICOH PJ WX3351N/WX4241N only) Display the image width as the projection screen width while maintaining the input signal aspect ratio. When you select [Computer 1], [Computer 2], [HDMI.... • 16:9 Display using 16:9 aspect ratio. • RICOH PJ X3351N/X4241N: 1024 × 576 resolution • RICOH PJ WX3351N/WX4241N: 1280 × 720 resolution • Full Display using full size resolution. • RICOH PJ X3351N/X4241N: 1024 × 768 resolution • RICOH PJ WX3351N/WX4241N: 1280 × 800 resolution • Native Display the image without...
This function is 1920. • Zoom (RICOH PJ WX3351N/WX4241N only) Display the image width as the projection screen width while maintaining the input signal aspect ratio. When you select [Computer 1], [Computer 2], [HDMI.... • 16:9 Display using 16:9 aspect ratio. • RICOH PJ X3351N/X4241N: 1024 × 576 resolution • RICOH PJ WX3351N/WX4241N: 1280 × 720 resolution • Full Display using full size resolution. • RICOH PJ X3351N/X4241N: 1024 × 768 resolution • RICOH PJ WX3351N/WX4241N: 1280 × 800 resolution • Native Display the image without...

Operating Instructions
Page 106
... to turn on the projector. • Wired LAN You can turn on the projector from standby mode via a wired LAN. • Wired/Wireless LAN (RICOH PJ X3351N/WX3351N/ WX4241N only) You can turn on Standby Select a network function to be enabled while in standby to save energy while in standby. • Eco You...
... to turn on the projector. • Wired LAN You can turn on the projector from standby mode via a wired LAN. • Wired/Wireless LAN (RICOH PJ X3351N/WX3351N/ WX4241N only) You can turn on Standby Select a network function to be enabled while in standby to save energy while in standby. • Eco You...

Operating Instructions
Page 108
Changing the Projector Settings Item Default User Logo > Register Logo - User logos can be registered up to the following resolutions: • RICOH PJ X3351N/X4241N: 1024 × 768 pixels • RICOH PJ WX3351N/WX4241N: 1280 × 800 pixels This function is connected to [On], [3D Projection] in the start-up screen or as the input signal...
Changing the Projector Settings Item Default User Logo > Register Logo - User logos can be registered up to the following resolutions: • RICOH PJ X3351N/X4241N: 1024 × 768 pixels • RICOH PJ WX3351N/WX4241N: 1280 × 800 pixels This function is connected to [On], [3D Projection] in the start-up screen or as the input signal...

Operating Instructions
Page 115
... projector automatically. Enable IP Address Enter the projector's IP address. 0.0.0.0 Subnet Mask Enter the subnet mask. 0.0.0.0 Default Gateway Enter the default gateway. 0.0.0.0 Wireless LAN (RICOH PJ X3351N/WX3351N/WX4241N only) Simple Settings Item Simple Wireless LAN Setup - Default Enable 113 The IP address is allocated automatically from the DHCP server when [Enable] is...
... projector automatically. Enable IP Address Enter the projector's IP address. 0.0.0.0 Subnet Mask Enter the subnet mask. 0.0.0.0 Default Gateway Enter the default gateway. 0.0.0.0 Wireless LAN (RICOH PJ X3351N/WX3351N/WX4241N only) Simple Settings Item Simple Wireless LAN Setup - Default Enable 113 The IP address is allocated automatically from the DHCP server when [Enable] is...

Operating Instructions
Page 166
8. Appendix Component Projection method Lamp Projection screen size Projection distance Speaker Specifications RICOH PJ X3351N/WX3351N: 1.5x zoom lens RICOH PJ X4241N/WX4241N: Short-focus lens 250 W high-pressure mercury lamp RICOH PJ X3351N: 30 to 200 inches RICOH PJ WX3351N: 40 to 240 inches RICOH PJ X4241N: 50 to 120 inches RICOH PJ WX4241N: 60 to 140 inches RICOH PJ X3351N: 0.68 to 7.20 m (2.22 to 23.61 feet) RICOH PJ WX3351N: 0.77 to 7.33 m (2.53 to 24.06 feet) RICOH PJ X4241N: 0.59 to 1.49 m (1.49 to 4.88 feet) RICOH PJ WX4241N: 0.61 to 1.48 m (2.00 to 4.85 feet) 10 W (Mono) 164
8. Appendix Component Projection method Lamp Projection screen size Projection distance Speaker Specifications RICOH PJ X3351N/WX3351N: 1.5x zoom lens RICOH PJ X4241N/WX4241N: Short-focus lens 250 W high-pressure mercury lamp RICOH PJ X3351N: 30 to 200 inches RICOH PJ WX3351N: 40 to 240 inches RICOH PJ X4241N: 50 to 120 inches RICOH PJ WX4241N: 60 to 140 inches RICOH PJ X3351N: 0.68 to 7.20 m (2.22 to 23.61 feet) RICOH PJ WX3351N: 0.77 to 7.33 m (2.53 to 24.06 feet) RICOH PJ X4241N: 0.59 to 1.49 m (1.49 to 4.88 feet) RICOH PJ WX4241N: 0.61 to 1.48 m (2.00 to 4.85 feet) 10 W (Mono) 164
