

Operating Instructions
Page 1
Operating Instructions Preparations for Using the Projector Projecting an Image Projecting Images from a USB Memory Device or Digital Camera Using the Projector via a Network Changing the Projector Settings Troubleshooting Maintenance Appendix For safe and correct use, be sure to read the Safety Information in Read This First before using the machine.
Operating Instructions Preparations for Using the Projector Projecting an Image Projecting Images from a USB Memory Device or Digital Camera Using the Projector via a Network Changing the Projector Settings Troubleshooting Maintenance Appendix For safe and correct use, be sure to read the Safety Information in Read This First before using the machine.

Operating Instructions
Page 3
...Range of the Remote Control...23 Loading Batteries into the Remote Control 24 Inputting Text...25 Operating Multiple Projectors with the Projector...8 How to the Projector...32 Connecting a Computer...32 Connecting AV Equipment...34 Connecting an External Display Device...35 Connecting an ...External Speaker...35 2. Preparations for Using the Projector Precautions for Using the Projector...37 1 TABLE OF CONTENTS Introduction...6 Copyrights to Images...6 Important...6 Notes to Users Viewing 3D Images...6 Manuals ...
...Range of the Remote Control...23 Loading Batteries into the Remote Control 24 Inputting Text...25 Operating Multiple Projectors with the Projector...8 How to the Projector...32 Connecting a Computer...32 Connecting AV Equipment...34 Connecting an External Display Device...35 Connecting an ...External Speaker...35 2. Preparations for Using the Projector Precautions for Using the Projector...37 1 TABLE OF CONTENTS Introduction...6 Copyrights to Images...6 Important...6 Notes to Users Viewing 3D Images...6 Manuals ...
Operating Instructions
Page 4
... Projection...42 Changing the Size of the Projected Image 42 Adjusting the Focus...44 Adjusting for Using a Wireless LAN...68 Connecting the Projector to JPEG Files 65 4. Projecting Images from a USB Memory Device or Digital Camera Requirements for Projecting Images from a USB Device ... Files Using JPEG Conversion Tool 64 How to Use JPEG Conversion Tool...64 Converting Presentation Files to a Network...70 2 Using the Projector via a Network Before Connecting to a Network...67 Connecting an Ethernet Cable...67 Precautions for Keystone Distortion...45 Operations while Projecting Images......
... Projection...42 Changing the Size of the Projected Image 42 Adjusting the Focus...44 Adjusting for Using a Wireless LAN...68 Connecting the Projector to JPEG Files 65 4. Projecting Images from a USB Memory Device or Digital Camera Requirements for Projecting Images from a USB Device ... Files Using JPEG Conversion Tool 64 How to Use JPEG Conversion Tool...64 Converting Presentation Files to a Network...70 2 Using the Projector via a Network Before Connecting to a Network...67 Connecting an Ethernet Cable...67 Precautions for Keystone Distortion...45 Operations while Projecting Images......
Operating Instructions
Page 5
... Images from DLNA-Compatible Devices 81 Projecting Images Stored on the DLNA Server 82 Projecting Images Using Smart Devices (RICOH PJ X3351N/WX3351N/WX4241N only 85 5. Opening Network Setting Wizard...71 Configuring the Wired LAN Settings...72 Configuring the Wireless LAN Settings for...USB Settings Menu...110 Settings...110 Display Status...111 Network Settings Menu...112 Wired LAN...112 Wireless LAN (RICOH PJ X3351N/WX3351N/WX4241N only 113 LAN Common...118 Projector ID...119 Setup Wizard...120 Display Status...120 Network Application Settings Menu...121 Administration Tools...121 3
... Images from DLNA-Compatible Devices 81 Projecting Images Stored on the DLNA Server 82 Projecting Images Using Smart Devices (RICOH PJ X3351N/WX3351N/WX4241N only 85 5. Opening Network Setting Wizard...71 Configuring the Wired LAN Settings...72 Configuring the Wireless LAN Settings for...USB Settings Menu...110 Settings...110 Display Status...111 Network Settings Menu...112 Wired LAN...112 Wireless LAN (RICOH PJ X3351N/WX3351N/WX4241N only 113 LAN Common...118 Projector ID...119 Setup Wizard...120 Display Status...120 Network Application Settings Menu...121 Administration Tools...121 3

Operating Instructions
Page 6
... Web Image Monitor 154 Displaying Web Image Monitor...154 About Browse Mode and Edit Mode...155 Login to Edit Mode...156 Controlling and Monitoring the Projector Using Crestron RoomView 157 Displaying Crestron WebUI...157 Using Crestron WebUI...158 Consumables...161 8. Troubleshooting Indicator Display List...131 Common Problems...136 Accessing the Online...
... Web Image Monitor 154 Displaying Web Image Monitor...154 About Browse Mode and Edit Mode...155 Login to Edit Mode...156 Controlling and Monitoring the Projector Using Crestron RoomView 157 Displaying Crestron WebUI...157 Using Crestron WebUI...158 Consumables...161 8. Troubleshooting Indicator Display List...131 Common Problems...136 Accessing the Online...

Operating Instructions
Page 8
... than 3D images. • Before viewing 3D images, make sure to read the manuals provided with the projector: • You need to use the optional 3D glasses that support DLP Link (RICOH PJ 3D Glasses Type 2). • How 3D images are examples that may vary according to the individual. •...; Do not use of handling or operating the machine. If you feel sick, consult a doctor. 6 The projector uses DLP Link technology to feel sick...
... than 3D images. • Before viewing 3D images, make sure to read the manuals provided with the projector: • You need to use the optional 3D glasses that support DLP Link (RICOH PJ 3D Glasses Type 2). • How 3D images are examples that may vary according to the individual. •...; Do not use of handling or operating the machine. If you feel sick, consult a doctor. 6 The projector uses DLP Link technology to feel sick...

Operating Instructions
Page 10
... products are a summary of Operating Instructions, see Operating Instructions for detailed information. It also provides information about how to install the projector, how to project images using general names: Product name RICOH JPEG Conversion Tool Type A General name JPEG Conversion Tool 8 Since the contents of this manual are referred to using the...
... products are a summary of Operating Instructions, see Operating Instructions for detailed information. It also provides information about how to install the projector, how to project images using general names: Product name RICOH JPEG Conversion Tool Type A General name JPEG Conversion Tool 8 Since the contents of this manual are referred to using the...

Operating Instructions
Page 11
... to pay attention to when using , see page 10 "Model-Specific Information". Indicates supplementary explanations of the projector's functions, and instructions on resolving user errors. [ ] Indicates the names of this manual are using the projector. Depending on which symbol corresponds to the model you are using. It also indicates items displayed on...
... to pay attention to when using , see page 10 "Model-Specific Information". Indicates supplementary explanations of the projector's functions, and instructions on resolving user errors. [ ] Indicates the names of this manual are using the projector. Depending on which symbol corresponds to the model you are using. It also indicates items displayed on...

Operating Instructions
Page 12
...the label contains the following information is region-specific. Read the label. Model-Specific Information This section explains how you can identify the region your projector belongs to. There is a region B model: • CODE XXXX -17 • Dimensions in this manual are given in the position shown... below. Read the information under the symbol that identify the region your projector belongs to the inch units. 10 The label contains details that corresponds to the region of measure: metric and inch. CUD107 The following ...
...the label contains the following information is region-specific. Read the label. Model-Specific Information This section explains how you can identify the region your projector belongs to. There is a region B model: • CODE XXXX -17 • Dimensions in this manual are given in the position shown... below. Read the information under the symbol that identify the region your projector belongs to the inch units. 10 The label contains details that corresponds to the region of measure: metric and inch. CUD107 The following ...

Operating Instructions
Page 13
...cord plug with wet hands. The machine might cause someone to connect it with children. • Do not use the machine. Preparations for Using the Projector • If metal objects, or water or other than those that might fall . 1. Hot air may result in fire or electric shock. •... the power cord and connection cable in fire or electric shock. • Do not use it to other appliances. Precautions for Using the Projector This chapter explains the names and functions of the different parts of this machine. Doing so could result in fire or electric shock. •...
...cord plug with wet hands. The machine might cause someone to connect it with children. • Do not use the machine. Preparations for Using the Projector • If metal objects, or water or other than those that might fall . 1. Hot air may result in fire or electric shock. •... the power cord and connection cable in fire or electric shock. • Do not use it to other appliances. Precautions for Using the Projector This chapter explains the names and functions of the different parts of this machine. Doing so could result in fire or electric shock. •...

Operating Instructions
Page 14
Preparations for Using the Projector • Push the power plug all the way into the base. Plug the power cord in fire or electric shock. • Do not block the ...
Preparations for Using the Projector • Push the power plug all the way into the base. Plug the power cord in fire or electric shock. • Do not block the ...
Operating Instructions
Page 15
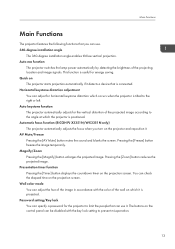
...Freeze Pressing the [AV Mute] button mutes the sound and blanks the screen. You can check the elapsed time on The projector starts projection automatically if it detects a device that is projected. Password setting/Key lock You can specify a password for horizontal ...Timer] button displays the countdown timer on the projector and reposition it is connected. Automatic focus function (RICOH PJ X3351N/WX3351N only) The projector automatically adjusts the focus when you can use it. Auto eco function The projector switches the lamp power automatically by detecting the ...
...Freeze Pressing the [AV Mute] button mutes the sound and blanks the screen. You can check the elapsed time on The projector starts projection automatically if it detects a device that is projected. Password setting/Key lock You can specify a password for horizontal ...Timer] button displays the countdown timer on the projector and reposition it is connected. Automatic focus function (RICOH PJ X3351N/WX3351N only) The projector automatically adjusts the focus when you can use it. Auto eco function The projector switches the lamp power automatically by detecting the ...

Operating Instructions
Page 16
... to convert PowerPoint materials to project images. Presentations without a computer The projector can project JPEG and MPEG files stored on the projection screen. 14 Miracast (RICOH PJ X3351N/WX3351N/WX4241N only) The projector is compatible with the projector and is used for Using the Projector Administrator authentication Enable administrator authentication so that is starting up. User logo...
... to convert PowerPoint materials to project images. Presentations without a computer The projector can project JPEG and MPEG files stored on the projection screen. 14 Miracast (RICOH PJ X3351N/WX3351N/WX4241N only) The projector is compatible with the projector and is used for Using the Projector Administrator authentication Enable administrator authentication so that is starting up. User logo...

Operating Instructions
Page 17
Read This First Start Guide Remote control AAA battery LR03 CD-ROM RGB cable Power cord Warranty card Carrying bag (RICOH PJ X3351N/WX3351N only) • The bundled accessories may vary depending on the location that everything is included in the package. Checking the Accessories Checking the Accessories The projector is provided with the projector. 15 Make sure that this projector was purchased. • Use only the RGB cable and power cord provided with the following accessories. If anything is missing or damaged, contact your sales representative or service representative.
Read This First Start Guide Remote control AAA battery LR03 CD-ROM RGB cable Power cord Warranty card Carrying bag (RICOH PJ X3351N/WX3351N only) • The bundled accessories may vary depending on the location that everything is included in the package. Checking the Accessories Checking the Accessories The projector is provided with the projector. 15 Make sure that this projector was purchased. • Use only the RGB cable and power cord provided with the following accessories. If anything is missing or damaged, contact your sales representative or service representative.

Operating Instructions
Page 18
Preparations for Using the Projector • The various applications are on the provided CD-ROM. 1. For instructions about using the applications, see page 64 "How to Use JPEG Conversion Tool", page 77 "How to Use QuickProjection", and page 151 "Managing the Projector Using Projector Management Utility". 16
Preparations for Using the Projector • The various applications are on the provided CD-ROM. 1. For instructions about using the applications, see page 64 "How to Use JPEG Conversion Tool", page 77 "How to Use QuickProjection", and page 151 "Managing the Projector Using Projector Management Utility". 16

Operating Instructions
Page 19
.... 2. Remote control receiver Receives the signal from inside the projector. 7. Zoom lever/Focus lever • Zoom lever (RICOH PJ X3351N/WX3351N) Adjusts the size of the projected image. • Focus lever (RICOH PJ X4241N/WX4241N) Adjusts the focus of the projecting location. 4. Projector Parts and Their Functions Projector Parts and Their Functions Exterior The illustrations below depict the...
.... 2. Remote control receiver Receives the signal from inside the projector. 7. Zoom lever/Focus lever • Zoom lever (RICOH PJ X3351N/WX3351N) Adjusts the size of the projected image. • Focus lever (RICOH PJ X4241N/WX4241N) Adjusts the focus of the projecting location. 4. Projector Parts and Their Functions Projector Parts and Their Functions Exterior The illustrations below depict the...

Operating Instructions
Page 20
... shipped. 1. Speaker Outputs the audio input from a video player. 18 Preparations for the optional interactive kit. Adjustable feet are located on the Projector The illustrations below depict the RICOH PJ X3351N/WX3351N. 7 8 1 2 3 4 56 CUD063 1. Be sure to disconnect the power cord before using the projector. Remove the film before attaching or detaching the adapter.
... shipped. 1. Speaker Outputs the audio input from a video player. 18 Preparations for the optional interactive kit. Adjustable feet are located on the Projector The illustrations below depict the RICOH PJ X3351N/WX3351N. 7 8 1 2 3 4 56 CUD063 1. Be sure to disconnect the power cord before using the projector. Remove the film before attaching or detaching the adapter.
Operating Instructions
Page 21
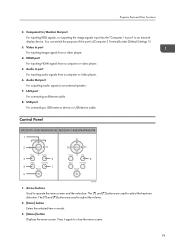
...] under [Default Settings 1]. 3. Control Panel RICOH PJ X3351N/WX3351N RICOH PJ X4241N/WX4241N 1 2 3 6 6 4 7 5 DHY100 1. The [ ] and [ ] buttons are used to adjust the keystone distortion. Computer2 In/Monitor Out port For inputting RGB signals, or outputting the image signals input into the "Computer1 In port" to close the menu screen. 19 Projector Parts and Their Functions 2. HDMI...
...] under [Default Settings 1]. 3. Control Panel RICOH PJ X3351N/WX3351N RICOH PJ X4241N/WX4241N 1 2 3 6 6 4 7 5 DHY100 1. The [ ] and [ ] buttons are used to adjust the keystone distortion. Computer2 In/Monitor Out port For inputting RGB signals, or outputting the image signals input into the "Computer1 In port" to close the menu screen. 19 Projector Parts and Their Functions 2. HDMI...

Operating Instructions
Page 22
...see page 38 "Projecting an Image". 5. [Power] button Turns the projector on . • Off: Power is muted. 20 Press it, and then adjust the focus using the [ ] and [ ] buttons. • [Eco] button (RICOH PJ X4241N/WX4241N) Displays the [Energy Saving Settings] screen. On the [Energy Saving ...Settings] screen, you can confirm the status of the projector with the indicator. • On: Power is on and off . • Flashing at ...
...see page 38 "Projecting an Image". 5. [Power] button Turns the projector on . • Off: Power is muted. 20 Press it, and then adjust the focus using the [ ] and [ ] buttons. • [Eco] button (RICOH PJ X4241N/WX4241N) Displays the [Energy Saving Settings] screen. On the [Energy Saving ...Settings] screen, you can confirm the status of the projector with the indicator. • On: Power is on and off . • Flashing at ...

Operating Instructions
Page 23
.... For details, see page 49 "Freezing the Image". 8. [Magnify] button Displays the magnification ratio bar. Arrow buttons Used to enter numbers. 6. [Power] button Turns the projector on and off. 7. [Freeze] button Temporarily freezes the image. For details, see page 47 "Enlarging the Image". 21 Remote Control Parts and Their Functions Remote...
.... For details, see page 49 "Freezing the Image". 8. [Magnify] button Displays the magnification ratio bar. Arrow buttons Used to enter numbers. 6. [Power] button Turns the projector on and off. 7. [Freeze] button Temporarily freezes the image. For details, see page 47 "Enlarging the Image". 21 Remote Control Parts and Their Functions Remote...