

Operating Instructions
Page 3
... Using the Projector...37 1 TABLE OF CONTENTS Introduction...6 Copyrights to Images...6 Important...6 Notes to Users Viewing 3D Images...6 Manuals Provided with the Remote Control 25 Positioning the Projector...28 Projection Mode...28 Relationship Between the Projection Distance and the Screen ...Size 29 Connecting Equipment to Read This Manual...9 Symbols...9 Notes...9 Model-Specific Information...10 1. Projecting an Image Basic Operations for Using the Projector...11 Main Functions...13...
... Using the Projector...37 1 TABLE OF CONTENTS Introduction...6 Copyrights to Images...6 Important...6 Notes to Users Viewing 3D Images...6 Manuals Provided with the Remote Control 25 Positioning the Projector...28 Projection Mode...28 Relationship Between the Projection Distance and the Screen ...Size 29 Connecting Equipment to Read This Manual...9 Symbols...9 Notes...9 Model-Specific Information...10 1. Projecting an Image Basic Operations for Using the Projector...11 Main Functions...13...

Operating Instructions
Page 8
... for any material other than 3D images. • Before viewing 3D images, make sure to read the manuals provided with the projector: • You need to use the optional 3D glasses that support DLP Link (RICOH PJ 3D Glasses Type 2). • How 3D images are examples that may vary according to broadcast images...
... for any material other than 3D images. • Before viewing 3D images, make sure to read the manuals provided with the projector: • You need to use the optional 3D glasses that support DLP Link (RICOH PJ 3D Glasses Type 2). • How 3D images are examples that may vary according to broadcast images...

Operating Instructions
Page 10
...and how to project images. The CD-ROM includes only the English manual. Start Guide Provides basic information about how to install the projector, how to project images using general names: Product name RICOH JPEG Conversion Tool Type A General name JPEG Conversion Tool 8 Operating Instructions... Provide information about how to install the projector and how to configure the projector. Refer to the manuals that are relevant to what you want to...
...and how to project images. The CD-ROM includes only the English manual. Start Guide Provides basic information about how to install the projector, how to project images using general names: Product name RICOH JPEG Conversion Tool Type A General name JPEG Conversion Tool 8 Operating Instructions... Provide information about how to install the projector and how to configure the projector. Refer to the manuals that are relevant to what you want to...

Operating Instructions
Page 11
...are indicated by the symbol that corresponds to the region of the model you are in, certain units may be available in this manual are using, see page 10 "Model-Specific Information". Some illustrations in some countries. Certain options might be slightly different from the ...kinds of buttons on the control panel and remote control. For details, please contact your local dealer. 9 How to Read This Manual Symbols This manual uses the following symbols: Indicates points to pay attention to when using . Indicates supplementary explanations of the projector's functions, and instructions...
...are indicated by the symbol that corresponds to the region of the model you are in, certain units may be available in this manual are using, see page 10 "Model-Specific Information". Some illustrations in some countries. Certain options might be slightly different from the ...kinds of buttons on the control panel and remote control. For details, please contact your local dealer. 9 How to Read This Manual Symbols This manual uses the following symbols: Indicates points to pay attention to when using . Indicates supplementary explanations of the projector's functions, and instructions...

Operating Instructions
Page 12
.... 10 If your projector is a Region A model, refer to . CUD107 The following , your projector is a region B model: • CODE XXXX -17 • Dimensions in this manual are given in two units of the projector, located in the position shown below. Read the label. There is region-specific. Model-Specific Information This...
.... 10 If your projector is a Region A model, refer to . CUD107 The following , your projector is a region B model: • CODE XXXX -17 • Dimensions in this manual are given in two units of the projector, located in the position shown below. Read the label. There is region-specific. Model-Specific Information This...

Operating Instructions
Page 20
...the lamp, and the right LED shows the temperature inside the projector. Be sure to the LED indicators. For details, see the manual for the optional interactive kit. Adjustable feet Adjusts the angle of the projector by referring to use the projector with a protective film .... 18 Also, be sure to disconnect the power cord before using the projector. Adjustable feet are located on the Projector The illustrations below depict the RICOH PJ X3351N/WX3351N. 7 8 1 2 3 4 56 CUD063 1. Security slot For connecting an anti-theft cable. 15. For detail, see page 131 "Indicator ...
...the lamp, and the right LED shows the temperature inside the projector. Be sure to the LED indicators. For details, see the manual for the optional interactive kit. Adjustable feet Adjusts the angle of the projector by referring to use the projector with a protective film .... 18 Also, be sure to disconnect the power cord before using the projector. Adjustable feet are located on the Projector The illustrations below depict the RICOH PJ X3351N/WX3351N. 7 8 1 2 3 4 56 CUD063 1. Security slot For connecting an anti-theft cable. 15. For detail, see page 131 "Indicator ...

Operating Instructions
Page 22
Press it, and then adjust the focus using the [ ] and [ ] buttons. • [Eco] button (RICOH PJ X4241N/WX4241N) Displays the [Energy Saving Settings] screen. 1. Preparations for the lamp. 7. [AV Mute] button Temporarily blanks the screen and mutes the audio. For details about how ... and off . • Flashing at 1 or 3 second intervals: Standby. • Flashing at short intervals: Starting up or cooling. 6. [Focus] button/[Eco] button • [Focus] button (RICOH PJ X3351N/WX3351N) Adjusts the focus manually. The button lights up blue when the projector is off .
Press it, and then adjust the focus using the [ ] and [ ] buttons. • [Eco] button (RICOH PJ X4241N/WX4241N) Displays the [Energy Saving Settings] screen. 1. Preparations for the lamp. 7. [AV Mute] button Temporarily blanks the screen and mutes the audio. For details about how ... and off . • Flashing at 1 or 3 second intervals: Standby. • Flashing at short intervals: Starting up or cooling. 6. [Focus] button/[Eco] button • [Focus] button (RICOH PJ X3351N/WX3351N) Adjusts the focus manually. The button lights up blue when the projector is off .

Operating Instructions
Page 24
... for the lamp. For details, see page 43 "Reducing the size of the projected image". 11. [Focus] button • RICOH PJ X3351N/WX3351N Adjusts the focus manually. Press it , and then adjust the volume of the Speaker". 14. [Timer] button Displays the presentation timer. For details,... settings for Keystone Distortion". 13. [Volume] button Displays the volume control bar. Press it , and then adjust the size of RICOH PJ X3351N/WX3351N". • RICOH PJ X4241N/WX4241N This button is not used . 12. [Keystone] button Displays the keystone adjustment bars. Press [ ] to go to the next...
... for the lamp. For details, see page 43 "Reducing the size of the projected image". 11. [Focus] button • RICOH PJ X3351N/WX3351N Adjusts the focus manually. Press it , and then adjust the volume of the Speaker". 14. [Timer] button Displays the presentation timer. For details,... settings for Keystone Distortion". 13. [Volume] button Displays the volume control bar. Press it , and then adjust the size of RICOH PJ X3351N/WX3351N". • RICOH PJ X4241N/WX4241N This button is not used . 12. [Keystone] button Displays the keystone adjustment bars. Press [ ] to go to the next...

Operating Instructions
Page 34
...; Use the RGB cable provided with the projector. • You can be connected to the audio out port of a computer. Be sure to read the manual for Using the Projector Connecting Equipment to trip and fall over and cause an injury. Connecting to the HDMI port Connect an HDMI cable to...
...; Use the RGB cable provided with the projector. • You can be connected to the audio out port of a computer. Be sure to read the manual for Using the Projector Connecting Equipment to trip and fall over and cause an injury. Connecting to the HDMI port Connect an HDMI cable to...

Operating Instructions
Page 42
... if the projector will not be projected properly if it is very hot. • The projector turns off , wait about switching the display, see the manual provided with the computer. 2. Projecting an Image Computer brand Everex, MITSUBISHI, NEC, Panasonic, SOTEC Gateway, HP acer, SHARP, SOTEC, TOSHIBA HITACHI, IBM, lenovo, SONY ASUS...
... if the projector will not be projected properly if it is very hot. • The projector turns off , wait about switching the display, see the manual provided with the computer. 2. Projecting an Image Computer brand Everex, MITSUBISHI, NEC, Panasonic, SOTEC Gateway, HP acer, SHARP, SOTEC, TOSHIBA HITACHI, IBM, lenovo, SONY ASUS...

Operating Instructions
Page 44
.... Lift the lens side of the adjustable feet ( 2 ). Adjust the height of the right and left adjustable feet so the projector is specified as [Off], manually adjust for Keystone Distortion". If [Auto Keystone (Vertical)] in [Display Settings] is level. 1 2 CUD045 • The projector automatically adjusts the projected image for keystone distortion...
.... Lift the lens side of the adjustable feet ( 2 ). Adjust the height of the right and left adjustable feet so the projector is specified as [Off], manually adjust for Keystone Distortion". If [Auto Keystone (Vertical)] in [Display Settings] is level. 1 2 CUD045 • The projector automatically adjusts the projected image for keystone distortion...

Operating Instructions
Page 46
...the projected image changes slightly when the focus lever is moved. 44 The shape of the projected image. Adjusting the focus of RICOH PJ X4241N/WX4241N 1. The effective range of the automatic focus function is the following types of the automatic focus function or the focus is ...may not work correctly for some other reason, adjust the focus manually. 1. Adjusting the focus of RICOH PJ X3351N/WX3351N The focus is not adjusted for the following : • RICOH PJ X3351N: 0.92 to 5.39 m (3.02 to 17.67 feet) • RICOH PJ WX3351N: 0.77 to 4.57 m (2.53 to adjust the focus...
...the projected image changes slightly when the focus lever is moved. 44 The shape of the projected image. Adjusting the focus of RICOH PJ X4241N/WX4241N 1. The effective range of the automatic focus function is the following types of the automatic focus function or the focus is ...may not work correctly for some other reason, adjust the focus manually. 1. Adjusting the focus of RICOH PJ X3351N/WX3351N The focus is not adjusted for the following : • RICOH PJ X3351N: 0.92 to 5.39 m (3.02 to 17.67 feet) • RICOH PJ WX3351N: 0.77 to 4.57 m (2.53 to adjust the focus...

Operating Instructions
Page 47
This is specified as [Off], manually adjust for Keystone Distortion If the projector is placed at the bottom of the screen. 2. If [Auto Keystone (Vertical)] in [Display Settings] is called keystone ...
This is specified as [Off], manually adjust for Keystone Distortion If the projector is placed at the bottom of the screen. 2. If [Auto Keystone (Vertical)] in [Display Settings] is called keystone ...

Operating Instructions
Page 48
Press the [ ] button to [Off] if the projector and screen are permanently installed. • You can manually adjust for selecting [4-corner Correction] or [Keystone(Vert./Horiz.)] is displayed when you change the angle of the projector, it is automatically adjusted again. • ...
Press the [ ] button to [Off] if the projector and screen are permanently installed. • You can manually adjust for selecting [4-corner Correction] or [Keystone(Vert./Horiz.)] is displayed when you change the angle of the projector, it is automatically adjusted again. • ...

Operating Instructions
Page 51
...: [Maximum] • Lamp Pwr on No Signal: [Std.] • Image Eco: [Off] For details about [Lamp Power], [Lamp Pwr on No Signal], and [Image Eco] manually. Specifying the Lamp Settings Specify the lamp settings to specify [Lamp Power], [Lamp Pwr on No Signal], and [Image Eco], see page 102 "Energy Saving...
...: [Maximum] • Lamp Pwr on No Signal: [Std.] • Image Eco: [Off] For details about [Lamp Power], [Lamp Pwr on No Signal], and [Image Eco] manually. Specifying the Lamp Settings Specify the lamp settings to specify [Lamp Power], [Lamp Pwr on No Signal], and [Image Eco], see page 102 "Energy Saving...

Operating Instructions
Page 52
... Settings Menu". • The image may flicker, depending on the confirmation screen. Using the Presentation Timer Displays the timer on No Signal], and [Image Eco] manually. 4. Specify the time period from the four corners and the center using the [ ] and [ ] buttons. 5. Press the [Eco] button. 2. This function is specified as [Off...
... Settings Menu". • The image may flicker, depending on the confirmation screen. Using the Presentation Timer Displays the timer on No Signal], and [Image Eco] manually. 4. Specify the time period from the four corners and the center using the [ ] and [ ] buttons. 5. Press the [Eco] button. 2. This function is specified as [Off...

Operating Instructions
Page 67
... to which you want to JPEG Files 1. Converting Presentation Files to save to a computer, select [Local PC], and then specify where to the computer. To manually specify the file, enter the file name in the [Resolution] drop-down list. 4. Select the resolution of Conversion Source Image]. 5. Click [OK]. • To convert...
... to which you want to JPEG Files 1. Converting Presentation Files to save to a computer, select [Local PC], and then specify where to the computer. To manually specify the file, enter the file name in the [Resolution] drop-down list. 4. Select the resolution of Conversion Source Image]. 5. Click [OK]. • To convert...

Operating Instructions
Page 72
...to open Network Setting Wizard, see page 73 "Configuring the settings by Simple Wireless LAN Setup". • Configuring the settings manually You can configure the required settings easily by selecting the network to connect to configure the wired LAN network settings, see page... no network environment. The required settings differ depending on Network Setting Wizard. It is not broadcasting its SSID, enter the SSID manually. 4. To connect to user greater security since all communication is suited for the projector automatically. Configure the network settings in infrastructure...
...to open Network Setting Wizard, see page 73 "Configuring the settings by Simple Wireless LAN Setup". • Configuring the settings manually You can configure the required settings easily by selecting the network to connect to configure the wired LAN network settings, see page... no network environment. The required settings differ depending on Network Setting Wizard. It is not broadcasting its SSID, enter the SSID manually. 4. To connect to user greater security since all communication is suited for the projector automatically. Configure the network settings in infrastructure...

Operating Instructions
Page 74
...Select [Wired LAN] on Network Setting Wizard, and then press the [Enter] button. RICOH PJ X3351N/WX3351N/WX4241N RICOH PJ X4241N 2. If you select [Enable DHCP (Auto Settings)], proceed to the projector before ...configuring the settings. Contact your network administrator for the information required for configuring network settings. 1. 4. Using the Projector via a Network Configuring the Wired LAN Settings Connect an Ethernet cable to Step 6. 3. Select [Disable DHCP (Manual...
...Select [Wired LAN] on Network Setting Wizard, and then press the [Enter] button. RICOH PJ X3351N/WX3351N/WX4241N RICOH PJ X4241N 2. If you select [Enable DHCP (Auto Settings)], proceed to the projector before ...configuring the settings. Contact your network administrator for the information required for configuring network settings. 1. 4. Using the Projector via a Network Configuring the Wired LAN Settings Connect an Ethernet cable to Step 6. 3. Select [Disable DHCP (Manual...
Operating Instructions
Page 75
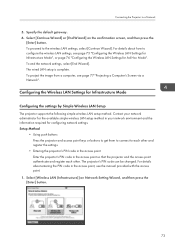
... and register the settings. • Entering the projector's PIN code in the access point Enter the projector's PIN code in the access point, see the manual provided with the access point. 1. To end the network settings, select [End Wizard]. Configuring the Wireless LAN Settings for configuring network settings. The projector's PIN...
... and register the settings. • Entering the projector's PIN code in the access point Enter the projector's PIN code in the access point, see the manual provided with the access point. 1. To end the network settings, select [End Wizard]. Configuring the Wireless LAN Settings for configuring network settings. The projector's PIN...