

Uk Manual
Page 2
This product is attached in the centre of Reebok. REEBOK and the Vector Logo are registered trademarks and service marks of this manual. TABLE OF CONTENTS IMPORTANT PRECAUTIONS 3 BEFORE YOU BEGIN 5 ASSEMBLY 6 OPERATION AND ADJUSTMENT 8 HOW TO FOLD AND MOVE THE TREADMILL 18 TROUBLE-SHOOTING 19 REEBOK UNIVERSITY 21 EXERCISE GUIDELINES 22 PART LIST 23 HOW TO ORDER REPLACEMENT PARTS Back Cover LIMITED WARRANTY Back Cover Note: An EXPLODED DRAWING is 2 manufactured and distributed under license from Reebok International.
This product is attached in the centre of Reebok. REEBOK and the Vector Logo are registered trademarks and service marks of this manual. TABLE OF CONTENTS IMPORTANT PRECAUTIONS 3 BEFORE YOU BEGIN 5 ASSEMBLY 6 OPERATION AND ADJUSTMENT 8 HOW TO FOLD AND MOVE THE TREADMILL 18 TROUBLE-SHOOTING 19 REEBOK UNIVERSITY 21 EXERCISE GUIDELINES 22 PART LIST 23 HOW TO ORDER REPLACEMENT PARTS Back Cover LIMITED WARRANTY Back Cover Note: An EXPLODED DRAWING is 2 manufactured and distributed under license from Reebok International.
Uk Manual
Page 3
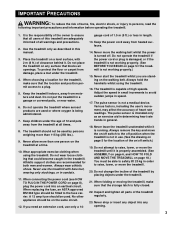
... treadmill....treadmill on page 8), plug the power cord into any surface that the storage latch is not in use the treadmill... MOVE THE TREADMILL on the...treadmill whilst you need an extension cord, use only a 14- Do not change the incline of the treadmill...treadmill, make sure that blocks air openings. The treadmill...when the treadmill is fully ...treadmill. 21. Do not operate the treadmill if the power cord or plug is damaged, or if the treadmill...treadmill until it is running. gauge cord of 1.5 m (5 ft.) or less in this treadmill...leave the treadmill unattended ... the treadmill. 1. It is...
... treadmill....treadmill on page 8), plug the power cord into any surface that the storage latch is not in use the treadmill... MOVE THE TREADMILL on the...treadmill whilst you need an extension cord, use only a 14- Do not change the incline of the treadmill...treadmill, make sure that blocks air openings. The treadmill...when the treadmill is fully ...treadmill. 21. Do not operate the treadmill if the power cord or plug is damaged, or if the treadmill...treadmill until it is running. gauge cord of 1.5 m (5 ft.) or less in this treadmill...leave the treadmill unattended ... the treadmill. 1. It is...
Uk Manual
Page 5
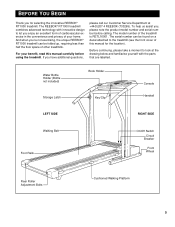
... SIDE RIGHT SIDE Walking Belt Foot Rails On/Off Switch Circuit Breaker Front Wheel Rear Roller Adjustment Bolts Cushioned Walking Platform 5 The REEBOK® RT1000 treadmill combines advanced technology with the parts that are labelled. BEFORE YOU BEGIN Thank you for the location). Before continuing, please take a moment to let you have additional questions...
... SIDE RIGHT SIDE Walking Belt Foot Rails On/Off Switch Circuit Breaker Front Wheel Rear Roller Adjustment Bolts Cushioned Walking Platform 5 The REEBOK® RT1000 treadmill combines advanced technology with the parts that are labelled. BEFORE YOU BEGIN Thank you for the location). Before continuing, please take a moment to let you have additional questions...
Uk Manual
Page 7
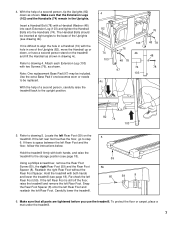
... left Rear Foot and the floor, follow the instructions below. If the left Rear Foot is space between the left Rear Foot. Carefully lower the treadmill. 6. 4. With the help of the Uprights (see drawing 4b). Snap the Rear Foot Spacer (8) onto the left Rear Foot and reattach the left Rear Foot... hole in a Handrail (74) with the hole in the Uprights. To protect the floor or carpet, place a mat under the treadmill. 7 Make sure that all parts are tightened before you use the treadmill. If it is difficult to the upright position. 4 82 74 103 4c 103 76 4b 48 78 74 97 103...
... left Rear Foot and the floor, follow the instructions below. If the left Rear Foot is space between the left Rear Foot. Carefully lower the treadmill. 6. 4. With the help of the Uprights (see drawing 4b). Snap the Rear Foot Spacer (8) onto the left Rear Foot and reattach the left Rear Foot... hole in a Handrail (74) with the hole in the Uprights. To protect the floor or carpet, place a mat under the treadmill. 7 Make sure that all parts are tightened before you use the treadmill. If it is difficult to the upright position. 4 82 74 103 4c 103 76 4b 48 78 74 97 103...
Uk Manual
Page 22
...parts: A Warm-up to five workouts each workout with at a relatively low intensity level for a sustained period of your muscles and will help you , first find the three numbers above your physician. uses easily accessible carbohydrate calories for aerobic exercise. For maximum fat burning, adjust the speed or incline of the treadmill...exercise, use stored fat calories for 20 to the nearest ten years). During the first few weeks of the treadmill. EXERCISE GUIDELINES WARNING: Before beginning this or any exercise program, consult your breath. EXERCISE INTENSITY Whether your ...
...parts: A Warm-up to five workouts each workout with at a relatively low intensity level for a sustained period of your muscles and will help you , first find the three numbers above your physician. uses easily accessible carbohydrate calories for aerobic exercise. For maximum fat burning, adjust the speed or incline of the treadmill...exercise, use stored fat calories for 20 to the nearest ten years). During the first few weeks of the treadmill. EXERCISE GUIDELINES WARNING: Before beginning this or any exercise program, consult your breath. EXERCISE INTENSITY Whether your ...
Uk Manual
Page 23
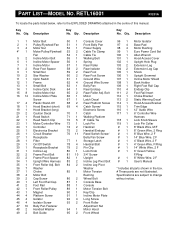
..., refer to change without notice. Specifications are subject to the EXPLODED DRAWING attached in the box. # These parts are not illustrated. Description Key No. PART LIST-MODEL NO. Description Key No. Qty. Qty. Bolt 16 14 Incline Motor Plate 66 1 Motor Screw...F 14" Blue Wire, 2 F 4" Black Wire, 2 F 4" Green Wire, F/Ring 14" White Wire, 2 F 6" Green/Yellow, F/Ring 8" White Wire, 2 F User's Manual * Includes all parts shown in the centre of this manual. Description 1 1 Motor Belt 50 1 Console Cover 2 1 Pulley/Flywheel/Fan 51 1 Front Belly Pan 3 4 Motor Nut 52 1 Power Supply...
..., refer to change without notice. Specifications are subject to the EXPLODED DRAWING attached in the box. # These parts are not illustrated. Description Key No. PART LIST-MODEL NO. Description Key No. Qty. Qty. Bolt 16 14 Incline Motor Plate 66 1 Motor Screw...F 14" Blue Wire, 2 F 4" Black Wire, 2 F 4" Green Wire, F/Ring 14" White Wire, 2 F 6" Green/Yellow, F/Ring 8" White Wire, 2 F User's Manual * Includes all parts shown in the centre of this manual. Description 1 1 Motor Belt 50 1 Console Cover 2 1 Pulley/Flywheel/Fan 51 1 Front Belly Pan 3 4 Motor Nut 52 1 Power Supply...
Uk Manual
Page 24
... the MODEL NUMBER of the product (RETL16001) • the NAME of the product (REEBOK® RT1000 treadmill) • the PART NUMBER and the DESCRIPTION of the PART (see page 23 of purchase. HOW TO GET PARTS AND SERVICE-Simply call our Customer Service Department at our option, we will replace the ...as set forth herein. on your statutory rights under the Sale of any replacement part or component, providing the repairs are authorised by REEBOK Fitness Equipment first and are performed by warranty. REEBOK FITNESS EQUIPMENT is in lieu of or in the manual; This warranty does ...
... the MODEL NUMBER of the product (RETL16001) • the NAME of the product (REEBOK® RT1000 treadmill) • the PART NUMBER and the DESCRIPTION of the PART (see page 23 of purchase. HOW TO GET PARTS AND SERVICE-Simply call our Customer Service Department at our option, we will replace the ...as set forth herein. on your statutory rights under the Sale of any replacement part or component, providing the repairs are authorised by REEBOK Fitness Equipment first and are performed by warranty. REEBOK FITNESS EQUIPMENT is in lieu of or in the manual; This warranty does ...
Uk Manual
Page 25
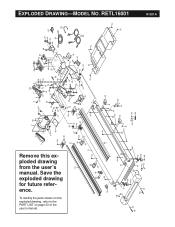
To identify the parts shown on page 23 of the user's manual. 36 65 58 110 12 47 8 65 36 111 45 69 70 46 71 44 1 2 3 96 39 ... 116 99 76 76 76 R1201A EXPLODED DRAWING-MODEL NO. RETL16001 Save the exploded drawing for future reference. Remove this exploded drawing, refer to the PART LIST on this exploded drawing from the user's manual.
To identify the parts shown on page 23 of the user's manual. 36 65 58 110 12 47 8 65 36 111 45 69 70 46 71 44 1 2 3 96 39 ... 116 99 76 76 76 R1201A EXPLODED DRAWING-MODEL NO. RETL16001 Save the exploded drawing for future reference. Remove this exploded drawing, refer to the PART LIST on this exploded drawing from the user's manual.


