
English Manual
Page 2
This product is attached in the center of Reebok. TABLE OF CONTENTS IMPORTANT PRECAUTIONS 3 BEFORE YOU BEGIN 5 ASSEMBLY 6 OPERATION AND ADJUSTMENT 11 HOW TO FOLD AND MOVE THE INCLINE TRAINER 28 TROUBLESHOOTING 30 CONDITIONING GUIDELINES 33 PART LIST 34 ORDERING REPLACEMENT PARTS Back Cover LIMITED WARRANTY Back Cover Note: An EXPLODED DRAWING is manufactured and distributed under license from Reebok International. 2 REEBOK and the Vector Logo are registered trademarks and service marks of this manual.
This product is attached in the center of Reebok. TABLE OF CONTENTS IMPORTANT PRECAUTIONS 3 BEFORE YOU BEGIN 5 ASSEMBLY 6 OPERATION AND ADJUSTMENT 11 HOW TO FOLD AND MOVE THE INCLINE TRAINER 28 TROUBLESHOOTING 30 CONDITIONING GUIDELINES 33 PART LIST 34 ORDERING REPLACEMENT PARTS Back Cover LIMITED WARRANTY Back Cover Note: An EXPLODED DRAWING is manufactured and distributed under license from Reebok International. 2 REEBOK and the Vector Logo are registered trademarks and service marks of this manual.
English Manual
Page 3
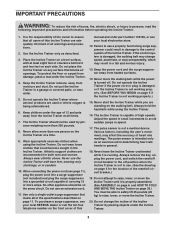
...power cord (see your local REEBOK dealer or call the toll-free telephone number on each side. To purchase a surge suppressor, see your local electronics store. 12. The Incline Trainer is turned off position when the Incline Trainer is the responsibility of this ... to persons, read the following important precautions and information before operating the Incline Trainer. 1. Never leave the Incline Trainer unattended while it is properly assembled. (See ASSEMBLY on page 6, and HOW TO FOLD AND MOVE THE Incline Trainer on page 5 if the Incline Trainer is being administered. 6.
...power cord (see your local REEBOK dealer or call the toll-free telephone number on each side. To purchase a surge suppressor, see your local electronics store. 12. The Incline Trainer is turned off position when the Incline Trainer is the responsibility of this ... to persons, read the following important precautions and information before operating the Incline Trainer. 1. Never leave the Incline Trainer unattended while it is properly assembled. (See ASSEMBLY on page 6, and HOW TO FOLD AND MOVE THE Incline Trainer on page 5 if the Incline Trainer is being administered. 6.
English Manual
Page 4
... motor hood unless instructed to the next settings of the Incline Trainer regularly. 22. The Incline Trainer is intended for personal injury or property damage sustained by experienced users. 25. When folding or moving the Incline Trainer, make sure that the storage latch is heard, the speed... and/or incline will alert you can manually override the speed and incline settings by an authorized service representative. When using...
... motor hood unless instructed to the next settings of the Incline Trainer regularly. 22. The Incline Trainer is intended for personal injury or property damage sustained by experienced users. 25. When folding or moving the Incline Trainer, make sure that the storage latch is heard, the speed... and/or incline will alert you can manually override the speed and incline settings by an authorized service representative. When using...

English Manual
Page 5
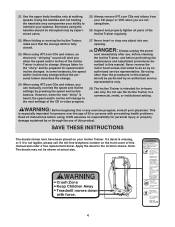
... fee for selecting the revolutionary REEBOK® X5 Incline Trainer. The serial number can be found on a decal attached to make your benefit, read this manual. BEFORE YOU BEGIN Thank you for any service needed under warranty, you must register the Incline Trainer at home more enjoyable and effective...To help us assist you, note the product model number and serial number before you 're not exercising, the unique X5 Incline Trainer can be folded up, requiring less floor space. Upper Body Handles Latch Knob Key/Clip Handgrip Pulse Sensor Handrail Console Fan Water Bottle ...
... fee for selecting the revolutionary REEBOK® X5 Incline Trainer. The serial number can be found on a decal attached to make your benefit, read this manual. BEFORE YOU BEGIN Thank you for any service needed under warranty, you must register the Incline Trainer at home more enjoyable and effective...To help us assist you, note the product model number and serial number before you 're not exercising, the unique X5 Incline Trainer can be folded up, requiring less floor space. Upper Body Handles Latch Knob Key/Clip Handgrip Pulse Sensor Handrail Console Fan Water Bottle ...
English Manual
Page 9
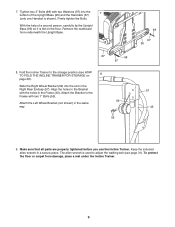
...is shown). Attach the Bracket to the storage position (see page 31). Keep the included allen wrench in the Right Rear Endcap (57). Fold the Incline Trainer to the Frame with two 1" Bolts (55). 59 Attach the Left Wheel Bracket (not shown) in the Frame (43). 7. Align ...all parts are properly tightened before you use the Incline Trainer. Firmly tighten the Bolts. Remove the cardboard from damage, place a mat under the Incline Trainer. 9 The allen wrench is used to adjust the walking belt (see HOW 8 TO FOLD THE INCLINE TRAINER FOR STORAGE on the floor. To protect the ...
...is shown). Attach the Bracket to the storage position (see page 31). Keep the included allen wrench in the Right Rear Endcap (57). Fold the Incline Trainer to the Frame with two 1" Bolts (55). 59 Attach the Left Wheel Bracket (not shown) in the Frame (43). 7. Align ...all parts are properly tightened before you use the Incline Trainer. Firmly tighten the Bolts. Remove the cardboard from damage, place a mat under the Incline Trainer. 9 The allen wrench is used to adjust the walking belt (see HOW 8 TO FOLD THE INCLINE TRAINER FOR STORAGE on the floor. To protect the ...

English Manual
Page 28
.... To reduce the risk of injury, bend your legs and keep your back. HOW TO FOLD AND MOVE THE INCLINE TRAINER HOW TO FOLD THE INCLINE TRAINER FOR STORAGE Before folding the Incline Trainer, adjust the incline to the vertical position. 2. Raise the Incline Trainer about halfway to the lowest position. Using your right hand to the left hand, pull the latch...
.... To reduce the risk of injury, bend your legs and keep your back. HOW TO FOLD AND MOVE THE INCLINE TRAINER HOW TO FOLD THE INCLINE TRAINER FOR STORAGE Before folding the Incline Trainer, adjust the incline to the vertical position. 2. Raise the Incline Trainer about halfway to the lowest position. Using your right hand to the left hand, pull the latch...
