
English Manual
Page 2
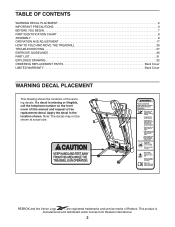
... is manufactured and distributed under license from Reebok International. 2 Note: The decals may not be shown at actual size. TABLE OF CONTENTS WARNING DECAL PLACEMENT 2 IMPORTANT PRECAUTIONS 3 BEFORE YOU BEGIN 7 PART IDENTIFICATION CHART 8 ASSEMBLY 9 OPERATION AND ADJUSTMENT 17 HOW TO FOLD AND MOVE THE TREADMILL 26 TROUBLESHOOTING 27 EXERCISE GUIDELINES 30 PART LIST...
... is manufactured and distributed under license from Reebok International. 2 Note: The decals may not be shown at actual size. TABLE OF CONTENTS WARNING DECAL PLACEMENT 2 IMPORTANT PRECAUTIONS 3 BEFORE YOU BEGIN 7 PART IDENTIFICATION CHART 8 ASSEMBLY 9 OPERATION AND ADJUSTMENT 17 HOW TO FOLD AND MOVE THE TREADMILL 26 TROUBLESHOOTING 27 EXERCISE GUIDELINES 30 PART LIST...
English Manual
Page 4
...28. SAVE THESE INSTRUCTIONS 4 Never leave the treadmill unattended while it is holding the frame securely in this manual. ing the treadmill, and before clean- When folding or moving the treadmill, make sure that the storage latch is properly assembled. (See ASSEMBLY on page 9 and HOW TO FOLD AND MOVE... THE TREADMILL on page 26.) You must be performed by an...
...28. SAVE THESE INSTRUCTIONS 4 Never leave the treadmill unattended while it is holding the frame securely in this manual. ing the treadmill, and before clean- When folding or moving the treadmill, make sure that the storage latch is properly assembled. (See ASSEMBLY on page 9 and HOW TO FOLD AND MOVE... THE TREADMILL on page 26.) You must be performed by an...
English Manual
Page 8
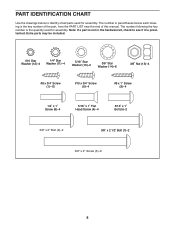
The number following the key number is the quantity used for assembly. Note: If a part is not in parentheses below to see if it is the key number of the part, from the PART LIST near the ... Head Screw (4)–-4 5/16" x 1" Bolt (5)–-2 3/8" x 2" Bolt (2)–-2 3/8" x 2 1/2" Bolt (7)–-2 3/8" x 4" Screw (3)–-6 8 The number in the hardware kit, check to identify small parts used for assembly.
The number following the key number is the quantity used for assembly. Note: If a part is not in parentheses below to see if it is the key number of the part, from the PART LIST near the ... Head Screw (4)–-4 5/16" x 1" Bolt (5)–-2 3/8" x 2" Bolt (2)–-2 3/8" x 2 1/2" Bolt (7)–-2 3/8" x 4" Screw (3)–-6 8 The number in the hardware kit, check to identify small parts used for assembly.
English Manual
Page 9
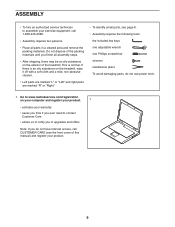
... nish all parts in a cleared area and remove the packing materials. Go to www.reebokservice.com/registration on the exterior of the treadmill. If there is normal. ASSEMBLY •• To hire an authorized service technician to notify you of upgrades and offers Note: If you do not use power tools...
... nish all parts in a cleared area and remove the packing materials. Go to www.reebokservice.com/registration on the exterior of the treadmill. If there is normal. ASSEMBLY •• To hire an authorized service technician to notify you of upgrades and offers Note: If you do not use power tools...
English Manual
Page 13
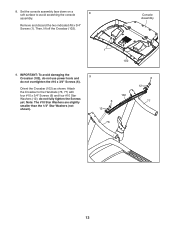
do not overtighten the #10 x 3/4" Screws (6). Then, lift off the Crossbar (102). Set the console assembly face down on a soft surface to the Handrails (76, 77) with four #10 x 3/4" Screws (6) and four #10 Star Washers (12); Orient the Crossbar... (102) as shown. 8. Remove and discard the two indicated #8 x 3/4" Screws (1). Attach the Crossbar to avoid scratching the console 8 assembly. Console Assembly 1 102 9. Note: The #10 Star Washers are slightly smaller than the 1/4" Star Washers (not shown). 102 6 12 76 6 12 77 13 IMPORTANT: To ...
do not overtighten the #10 x 3/4" Screws (6). Then, lift off the Crossbar (102). Set the console assembly face down on a soft surface to the Handrails (76, 77) with four #10 x 3/4" Screws (6) and four #10 Star Washers (12); Orient the Crossbar... (102) as shown. 8. Remove and discard the two indicated #8 x 3/4" Screws (1). Attach the Crossbar to avoid scratching the console 8 assembly. Console Assembly 1 102 9. Note: The #10 Star Washers are slightly smaller than the 1/4" Star Washers (not shown). 102 6 12 76 6 12 77 13 IMPORTANT: To ...

English Manual
Page 14
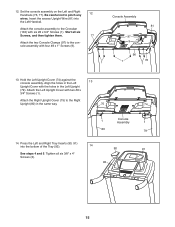
... two #10 x 3/4" Screws (6) in each end of the Crossbar. Connect the Upright Wire (81) to the console wire. Remove the wire tie from the console assembly to pinch the Upright Wire (81). do not overtighten the Screws. 10. do not tighten the Screws yet. First, tighten the two indicated #10 x 3/4" Screws... (6) in each end of a second person, hold the console assembly near the Left Handrail (76) and the Right Handrail (not shown). If they do not, turn one connector and try again.
... two #10 x 3/4" Screws (6) in each end of the Crossbar. Connect the Upright Wire (81) to the console wire. Remove the wire tie from the console assembly to pinch the Upright Wire (81). do not overtighten the Screws. 10. do not tighten the Screws yet. First, tighten the two indicated #10 x 3/4" Screws... (6) in each end of a second person, hold the console assembly near the Left Handrail (76) and the Right Handrail (not shown). If they do not, turn one connector and try again.
English Manual
Page 15
... Upright (80) in the Left Upright (79). Attach the Left Upright Cover with six #8 x 3/4" Screws (1). Hold the Left Upright Cover (74) against the console assembly. Attach the Right Upright Cover (75) to the Crossbar (102) with two #8 x 3/4" Screws (1). Start all six 3/8" x 4" Screws (3). 92 15 Tighten all... six Screws, and then tighten them. 77 Attach the two Console Clamps (97) to pinch any 12 wires. Set the console assembly on the Left and Right Handrails (76, 77). Insert the excess Upright Wire (81) into the bottom of the Tray (92). 14 ...
... Upright (80) in the Left Upright (79). Attach the Left Upright Cover with six #8 x 3/4" Screws (1). Hold the Left Upright Cover (74) against the console assembly. Attach the Right Upright Cover (75) to the Crossbar (102) with two #8 x 3/4" Screws (1). Start all six 3/8" x 4" Screws (3). 92 15 Tighten all... six Screws, and then tighten them. 77 Attach the two Console Clamps (97) to pinch any 12 wires. Set the console assembly on the Left and Right Handrails (76, 77). Insert the excess Upright Wire (81) into the bottom of the Tray (92). 14 ...