

English Manual
Page 1
... the serial number in this manual before contacting us: CALL TOLL-FREE: 1-877-994-4999 Mon.-Fri. 6 a.m.-6 p.m. MST Sat. 8 a.m.-4 p.m. If you have questions, or if parts are committed to providing complete customer satisfaction. Keep this equipment. USERʼS MANUAL Visit our website at www.reebokhomefitness.com new products, prizes, fitness tips...
... the serial number in this manual before contacting us: CALL TOLL-FREE: 1-877-994-4999 Mon.-Fri. 6 a.m.-6 p.m. MST Sat. 8 a.m.-4 p.m. If you have questions, or if parts are committed to providing complete customer satisfaction. Keep this equipment. USERʼS MANUAL Visit our website at www.reebokhomefitness.com new products, prizes, fitness tips...

English Manual
Page 2
.... 2 iPod is manufactured and distributed under license from Reebok International. TABLE OF CONTENTS WARNING DECAL PLACEMENT 2 IMPORTANT PRECAUTIONS 3 BEFORE YOU BEGIN 4 ASSEMBLY 5 HOW TO USE THE ELLIPTICAL EXERCISER 13 MAINTENANCE AND TROUBLESHOOTING 25 EXERCISE GUIDELINES 26 PART LIST 28 EXPLODED DRAWING 30 ORDERING REPLACEMENT PARTS Back Cover LIMITED WARRANTY Back Cover WARNING DECAL PLACEMENT...
.... 2 iPod is manufactured and distributed under license from Reebok International. TABLE OF CONTENTS WARNING DECAL PLACEMENT 2 IMPORTANT PRECAUTIONS 3 BEFORE YOU BEGIN 4 ASSEMBLY 5 HOW TO USE THE ELLIPTICAL EXERCISER 13 MAINTENANCE AND TROUBLESHOOTING 25 EXERCISE GUIDELINES 26 PART LIST 28 EXPLODED DRAWING 30 ORDERING REPLACEMENT PARTS Back Cover LIMITED WARRANTY Back Cover WARNING DECAL PLACEMENT...
English Manual
Page 3
... problems. 2. Wear appropriate exercise clothes when exercising; The pulse sensor is enough clearance around your elliptical exerciser. 10. Before beginning any worn parts immediately. 6. Hold the handgrip pulse sensor or the handlebars when mounting, dismounting, or using your... the userʼs movement, may affect the accuracy of all parts regularly. Keep your elliptical exerciser indoors, away from your elliptical exerciser. Place your elliptical exerciser on your elliptical exerciser before using your elliptical exerciser at all times. 7. It is not a medical device...
... problems. 2. Wear appropriate exercise clothes when exercising; The pulse sensor is enough clearance around your elliptical exerciser. 10. Before beginning any worn parts immediately. 6. Hold the handgrip pulse sensor or the handlebars when mounting, dismounting, or using your... the userʼs movement, may affect the accuracy of all parts regularly. Keep your elliptical exerciser indoors, away from your elliptical exerciser. Place your elliptical exerciser on your elliptical exerciser before using your elliptical exerciser at all times. 7. It is not a medical device...
English Manual
Page 4
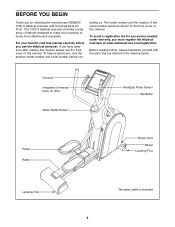
... this manual, please see the front cover of this manual. BEFORE YOU BEGIN Thank you for selecting the revolutionary REEBOK® 1000 X elliptical exerciser with the parts that are shown on the front cover of this manual. tacting us assist you, note the product model number ...and serial number before you use the elliptical exerciser. The 1000 X elliptical exerciser provides a wide array of features designed to make your benefit, ...
... this manual, please see the front cover of this manual. BEFORE YOU BEGIN Thank you for selecting the revolutionary REEBOK® 1000 X elliptical exerciser with the parts that are shown on the front cover of this manual. tacting us assist you, note the product model number ...and serial number before you use the elliptical exerciser. The 1000 X elliptical exerciser provides a wide array of features designed to make your benefit, ...
English Manual
Page 5
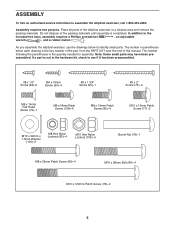
... (78)-2 5 The number following the parentheses is completed. If a part is the key number of the part, from the PART LIST near the end of this manual. Assembly requires two persons. As you assemble the elliptical exerciser, use the drawings below each drawing is not in the hardware ...kit, check to the included hex keys, assembly requires a Phillips screwdriver , an adjustable wrench , and a rubber mallet . Place all parts of the packing materials until assembly ...
... (78)-2 5 The number following the parentheses is completed. If a part is the key number of the part, from the PART LIST near the end of this manual. Assembly requires two persons. As you assemble the elliptical exerciser, use the drawings below each drawing is not in the hardware ...kit, check to the included hex keys, assembly requires a Phillips screwdriver , an adjustable wrench , and a rubber mallet . Place all parts of the packing materials until assembly ...
English Manual
Page 12
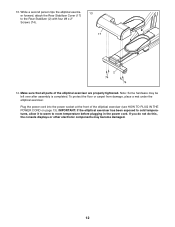
...all parts of the elliptical exerciser (see HOW TO PLUG IN THE POWER CORD on page 13). IMPORTANT: If the elliptical exerciser has been exposed to cold temperatures, allow it to warm to the Rear Stabilizer (2) with four #8 x 2" Screws (74). 17 2 74 74 14. While a second person tips the elliptical exercis-... become damaged. 12 To protect the floor or carpet from damage, place a mat under the elliptical exerciser. Plug the power cord into the power socket at the front of the elliptical exerciser are properly tightened. If you do not do this, the console displays or other electronic ...
...all parts of the elliptical exerciser (see HOW TO PLUG IN THE POWER CORD on page 13). IMPORTANT: If the elliptical exerciser has been exposed to cold temperatures, allow it to warm to the Rear Stabilizer (2) with four #8 x 2" Screws (74). 17 2 74 74 14. While a second person tips the elliptical exercis-... become damaged. 12 To protect the floor or carpet from damage, place a mat under the elliptical exerciser. Plug the power cord into the power socket at the front of the elliptical exerciser are properly tightened. If you do not do this, the console displays or other electronic ...
English Manual
Page 25
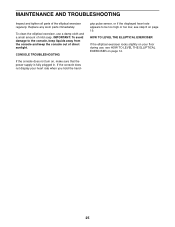
... and keep the console out of mild soap. IMPORTANT: To avoid damage to be too high or too low, see HOW TO LEVEL THE ELLIPTICAL EXERCISER on page 19. CONSOLE TROUBLESHOOTING If the console does not turn on, make sure that the power supply is fully plugged in. Replace ...any worn parts immediately. If the console does not display your floor during use a damp cloth and a small amount of direct sunlight. To clean the elliptical exerciser, use , see step 6 on page 14. 25 MAINTENANCE AND TROUBLESHOOTING Inspect and...
... and keep the console out of mild soap. IMPORTANT: To avoid damage to be too high or too low, see HOW TO LEVEL THE ELLIPTICAL EXERCISER on page 19. CONSOLE TROUBLESHOOTING If the console does not turn on, make sure that the power supply is fully plugged in. Replace ...any worn parts immediately. If the console does not display your floor during use a damp cloth and a small amount of direct sunlight. To clean the elliptical exerciser, use , see step 6 on page 14. 25 MAINTENANCE AND TROUBLESHOOTING Inspect and...
English Manual
Page 26
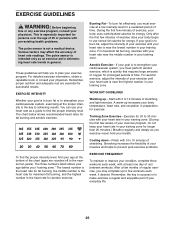
... shows recommended heart rates for persons over the age of time. Training Zone Exercise-Exercise for energy. A warm-up to make exercise a regular and enjoyable part of exercise, your exercise program. After a few minutes of your exercise until your heart rate is especially important for fat burning and aerobic exercise. Various...
... shows recommended heart rates for persons over the age of time. Training Zone Exercise-Exercise for energy. A warm-up to make exercise a regular and enjoyable part of exercise, your exercise program. After a few minutes of your exercise until your heart rate is especially important for fat burning and aerobic exercise. Various...
English Manual
Page 28
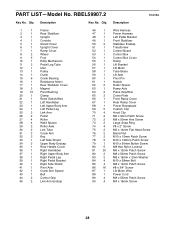
... x 16mm x 2mm Washer M10 x 58mm Bolt M8 x 19mm Patch Screw #8 x 3/4" Screw Lift Motor Wire Power Cord M8 x 55mm Patch Screw M4 x 16mm Screw 28 Qty. PART LIST-Model No. RBEL59907.2 Key No. Description Key No.
... x 16mm x 2mm Washer M10 x 58mm Bolt M8 x 19mm Patch Screw #8 x 3/4" Screw Lift Motor Wire Power Cord M8 x 55mm Patch Screw M4 x 16mm Screw 28 Qty. PART LIST-Model No. RBEL59907.2 Key No. Description Key No.
English Manual
Page 29
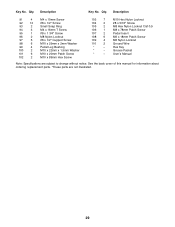
... M10 x 89mm Hex Screw 103 7 104 2 105 2 106 1 107 2 108 6 109 4 110 2 * - * - * - See the back cover of this manual for information about ordering replacement parts. *These parts are subject to change without notice. Key No. Qty. Qty. M10 Hex Nylon Locknut #8 x 5/16" Screw M8 Hex Nylon Locknut Cls10.9 M8 x 78mm Patch Screw...
... M10 x 89mm Hex Screw 103 7 104 2 105 2 106 1 107 2 108 6 109 4 110 2 * - * - * - See the back cover of this manual for information about ordering replacement parts. *These parts are subject to change without notice. Key No. Qty. Qty. M10 Hex Nylon Locknut #8 x 5/16" Screw M8 Hex Nylon Locknut Cls10.9 M8 x 78mm Patch Screw...
English Manual
Page 32
... long an implied warranty lasts. ICON HEALTH & FITNESS, INC., 1500 S. 1000 W., LOGAN, UT 84321-9813 Part No. 266255 R0408A Printed in connection with respect to state. ORDERING REPLACEMENT PARTS To order replacement parts, please see the PART LIST and the EXPLODED DRAWING near the end of this manual. To help ...; the name of the product (see the front cover of this manual) • the key number and description of the replacement part(s) (see the front cover of this manual) LIMITED WARRANTY ICON Health & Fitness, Inc. (ICON) warrants this product to the original purchaser.
... long an implied warranty lasts. ICON HEALTH & FITNESS, INC., 1500 S. 1000 W., LOGAN, UT 84321-9813 Part No. 266255 R0408A Printed in connection with respect to state. ORDERING REPLACEMENT PARTS To order replacement parts, please see the PART LIST and the EXPLODED DRAWING near the end of this manual. To help ...; the name of the product (see the front cover of this manual) • the key number and description of the replacement part(s) (see the front cover of this manual) LIMITED WARRANTY ICON Health & Fitness, Inc. (ICON) warrants this product to the original purchaser.


