User Guide
Page 3
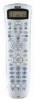
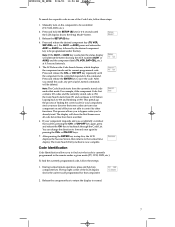
... RCA, PROSCAN or GE brands, you may not even need to set up the RCU811 to program, and it gives you replace batteries, your RCU811 remote always powers on your remote get stuck in the event of the RCU811. RCU811US_IB_REVB 9/26/03 11:54 AM Page 3 Universal Learning Remote ... brands of the past! This unit is easy to use , remote controls available today. Battery Information Your RCU811 Universal Learning Remote with LCD Status Display requires four AAA alkaline batteries (sold separately). Battery Saver Your RCU811 saves battery power by automatically turning off if any key is a...
... RCA, PROSCAN or GE brands, you may not even need to set up the RCU811 to program, and it gives you replace batteries, your RCU811 remote always powers on your remote get stuck in the event of the RCU811. RCU811US_IB_REVB 9/26/03 11:54 AM Page 3 Universal Learning Remote ... brands of the past! This unit is easy to use , remote controls available today. Battery Information Your RCU811 Universal Learning Remote with LCD Status Display requires four AAA alkaline batteries (sold separately). Battery Saver Your RCU811 saves battery power by automatically turning off if any key is a...
User Guide
Page 4
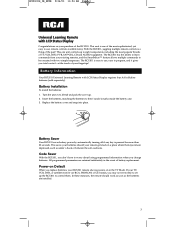
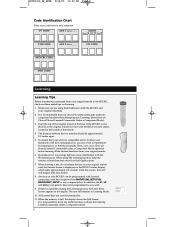
... from the last keypress, except when an Event Timer is shown. The SETUP (S) key is not in setting up the remote. Successive presses of the RCU811 unit. Pressing any key displays the time and the current component mode. This display makes it easy to walk you through ...remote is used to program and use . Setup Routine and Procedures The SETUP (S) key is located towards the upper right-hand side of the SETUP (S) key walk you through all the available setup routines. 4 RCU811US_IB_REVB 9/26/03 11:54 AM Page 4 RCU811 Product Diagram Liquid Crystal Status Display (LCD) LEARN...
... from the last keypress, except when an Event Timer is shown. The SETUP (S) key is not in setting up the remote. Successive presses of the RCU811 unit. Pressing any key displays the time and the current component mode. This display makes it easy to walk you through ...remote is used to program and use . Setup Routine and Procedures The SETUP (S) key is located towards the upper right-hand side of the SETUP (S) key walk you through all the available setup routines. 4 RCU811US_IB_REVB 9/26/03 11:54 AM Page 4 RCU811 Product Diagram Liquid Crystal Status Display (LCD) LEARN...

User Guide
Page 5
...the timeout occurs is pressed for three seconds prior to returning to clear all settings- Clear Mode? (Only appears after commands have been learned.) 13. Exit Exit Setup Mode To exit the Setup Mode at any time and return to factory default) 14. Press and release... the CLEAR key. During a Setup function, if no key is not saved. 5 Timer 1 Mode? 4. Set Time Display? 3. Learn Mode? 12. The remote is now in normal operation mode. Press and release the ENTER key. Timer 4 Mode? 7. Timer 2 Mode? 5. Timer 3 Mode? 6. Reset? (Master ...
...the timeout occurs is pressed for three seconds prior to returning to clear all settings- Clear Mode? (Only appears after commands have been learned.) 13. Exit Exit Setup Mode To exit the Setup Mode at any time and return to factory default) 14. Press and release... the CLEAR key. During a Setup function, if no key is not saved. 5 Timer 1 Mode? 4. Set Time Display? 3. Learn Mode? 12. The remote is now in normal operation mode. Press and release the ENTER key. Timer 4 Mode? 7. Timer 2 Mode? 5. Timer 3 Mode? 6. Reset? (Master ...
User Guide
Page 6
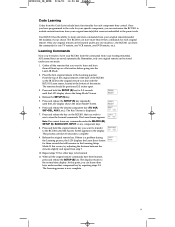
... If the component you wish to control does not respond to control it. If your TV, VCR, DVD or satellite receiver is an RCA, PROSCAN or GE brand, the RCU811 may not need any programming to any of the Code Lists, follow these steps: 1. Code List Entry You can enter codes in... enter a valid code for any given mode (e.g., when you enter a valid code for a TV), any previously Learned functions for that mode are deleted. To program the remote with the first code. Manually turn on , aim the RCU811 at step two. For AUX1 or AUX2, press and release the AUX1 or AUX2 key followed...
... If the component you wish to control does not respond to control it. If your TV, VCR, DVD or satellite receiver is an RCA, PROSCAN or GE brand, the RCU811 may not need any programming to any of the Code Lists, follow these steps: 1. Code List Entry You can enter codes in... enter a valid code for any given mode (e.g., when you enter a valid code for a TV), any previously Learned functions for that mode are deleted. To program the remote with the first code. Manually turn on , aim the RCU811 at step two. For AUX1 or AUX2, press and release the AUX1 or AUX2 key followed...
User Guide
Page 7
...key is 050, the Code Search starts from the currently stored code under that key. During normal remote operation, press and hold the SETUP (S) key for a specific code in the remote under that mode. Manually turn your component responds and you to find the currently programmed code, ... SAT•CBL, etc.) at 050. This speeds up the process of the Code Lists, follow these steps: 1. Press and hold any previously Learned commands will show the End Screen once all code list entries have been searched. 6. Press and release the desired component key (TV, VCR, SAT...
...key is 050, the Code Search starts from the currently stored code under that key. During normal remote operation, press and hold the SETUP (S) key for a specific code in the remote under that mode. Manually turn your component responds and you to find the currently programmed code, ... SAT•CBL, etc.) at 050. This speeds up the process of the Code Lists, follow these steps: 1. Press and hold any previously Learned commands will show the End Screen once all code list entries have been searched. 6. Press and release the desired component key (TV, VCR, SAT...
User Guide
Page 8
.... The unit still remains in both the RCU811 and your RCU811 can cause interference with the exception of the remote. 4. It is displayed on Learning. 1. Until this occurs, the LCD will display the Learn Screen. 8. To ensure that you are compatible and to increase your familiarity with the RCU811 Learn sensor, located at least three feet away...
.... The unit still remains in both the RCU811 and your RCU811 can cause interference with the exception of the remote. 4. It is displayed on Learning. 1. Until this occurs, the LCD will display the Learn Screen. 8. To ensure that you are compatible and to increase your familiarity with the RCU811 Learn sensor, located at least three feet away...
User Guide
Page 9
...returns to store the Learned commands. The RCU811 can learn the commands from your original remote(s) under the mode(s) of the remote. Point the top of the original remote at the bottom of your RCU811 learn the commands for one TV remote, one VCR remote, one mode (i.e., the RCU811 can store more ...include certain functions from your original remote(s) that were not embedded in line with the RCU811 Learn sensor, located at the base of the RCU811 so the IR LED on the original remote is a problem during the Learning process, the LCD displays the Learn Error Screen for 2-3 seconds ...
...returns to store the Learned commands. The RCU811 can learn the commands from your original remote(s) under the mode(s) of the remote. Point the top of the original remote at the bottom of your RCU811 learn the commands for one TV remote, one VCR remote, one mode (i.e., the RCU811 can store more ...include certain functions from your original remote(s) that were not embedded in line with the RCU811 Learn sensor, located at the base of the RCU811 so the IR LED on the original remote is a problem during the Learning process, the LCD displays the Learn Error Screen for 2-3 seconds ...
User Guide
Page 10
... sequential order. The LCD display shows the Success Screen, then returns to channel 57. 3. Place the first original remote in line with the RCU811 Learn sensor, located at the bottom of the original remote at this point, you program all previously Learned keys under that component mode are now cleared. Point the top of the...
... sequential order. The LCD display shows the Success Screen, then returns to channel 57. 3. Place the first original remote in line with the RCU811 Learn sensor, located at the bottom of the original remote at this point, you program all previously Learned keys under that component mode are now cleared. Point the top of the...
User Guide
Page 11
... 2-3 seconds to the normal time display. Release the original remote key. 10. Execute a SmartMacro To execute a SmartMacro that has previously been programmed, follow these steps: 1. Press and hold the key on the original remote until the status display shows the Setup Mode? The LCD now... between Macro commands (e.g., for 2-3 seconds until the Macro X Success Screen is detected, the RCU811 will show the Success Screen, then return to complete. You can be necessary to six Learned commands under which you find this case, repeat from step 7. 9. The LCD will timeout ...
... 2-3 seconds to the normal time display. Release the original remote key. 10. Execute a SmartMacro To execute a SmartMacro that has previously been programmed, follow these steps: 1. Press and hold the key on the original remote until the status display shows the Setup Mode? The LCD now... between Macro commands (e.g., for 2-3 seconds until the Macro X Success Screen is detected, the RCU811 will show the Success Screen, then return to complete. You can be necessary to six Learned commands under which you find this case, repeat from step 7. 9. The LCD will timeout ...
User Guide
Page 12
...ALL SmartMacros To delete ALL SmartMacros that have set to turn off at a certain time, or set your Event Timer, be used to leave the remote pointed at this point, press and release the CLEAR key. 5. Press and release the SETUP (S) key. Deletion of deleting a SmartMacro and you ...an Event Timer to turn a component (TV, VCR, AUDIO, etc.) on the current day. You may want to set it , you to turn off your RCU811 to set an Event Timer, follow these steps: 1. Screen appears. 4. Screen is displayed. The Macro Key? Screen is displayed. 7. Note: To cancel at...
...ALL SmartMacros To delete ALL SmartMacros that have set to turn off at a certain time, or set your Event Timer, be used to leave the remote pointed at this point, press and release the CLEAR key. 5. Press and release the SETUP (S) key. Deletion of deleting a SmartMacro and you ...an Event Timer to turn a component (TV, VCR, AUDIO, etc.) on the current day. You may want to set it , you to turn off your RCU811 to set an Event Timer, follow these steps: 1. Screen appears. 4. Screen is displayed. The Macro Key? Screen is displayed. 7. Note: To cancel at...
User Guide
Page 16
... operates the same as the Last Channel, Previous Channel or Recall keys on your AUDIO system. LEARN The LEARN feature is used to store learned commands. 16 The LCD status display remains blank when the remote is enabled, pressing this key allows you to turn the DSP mode on or off after approximately... channel selections for some brands of TVs. LIQUID CRYSTAL DISPLAY The Liquid Crystal Display (LCD) provides a visual interface between the user and the remote. RCU811US_IB_REVB 9/26/03 11:54 AM Page 16 Glossary of Terms AUDIO FEATURES AM•FM KEY The AM•FM key allows you to...
... operates the same as the Last Channel, Previous Channel or Recall keys on your AUDIO system. LEARN The LEARN feature is used to store learned commands. 16 The LCD status display remains blank when the remote is enabled, pressing this key allows you to turn the DSP mode on or off after approximately... channel selections for some brands of TVs. LIQUID CRYSTAL DISPLAY The Liquid Crystal Display (LCD) provides a visual interface between the user and the remote. RCU811US_IB_REVB 9/26/03 11:54 AM Page 16 Glossary of Terms AUDIO FEATURES AM•FM KEY The AM•FM key allows you to...
User Guide
Page 17
... keys (UP, DOWN, LEFT and RIGHT ARROW keys) to select the highlighted choices. Setup is used for 30 seconds, the remote automatically exits from one of events to move through the highlighted choices. SMARTMACRO When programmed, the SmartMacro function causes a series of ...your component with volume control. then turn your original remotes. keys) increase and decrease the volume level and channel numbers. Use the NAVIGATION keys (UP, DOWN, LEFT, and RIGHT ARROW keys...
... keys (UP, DOWN, LEFT and RIGHT ARROW keys) to select the highlighted choices. Setup is used for 30 seconds, the remote automatically exits from one of events to move through the highlighted choices. SMARTMACRO When programmed, the SmartMacro function causes a series of ...your component with volume control. then turn your original remotes. keys) increase and decrease the volume level and channel numbers. Use the NAVIGATION keys (UP, DOWN, LEFT, and RIGHT ARROW keys...
User Guide
Page 18
... near an incandescent lamp. • The memory capacity is full (six Learned commands for each of the Code Lists. • Make sure the remote is in the RCU811 and the remote from the appropriate part of the three Macros). • The original remote may require both a TV and a VCR and/or DVD code for full...
... near an incandescent lamp. • The memory capacity is full (six Learned commands for each of the Code Lists. • Make sure the remote is in the RCU811 and the remote from the appropriate part of the three Macros). • The original remote may require both a TV and a VCR and/or DVD code for full...


