User Guide
Page 2
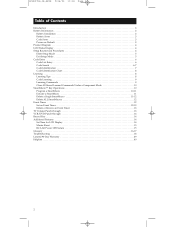
...Installation 3 Battery Saver 3 Code Saver 3 Power-on Default 3 Product Diagram 4 LCD Status Display 4 Setup Routine and Procedures 4 Enter Setup Mode 5 Exit Setup Mode 5 Code Entry 6 Code List Entry 6 Code Search 6-7 Code Identification 7 Code Identification Chart 8 Learning 8 Learning Tips 8 Code Learning 9 Learning Commands 9 Clear All Stored Learned Commands Under a Component Mode ...Punch-through 14 Record Key 14 Additional Features 14 Set Time for LCD Display 14 Master Reset 15 RCA All Power Off Feature 15 Glossary 16-17 Troubleshooting 18 Limited 90-Day Warranty 39...
...Installation 3 Battery Saver 3 Code Saver 3 Power-on Default 3 Product Diagram 4 LCD Status Display 4 Setup Routine and Procedures 4 Enter Setup Mode 5 Exit Setup Mode 5 Code Entry 6 Code List Entry 6 Code Search 6-7 Code Identification 7 Code Identification Chart 8 Learning 8 Learning Tips 8 Code Learning 9 Learning Commands 9 Clear All Stored Learned Commands Under a Component Mode ...Punch-through 14 Record Key 14 Additional Features 14 Set Time for LCD Display 14 Master Reset 15 RCA All Power Off Feature 15 Glossary 16-17 Troubleshooting 18 Limited 90-Day Warranty 39...
User Guide
Page 3
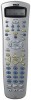
... is pressed for more than 30 seconds. Battery Information Your RCU807 Universal Learning Remote with two simple keypresses. All programmed parameters are RCA, PROSCAN or GE brands, you replace batteries, your RCU807 remote always powers on your batteries should work as soon as under a ...batteries: 1. This unit is easy to use , remote controls available today. RCU807US_IB_REVB 9/26/03 10:18 Page 3 Universal Learning Remote with LCD Status Display Congratulations on in the TV Mode. The RCU807 is one unit controls up the RCU807 to the (+) and (-) marks inside the battery case...
... is pressed for more than 30 seconds. Battery Information Your RCU807 Universal Learning Remote with two simple keypresses. All programmed parameters are RCA, PROSCAN or GE brands, you replace batteries, your RCU807 remote always powers on your batteries should work as soon as under a ...batteries: 1. This unit is easy to use , remote controls available today. RCU807US_IB_REVB 9/26/03 10:18 Page 3 Universal Learning Remote with LCD Status Display Congratulations on in the TV Mode. The RCU807 is one unit controls up the RCU807 to the (+) and (-) marks inside the battery case...

User Guide
Page 6
...three methods: Code List Entry, Code Search or Code Autosearch. If your brand has more than one of the codes you have entered the correct code number for your component, it . Note: For an invalid code entry, the LCD displays the Invalid Screen for the RCU807 to control ...code from the list is an RCA, PROSCAN or GE brand, the RCU807 may not need any programming to any previously Learned functions for your component does not respond, try the Code Search or Code Autosearch methods. When a valid code from the Code Lists. (Refer to the Code List enclosed.) This enables the remote...
...three methods: Code List Entry, Code Search or Code Autosearch. If your brand has more than one of the codes you have entered the correct code number for your component, it . Note: For an invalid code entry, the LCD displays the Invalid Screen for the RCU807 to control ...code from the list is an RCA, PROSCAN or GE brand, the RCU807 may not need any programming to any previously Learned functions for your component does not respond, try the Code Search or Code Autosearch methods. When a valid code from the Code Lists. (Refer to the Code List enclosed.) This enables the remote...
User Guide
Page 7
...programmed code, follow these steps: 1. Code Identification Code Identification allows you to 000 and finishing at 0.5-second intervals. 5. During normal remote operation, press and hold the SETUP (S) key for 2-3 seconds until the component to bypass codes you may discover that key. Press and hold any previously Learned ...) and the component label (TV, VCR, SAT•CBL, etc.) at 050. The top right corner of the LCD display shows the current code programmed for that code by pressing the CH+ or ON•OFF keys. 7. The display will be programmed under a given mode (TV...
...programmed code, follow these steps: 1. Code Identification Code Identification allows you to 000 and finishing at 0.5-second intervals. 5. During normal remote operation, press and hold the SETUP (S) key for 2-3 seconds until the component to bypass codes you may discover that key. Press and hold any previously Learned ...) and the component label (TV, VCR, SAT•CBL, etc.) at 050. The top right corner of the LCD display shows the current code programmed for that code by pressing the CH+ or ON•OFF keys. 7. The display will be programmed under a given mode (TV...
User Guide
Page 8
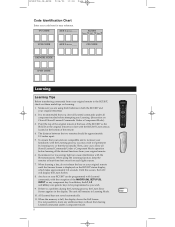
... ❒ Tape ❒ VCR CODE AUX 2 device:______ CD CODE SAT•CBL CODE DVD CODE Learning Learning Tips Before transferring commands from your original remote. 6. Then, carry out a Clear all Stored Learned Commands Under a Component Mode operation before learning all component modes before attempting any Learning. (See section on your RCU807 can cause interference with the RCU807 Learn sensor, located at least...
... ❒ Tape ❒ VCR CODE AUX 2 device:______ CD CODE SAT•CBL CODE DVD CODE Learning Learning Tips Before transferring commands from your original remote. 6. Then, carry out a Clear all Stored Learned Commands Under a Component Mode operation before learning all component modes before attempting any Learning. (See section on your RCU807 can cause interference with the RCU807 Learn sensor, located at least...
User Guide
Page 9
... not embedded in line with the RCU807 Learn sensor, located at the base of the RCU807 so the IR LED on the original remote is a problem during the Learning process, the LCD displays the Learn Error Screen for three seconds but still remains in the code for each original remote. Place the first original remote in the display. Press and...
... not embedded in line with the RCU807 Learn sensor, located at the base of the RCU807 so the IR LED on the original remote is a problem during the Learning process, the LCD displays the Learn Error Screen for three seconds but still remains in the code for each original remote. Place the first original remote in the display. Press and...
User Guide
Page 10
... If you want the RCU807 to the normal time display. 7. Press and release the SETUP (S) key repeatedly until the status display shows the Setup Mode? Press and release the desired component key for the Learned commands you want to their preset code functions. 1. The LCD display shows the Success...1. Turn on the TV. 2. Point the top of the original remote at the bottom of the remote. Release the SETUP (S) key. 3. If you program all previously Learned keys under that component mode return to clear all of the Learned commands under one component mode (e.g., TV, VCR, DVD, etc.), follow...
... If you want the RCU807 to the normal time display. 7. Press and release the SETUP (S) key repeatedly until the status display shows the Setup Mode? Press and release the desired component key for the Learned commands you want to their preset code functions. 1. The LCD display shows the Success...1. Turn on the TV. 2. Point the top of the original remote at the bottom of the remote. Release the SETUP (S) key. 3. If you program all previously Learned keys under that component mode return to clear all of the Learned commands under one component mode (e.g., TV, VCR, DVD, etc.), follow...
User Guide
Page 13
...keys is displayed in the LCD). To exit Setup Mode, press and release the SETUP (S) repeatedly until the LCD display shows the Setup Mode? TV Volume Punch-through Your RCU807's Volume Punch-through feature... the SETUP (S) key. 3. The LCD shows component changes for the Volume Punch-through keys if they are pressed in other components punch through " from the CD/AUDIO code. Press and release the LEVEL+/UP ... is flashing under the minutes (MM) digits is also available if one component to the Learn Mode? RCU807US_IB_REVB 9/26/03 10:18 Page 13 6. Press and release the LEVEL+/UP ARROW...
...keys is displayed in the LCD). To exit Setup Mode, press and release the SETUP (S) repeatedly until the LCD display shows the Setup Mode? TV Volume Punch-through Your RCU807's Volume Punch-through feature... the SETUP (S) key. 3. The LCD shows component changes for the Volume Punch-through keys if they are pressed in other components punch through " from the CD/AUDIO code. Press and release the LEVEL+/UP ... is flashing under the minutes (MM) digits is also available if one component to the Learn Mode? RCU807US_IB_REVB 9/26/03 10:18 Page 13 6. Press and release the LEVEL+/UP ARROW...
User Guide
Page 14
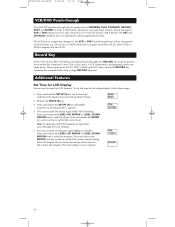
... display, follow these steps: 1. Screen. 2. Press and release the SETUP (S) key repeatedly until the LCD display shows the Setup Mode? Note: To adjust the AM/PM designation, repeatedly scroll through the six ...RECORD key must be flashing. Additional Features Set Time for LCD Display You can set the time for TV, DVD, CABLE and SAT codes, where the RECORD key transmits the command after only a ...the normal time display. RCU807US_IB_REVB 9/26/03 10:18 Page 14 VCR/DVD Punch-through Your RCU807 punches through the hour settings. 5. This is also true if a VCR component is programmed under...
... display, follow these steps: 1. Screen. 2. Press and release the SETUP (S) key repeatedly until the LCD display shows the Setup Mode? Note: To adjust the AM/PM designation, repeatedly scroll through the six ...RECORD key must be flashing. Additional Features Set Time for LCD Display You can set the time for TV, DVD, CABLE and SAT codes, where the RECORD key transmits the command after only a ...the normal time display. RCU807US_IB_REVB 9/26/03 10:18 Page 14 VCR/DVD Punch-through Your RCU807 punches through the hour settings. 5. This is also true if a VCR component is programmed under...
User Guide
Page 15
... the ON•OFF key is pressed twice consecutively (within two seconds), all normal operating modes. The LCD displays the Confirm? Press and release the ENTER key. The LCD shows the All Off Screen while this point, you wish to the original factory settings. Screen. 2. To...is available in all RCA equipment is active. 15 RCU807US_IB_REVB 9/26/03 10:18 Page 15 Master Reset A Master Reset returns the RCU807 back to cancel the Master Reset operation, press and release the CLEAR key. 6. The Master Reset clears all user-programmed codes, Learned commands, Event Timers...
... the ON•OFF key is pressed twice consecutively (within two seconds), all normal operating modes. The LCD displays the Confirm? Press and release the ENTER key. The LCD shows the All Off Screen while this point, you wish to the original factory settings. Screen. 2. To...is available in all RCA equipment is active. 15 RCU807US_IB_REVB 9/26/03 10:18 Page 15 Master Reset A Master Reset returns the RCU807 back to cancel the Master Reset operation, press and release the CLEAR key. 6. The Master Reset clears all user-programmed codes, Learned commands, Event Timers...
User Guide
Page 16
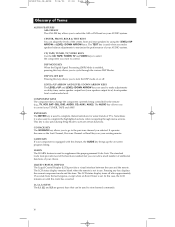
Sometimes it is also used to complete the highlighted sections when navigating through the various DSP Modes. LEARN The LEARN feature is also used to supplement the preprogrammed Code Lists. ENTER KEY The ENTER key is equipped with this key allows you selected. GUIDE KEY If your choice..... This key is used during Setup Mode to activate certain functions. LIQUID CRYSTAL DISPLAY The Liquid Crystal Display (LCD) provides a visual interface between the user and the remote. Pressing any key displays the current component mode and the time. L1, L2, L3 KEYS The L1, L2...
Sometimes it is also used to complete the highlighted sections when navigating through the various DSP Modes. LEARN The LEARN feature is also used to supplement the preprogrammed Code Lists. ENTER KEY The ENTER key is equipped with this key allows you selected. GUIDE KEY If your choice..... This key is used during Setup Mode to activate certain functions. LIQUID CRYSTAL DISPLAY The Liquid Crystal Display (LCD) provides a visual interface between the user and the remote. Pressing any key displays the current component mode and the time. L1, L2, L3 KEYS The L1, L2...
User Guide
Page 17
... system, press and release the SELECT/OK, ENTER, or MENU keys to select a highlighted choice. then set up the remote. You can work while the remote is pressed for Code List Entry, Code Search, Code Identification and other functions. NOTE: With some manufactured models, the MENU or ENTER key is used to turn on your...
... system, press and release the SELECT/OK, ENTER, or MENU keys to select a highlighted choice. then set up the remote. You can work while the remote is pressed for Code List Entry, Code Search, Code Identification and other functions. NOTE: With some manufactured models, the MENU or ENTER key is used to turn on your...
User Guide
Page 18
... AAA alkaline batteries. • Try all the codes from the appropriate part of the Code Lists. • Make sure the remote is in the RCU807 and the remote from which you press a key. RCU807US_IB_REVB 9/26/03 10:18 Page 18 Troubleshooting PROBLEM The LCD status display is full (six Learned commands for full operation depending on your...
... AAA alkaline batteries. • Try all the codes from the appropriate part of the Code Lists. • Make sure the remote is in the RCU807 and the remote from which you press a key. RCU807US_IB_REVB 9/26/03 10:18 Page 18 Troubleshooting PROBLEM The LCD status display is full (six Learned commands for full operation depending on your...


