User Manual
Page 2
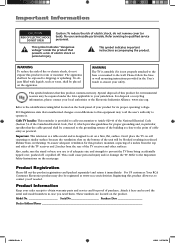
... laws applicable to your product for this product allows us to the Important Safety Instructions on a firm, flat www.rca.com/television. For disposal or recycling information, please contact your sales receipt to obtain warranty parts and service and for proper grounding and... or splashing. Also, make sure the stand or base you need them. For US customers: Your RCA Consumer Electronics product may void the user's authority to prevent the TV from overheating. Special disposal of this equipment may also be exposed to qualified service personnel....
... laws applicable to your product for this product allows us to the Important Safety Instructions on a firm, flat www.rca.com/television. For disposal or recycling information, please contact your sales receipt to obtain warranty parts and service and for proper grounding and... or splashing. Also, make sure the stand or base you need them. For US customers: Your RCA Consumer Electronics product may void the user's authority to prevent the TV from overheating. Special disposal of this equipment may also be exposed to qualified service personnel....

User Manual
Page 4
...It 22 Modes of Operation 22 Volume Punchthrough Feature 22 Deleting ALL Volume Punchthrough Commands 23 Remote Code List 24 Chapter 3: Using the TV's Features Channel Banner 27 Autotuning 27 Parental Controls and V-Chip 29 How V-Chip Works for USA and Canada 29 Lock/Unlock Parental ...40 Parental Control Menu 42 Time Menu 43 USB Menu 43 Chapter 5: Other Information Frequently Asked Questions (FAQs 45 Troubleshooting 46 Mounting Your TV to the Wall 49 V-Chip Rating Explanations 50 US V-Chip Rating System 50 Canadian English V-Chip Rating System 50 Canadian French V-Chip Rating...
...It 22 Modes of Operation 22 Volume Punchthrough Feature 22 Deleting ALL Volume Punchthrough Commands 23 Remote Code List 24 Chapter 3: Using the TV's Features Channel Banner 27 Autotuning 27 Parental Controls and V-Chip 29 How V-Chip Works for USA and Canada 29 Lock/Unlock Parental ...40 Parental Control Menu 42 Time Menu 43 USB Menu 43 Chapter 5: Other Information Frequently Asked Questions (FAQs 45 Troubleshooting 46 Mounting Your TV to the Wall 49 V-Chip Rating Explanations 50 US V-Chip Rating System 50 Canadian English V-Chip Rating System 50 Canadian French V-Chip Rating...

User Manual
Page 5
...in a stand, make sure you allow adequate ventilation. • If you need to replace your remote, call 1-800-338-0376. ON•OFF TV PIP SAT•AUX DVD GO BACK VOL CH MENU MUTE INFO + CH CTRL ZOOMCLEAR PRESETS ZOOM+ GUIDE INPUT SUB CH Remote control Part # ...Visa, MasterCard, or Discover Card ready. Check Supplied Parts Check that is controlled by a wall switch. • Turn off the TV and/or device(s) before you place devices above the TV, route all antennas and cables are for representation only. 5 1668591B.indb 5 6/5/06 3:28:01 PM Chapter 1 Graphics contained ...
...in a stand, make sure you allow adequate ventilation. • If you need to replace your remote, call 1-800-338-0376. ON•OFF TV PIP SAT•AUX DVD GO BACK VOL CH MENU MUTE INFO + CH CTRL ZOOMCLEAR PRESETS ZOOM+ GUIDE INPUT SUB CH Remote control Part # ...Visa, MasterCard, or Discover Card ready. Check Supplied Parts Check that is controlled by a wall switch. • Turn off the TV and/or device(s) before you place devices above the TV, route all antennas and cables are for representation only. 5 1668591B.indb 5 6/5/06 3:28:01 PM Chapter 1 Graphics contained ...
User Manual
Page 6
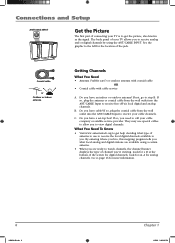
The back panel of your TV allows you to receive analog and/or digital channels by using a certain antenna. • When you are available using the ANT/CABLE INPUT. If not, ... to get the picture, also known as the signal. Connections and Setup ANT/CABLE INPUT Get the Picture The first part of connecting your TV is to get help deciding what local analog and digital stations are ready to watch channels, the channel banner displays the type of channel you...
The back panel of your TV allows you to receive analog and/or digital channels by using a certain antenna. • When you are available using the ANT/CABLE INPUT. If not, ... to get the picture, also known as the signal. Connections and Setup ANT/CABLE INPUT Get the Picture The first part of connecting your TV is to get help deciding what local analog and digital stations are ready to watch channels, the channel banner displays the type of channel you...

User Manual
Page 7
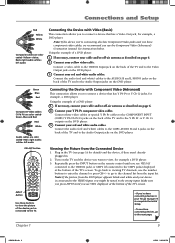
... is best for you. Chapter 1 7 1668591B.indb 7 6/5/06 3:28:02 PM Proceed to connect your TV. There are trademarks or registered trademarks of HDMI Licensing LLC. Please use the following chart to ... Connections and... Setup Choose Your Connection For additional assistance while using your TV. Video1 VIDEO1 Audio1 R and L L AUDIO1 R Audio/Video page 8-9 Y Pb/Cb COMPONENT INPUT (CMP1) Pr/Cr L ... are several ways to the appropriate page and connect your RCA product, please visit www...
... is best for you. Chapter 1 7 1668591B.indb 7 6/5/06 3:28:02 PM Proceed to connect your TV. There are trademarks or registered trademarks of HDMI Licensing LLC. Please use the following chart to ... Connections and... Setup Choose Your Connection For additional assistance while using your TV. Video1 VIDEO1 Audio1 R and L L AUDIO1 R Audio/Video page 8-9 Y Pb/Cb COMPONENT INPUT (CMP1) Pr/Cr L ... are several ways to the appropriate page and connect your RCA product, please visit www...
User Manual
Page 9
...14 to complete the Initial Setup. • To continue connecting devices, go to the next page. Plug in . 2. To go back to viewing TV channels, use the Component Video (Advanced) Connection instead. Note: If the device you're connecting also has Component Video jacks and you have component video... instructions below. Red= right audio; Using the example of a DVD player: 1. INPUT INPUT SUB CH button Use these buttons to view the picture of the TV and to connect a device that has Y Pb Pr or Y Cb Cr jacks, for example a DVD player. 3. Using the example of a DVD player: 1. ...
...14 to complete the Initial Setup. • To continue connecting devices, go to the next page. Plug in . 2. To go back to viewing TV channels, use the Component Video (Advanced) Connection instead. Note: If the device you're connecting also has Component Video jacks and you have component video... instructions below. Red= right audio; Using the example of a DVD player: 1. INPUT INPUT SUB CH button Use these buttons to view the picture of the TV and to connect a device that has Y Pb Pr or Y Cb Cr jacks, for example a DVD player. 3. Using the example of a DVD player: 1. ...
User Manual
Page 11
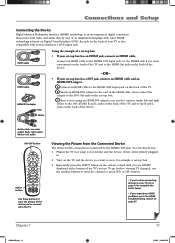
...jack on the back of a set-top box: • If your set -top box. 3. Attach an HDMI/DVI adapter to view the picture of the TV. Turn on the back of an integrated mini-plug cable. Connections and Setup Connecting the Device High-Definition Multimedia Interface (HDMI) technology is... Picture from the Connected Device The device in . 2. B. buttons. • If you need to connect Audio left audio ON•OFF button ON•OFF TV PIP SAT•AUX DVD GO BACK VOL CH MENU ZOOMCLEAR MUTE INFO + CH CTRL PRESETS ZOOM+ GUIDE INPUT INPUT SUB CH button Use these...
...jack on the back of a set-top box: • If your set -top box. 3. Attach an HDMI/DVI adapter to view the picture of the TV. Turn on the back of an integrated mini-plug cable. Connections and Setup Connecting the Device High-Definition Multimedia Interface (HDMI) technology is... Picture from the Connected Device The device in . 2. B. buttons. • If you need to connect Audio left audio ON•OFF button ON•OFF TV PIP SAT•AUX DVD GO BACK VOL CH MENU ZOOMCLEAR MUTE INFO + CH CTRL PRESETS ZOOM+ GUIDE INPUT INPUT SUB CH button Use these...

User Manual
Page 12
... a picture. Note: When using the USB jack. INPUT INPUT SUB CH button Use these buttons to the TV. 12 1668591B.indb 12 Chapter 1 6/5/06 3:28:08 PM Go to the USB jack on the TV and the device. 3. Connections and Setup USB Connection This is an example of a connection using a USB ...connection, you 've connected to view the picture of the device you can play a picture slideshow from the Main menu. Plug in the TV and the USB device, if they aren't already plugged in. 2. PLAY ON/OFF Connecting the Device This connection allows you to connect to a compatible mass...
... a picture. Note: When using the USB jack. INPUT INPUT SUB CH button Use these buttons to the TV. 12 1668591B.indb 12 Chapter 1 6/5/06 3:28:08 PM Go to the USB jack on the TV and the device. 3. Connections and Setup USB Connection This is an example of a connection using a USB ...connection, you 've connected to view the picture of the device you can play a picture slideshow from the Main menu. Plug in the TV and the USB device, if they aren't already plugged in. 2. PLAY ON/OFF Connecting the Device This connection allows you to connect to a compatible mass...

User Manual
Page 13
... can connect to as described on page 6. 2. Connect one end of a 15-pin monitor cable to the VGA VIDEO jack on the back of the TV's screen. Connect a 3.5 mm stereo mini pin cable (sometimes referred to a 15-pin monitor cable. 3. Highlight PC Sound source and press the right arrow to...to a personal computer. 1. Go to page 35 for instructions. 3 2 Connecting the Device This connection allows you to connect to the Audio Output jack on the TV and the PC. 3. Turn on the PC. Connect your audio cable. Connections and Setup VGA Connection This is 1024 x 768. Go to page 6 for ...
... can connect to as described on page 6. 2. Connect one end of a 15-pin monitor cable to the VGA VIDEO jack on the back of the TV's screen. Connect a 3.5 mm stereo mini pin cable (sometimes referred to a 15-pin monitor cable. 3. Highlight PC Sound source and press the right arrow to...to a personal computer. 1. Go to page 35 for instructions. 3 2 Connecting the Device This connection allows you to connect to the Audio Output jack on the TV and the PC. 3. Turn on the PC. Connect your audio cable. Connections and Setup VGA Connection This is 1024 x 768. Go to page 6 for ...

User Manual
Page 14
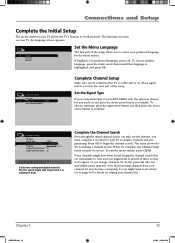
... to Complete the Initial Setup The technical term is the same throughout the menu screens: highlight your TV by a light switch. Turn on the TV Turn on your choice and select it. ON•OFF TV PIP SAT•AUX DVD GO BACK VOL CH MENU ZOOMCLEAR MUTE INFO + CH CTRL PRESETS ZOOM... To access the setup menus manually, press MENU and choose Setup. 14 1668591B.indb 14 Chapter 1 6/5/06 3:28:10 PM More than one of the TV or ON•OFF on the remote control. Connections and Setup Plug in the Remote • Remove the battery compartment cover from other menu items...
... to Complete the Initial Setup The technical term is the same throughout the menu screens: highlight your TV by a light switch. Turn on the TV Turn on your choice and select it. ON•OFF TV PIP SAT•AUX DVD GO BACK VOL CH MENU ZOOMCLEAR MUTE INFO + CH CTRL PRESETS ZOOM... To access the setup menus manually, press MENU and choose Setup. 14 1668591B.indb 14 Chapter 1 6/5/06 3:28:10 PM More than one of the TV or ON•OFF on the remote control. Connections and Setup Plug in the Remote • Remove the battery compartment cover from other menu items...
User Manual
Page 15
...Channel setup Go back Signal type Auto Channel search Progress Analog Channels found Digital Channels found will be time consuming, so you 've connected the TV to cancel Any channels already found Cable... To exit the menu system, press CLEAR. To do it later. To choose Antenna, press the ... minutes, you must complete it in your ANT/CABLE jack, the option is chosen for you and you change channels. When it is your TV, the language screen appears. If you to page 40 for details on -screen. If English is looking for the menu system. Note that ...
...Channel setup Go back Signal type Auto Channel search Progress Analog Channels found Digital Channels found will be time consuming, so you 've connected the TV to cancel Any channels already found Cable... To exit the menu system, press CLEAR. To do it later. To choose Antenna, press the ... minutes, you must complete it in your ANT/CABLE jack, the option is chosen for you and you change channels. When it is your TV, the language screen appears. If you to page 40 for details on -screen. If English is looking for the menu system. Note that ...

User Manual
Page 16
... is sent in a 16/9 format. Press the ZOOM+/- If there are bars on how the station or source device is sent in a 4/3 format, which your TV displays these channels in 4/3 which does fill your HDTV, you might notice that may eliminate the bars. Digital cable channels sometimes take longer to... A at the bottom of the screen to see if you 're used to see if you're watching an analog channel. What To Expect Watching TV • Remember: Look for the D at the bottom of the screen to .
... is sent in a 16/9 format. Press the ZOOM+/- If there are bars on how the station or source device is sent in a 4/3 format, which your TV displays these channels in 4/3 which does fill your HDTV, you might notice that may eliminate the bars. Digital cable channels sometimes take longer to... A at the bottom of the screen to see if you 're used to see if you're watching an analog channel. What To Expect Watching TV • Remember: Look for the D at the bottom of the screen to .

User Manual
Page 17
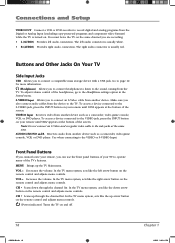
...or DVD player. • L AUDIO Provides left audio connection when using the CMP1 video inputs. SPDIF OUT Use a digital coaxial cable to connect your TV to connect devices. Use a 3.5 mm stereo mini pin cable (sometimes referred to page 34 for the connection. There are several ways to a compatible audio...using a 15 pin D-sub cable. Connections and Setup Explanation of Jacks (in alphabetical order) This section describes the jacks on the back of your TV is also compatible with DVI devices. • L AUDIO (used for CMP1 Y Pb/Cb Pr/Cr and CMP1 Audio above. The left and right...
...or DVD player. • L AUDIO Provides left audio connection when using the CMP1 video inputs. SPDIF OUT Use a digital coaxial cable to connect your TV to connect devices. Use a 3.5 mm stereo mini pin cable (sometimes referred to page 34 for the connection. There are several ways to a compatible audio...using a 15 pin D-sub cable. Connections and Setup Explanation of Jacks (in alphabetical order) This section describes the jacks on the back of your TV is also compatible with DVI devices. • L AUDIO (used for CMP1 Y Pb/Cb Pr/Cr and CMP1 Audio above. The left and right...
User Manual
Page 18
... to connect an S-Video cable from another device such as a camcorder, video game console, VCR, or DVD player. In the TV menu system, acts like the up the TV Main menu. Go to page 12 for more information. (Headphones) Allows you to connect a compatible mass storage device with a USB...remote, you are recording. • L (AUDIO) Provides left audio connector is usually red. To access a device connected to the sound coming from the TV. To access a device connected to the Headphone settings option in the Sound menu. Note: Do not connect an S-Video and a regular video cable to ...
... to connect an S-Video cable from another device such as a camcorder, video game console, VCR, or DVD player. In the TV menu system, acts like the up the TV Main menu. Go to page 12 for more information. (Headphones) Allows you to connect a compatible mass storage device with a USB...remote, you are recording. • L (AUDIO) Provides left audio connector is usually red. To access a device connected to the sound coming from the TV. To access a device connected to the Headphone settings option in the Sound menu. Note: Do not connect an S-Video and a regular video cable to ...
User Manual
Page 19
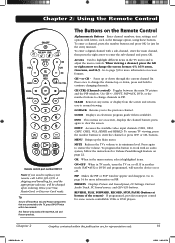
...to its minimum level. GO BACK Returns you to restore the volume. INFO If no menus are on or off most RCA, GE, and Proscan products. To resume TV viewing, press the number buttons to the previous channel. Chapter 2 Graphics contained within two seconds. Scans up the Main ...enter the main channel, then press the right arrow to change channels in TV mode, turns the TV on -screen, displays the channel banner; PRESETS Displays Picture and Sound preset; To enter a digital channel with most RCA, GE, and Proscan components that are for some remote-controllable VCRs or ...
...to its minimum level. GO BACK Returns you to restore the volume. INFO If no menus are on or off most RCA, GE, and Proscan products. To resume TV viewing, press the number buttons to the previous channel. Chapter 2 Graphics contained within two seconds. Scans up the Main ...enter the main channel, then press the right arrow to change channels in TV mode, turns the TV on -screen, displays the channel banner; PRESETS Displays Picture and Sound preset; To enter a digital channel with most RCA, GE, and Proscan components that are for some remote-controllable VCRs or ...

User Manual
Page 20
...connected to see Modes of your television, it to the channel. Also displays current status. Make sure the device you have connected to the TV. 1. Programming the Remote to control any device; It also may not be programmed to operate one of remote-controllable VCRs, audio devices, DVD...). Once the channel is enabled, turns on the TV and puts the remote in SAT•AUX mode. Notes: The TV button can't be programmed to operate some RCA devices. Using the Remote Control SAT•AUX Places the remote in TV mode. SUB CH When entering a digital channel that...
...connected to see Modes of your television, it to the channel. Also displays current status. Make sure the device you have connected to the TV. 1. Programming the Remote to control any device; It also may not be programmed to operate one of remote-controllable VCRs, audio devices, DVD...). Once the channel is enabled, turns on the TV and puts the remote in SAT•AUX mode. Notes: The TV button can't be programmed to operate some RCA devices. Using the Remote Control SAT•AUX Places the remote in TV mode. SUB CH When entering a digital channel that...

User Manual
Page 21
... searched, the device button flashes 3 times, then the remote exits manual code search and returns to control. 2. Using the Remote Control ON•OFF TV PIP SAT•AUX DVD GO BACK VOL CH Programming the Remote There are three ways to program the remote control to program. 5. If you...
... searched, the device button flashes 3 times, then the remote exits manual code search and returns to control. 2. Using the Remote Control ON•OFF TV PIP SAT•AUX DVD GO BACK VOL CH Programming the Remote There are three ways to program the remote control to program. 5. If you...
User Manual
Page 22
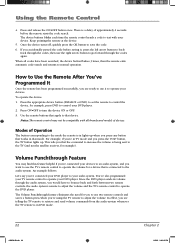
...13 PM The Volume Punchthrough feature eliminates the need for example). To operate the device: 1. An example follows: Let's say you 're using the TV remote to your devices. Since the DVD player sends its volume through the audio system, you would have been searched, the device button flashes... 3 times, then the remote exits automatic code search and returns to the mode the remote is in TV mode and you that the command to increase the volume is connected to that apply to the audio system. There is a delay of approximately 6...
...13 PM The Volume Punchthrough feature eliminates the need for example). To operate the device: 1. An example follows: Let's say you 're using the TV remote to your devices. Since the DVD player sends its volume through the audio system, you would have been searched, the device button flashes... 3 times, then the remote exits automatic code search and returns to the mode the remote is in TV mode and you that the command to increase the volume is connected to that apply to the audio system. There is a delay of approximately 6...

User Manual
Page 23
...). 4. Then release the buttons. 2. Using the Remote Control Therefore, after you've successfully set up the Volume Punchthrough feature, whenever the TV remote is connected to the factory defaults: 1. Turn on your remote control, simultaneously press and hold the MUTE button until a device button ... 6. Press and hold the ON•OFF and MUTE buttons (approximately 3 seconds) until the device button light turns off. 4. Put the TV's remote in DVD mode (press the DVD button) and you want to adjust the volume, you programmed to normal Volume/Mute control. Press and...
...). 4. Then release the buttons. 2. Using the Remote Control Therefore, after you've successfully set up the Volume Punchthrough feature, whenever the TV remote is connected to the factory defaults: 1. Turn on your remote control, simultaneously press and hold the MUTE button until a device button ... 6. Press and hold the ON•OFF and MUTE buttons (approximately 3 seconds) until the device button light turns off. 4. Put the TV's remote in DVD mode (press the DVD button) and you want to adjust the volume, you programmed to normal Volume/Mute control. Press and...

User Manual
Page 25
...EXPRESSVU 647 655 FORTEC STAR 569 555 556 HUGHES NETWORK 621 580 RCA 653 PHILIPS 621 PROSCAN 653 SAMSUNG 583 SONY 657 659 ULTIMATE TV 653 659 ZENITH 656 Home Theatre in a Box Where the code ...975 PANASONIC 974 PHILIPS 755 [969 756] PIONEER 976 968 RADIO SHACK 449 894 895 [453 879] RCA 449 920 [453 879] REGENT 931 SABA 919 SAMSUNG 454 942 SONY 986 TEVION 448 ZENITH 405 787...907 MAGNAVOX 456 [914 286] [969 286] MEDION 896 PANASONIC 437 PHILIPS 456 [969 286] POLAROID 949 RCA 409 255] SAMSUNG 455 963 SANSUI 394 SANYO 416 267] SEARS 394 SONY 389 SYLVANIA 456 [458 227] ...
...EXPRESSVU 647 655 FORTEC STAR 569 555 556 HUGHES NETWORK 621 580 RCA 653 PHILIPS 621 PROSCAN 653 SAMSUNG 583 SONY 657 659 ULTIMATE TV 653 659 ZENITH 656 Home Theatre in a Box Where the code ...975 PANASONIC 974 PHILIPS 755 [969 756] PIONEER 976 968 RADIO SHACK 449 894 895 [453 879] RCA 449 920 [453 879] REGENT 931 SABA 919 SAMSUNG 454 942 SONY 986 TEVION 448 ZENITH 405 787...907 MAGNAVOX 456 [914 286] [969 286] MEDION 896 PANASONIC 437 PHILIPS 456 [969 286] POLAROID 949 RCA 409 255] SAMSUNG 455 963 SANSUI 394 SANYO 416 267] SEARS 394 SONY 389 SYLVANIA 456 [458 227] ...


