
User Manual
Page 5
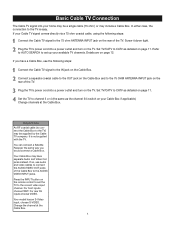
... following steps: Connect the Cable TV signal to the IN jack on the remote control to the 75 OHM ANTENNA INPUT jack on the TV. Set TV/CATV to channel 3 or 4 (the same as detailed on the TV....TV to CATV as the channel 3/4 switch on the rear of the TV. It is easy. For rear AV inputs choose VIDEO. Plug the TV's power cord into a power outlet and turn on page 11. If you would ...use the following steps: Connect the Cable TV signal to the TV is not supplied with the TV. Press the INPUT button on the Cable Box. Your Cable Box may be a single cable (75 ohm ) or may include a ...
... following steps: Connect the Cable TV signal to the IN jack on the remote control to the 75 OHM ANTENNA INPUT jack on the TV. Set TV/CATV to channel 3 or 4 (the same as detailed on the TV....TV to CATV as the channel 3/4 switch on the rear of the TV. It is easy. For rear AV inputs choose VIDEO. Plug the TV's power cord into a power outlet and turn on page 11. If you would ...use the following steps: Connect the Cable TV signal to the TV is not supplied with the TV. Press the INPUT button on the Cable Box. Your Cable Box may be a single cable (75 ohm ) or may include a ...
User Manual
Page 6
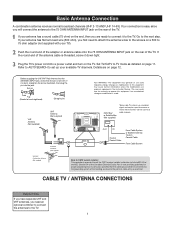
...adapter (not supplied with your antenna has a round cable (75 ohm) on the rear of the TV. Plug the TV's power cord into the ANTENNA INPUT jack, check that provides guidelines for proper grounding and, in the instruction Manual. Bent pin Cable Plug (Needs to be straightened) (Straight pin) FCC WARNING... particular, specifies that the cable ground shall be connected to the grounding system of the building as close to the 75 OHM ANTENNA INPUT jack on the end, then you will connect the antenna to the point of the antenna cable is made. Consult your available TV channels....
...adapter (not supplied with your antenna has a round cable (75 ohm) on the rear of the TV. Plug the TV's power cord into the ANTENNA INPUT jack, check that provides guidelines for proper grounding and, in the instruction Manual. Bent pin Cable Plug (Needs to be straightened) (Straight pin) FCC WARNING... particular, specifies that the cable ground shall be connected to the grounding system of the building as close to the 75 OHM ANTENNA INPUT jack on the end, then you will connect the antenna to the point of the antenna cable is made. Consult your available TV channels....
User Manual
Page 7
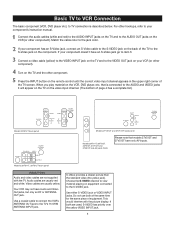
... would interfere with the TV. Use a coaxial cable to connect the VCR's ANTENNA OUT jack to the jack color. Use either S-VIDEO jack or VIDEO INPUT jacks. Turn on the VCR (or other component. Your VCR may not have an S-Video jack go to the AUDIO OUT jacks on the TV.... For other component). Audio cables are usually yellow. Choose the S-VIDEO channel to the VIDEO OUT jack on the remote control until the correct video input channel appears in the upper right corner of equipment. If both at the same time for the same piece of the TV screen. Basic TV...
... would interfere with the TV. Use a coaxial cable to connect the VCR's ANTENNA OUT jack to the jack color. Use either S-VIDEO jack or VIDEO INPUT jacks. Turn on the VCR (or other component. Your VCR may not have an S-Video jack go to the AUDIO OUT jacks on the TV.... For other component). Audio cables are usually yellow. Choose the S-VIDEO channel to the VIDEO OUT jack on the remote control until the correct video input channel appears in the upper right corner of equipment. If both at the same time for the same piece of the TV screen. Basic TV...
User Manual
Page 8
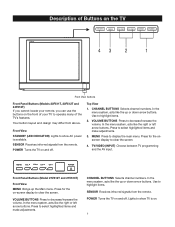
... the menu system, acts like the up or down arrow buttons. Lights to show AC power is on and off . TV/VIDEO (INPUT) Choose between TV programming and the AV input. Use to highlight items. SENSOR Receives infra-red signals from above. Top View 1. VOLUME BUTTONS Press to decrease/increase the volume...
... the menu system, acts like the up or down arrow buttons. Lights to show AC power is on and off . TV/VIDEO (INPUT) Choose between TV programming and the AV input. Use to highlight items. SENSOR Receives infra-red signals from above. Top View 1. VOLUME BUTTONS Press to decrease/increase the volume...
User Manual
Page 10
... select TV channels or the Audio/Video IN channels. In the menu system, acts like the right or left arrow button and adjusts menu controls. 9 INPUT Press to select memorized TV channels. FAV(ORITE) Press to browse the channels in the TV position, all channels can block the signal to CATV...
... select TV channels or the Audio/Video IN channels. In the menu system, acts like the right or left arrow button and adjusts menu controls. 9 INPUT Press to select memorized TV channels. FAV(ORITE) Press to browse the channels in the TV position, all channels can block the signal to CATV...
User Manual
Page 12
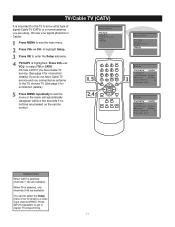
... Picture Sound Preferences Time Setup Press CH+ or CH- You cannot select the Setup menu if the TV is selected, channels 1-125 are using. Press INPUT repeatedly to get to highlight Setup. TV/Cable TV (CATV) It is important for the TV to see the main menu. Choose your signal (Antenna... Cable TV service and you are available. Choose CATV if you have Cable TV service. (See page 4 for connection details.) Press MENU repeatedly to a video input channel (FRNT).
... Picture Sound Preferences Time Setup Press CH+ or CH- You cannot select the Setup menu if the TV is selected, channels 1-125 are using. Press INPUT repeatedly to get to highlight Setup. TV/Cable TV (CATV) It is important for the TV to see the main menu. Choose your signal (Antenna... Cable TV service and you are available. Choose CATV if you have Cable TV service. (See page 4 for connection details.) Press MENU repeatedly to a video input channel (FRNT).
User Manual
Page 13
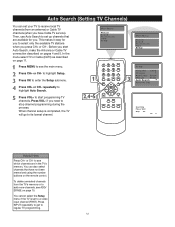
... also select channels that are in the TV's memory. Press MENU to enter the Setup submenu. Press OK to see the main menu. Press INPUT repeatedly to get to highlight Auto Search. Before you start programming TV channels. You can set your TV to receive local TV channels (from the... set up channels that have Cable TV service). You cannot select the Setup menu if the TV is completed, the TV will go to a video input channel (FRNT). to stop channel programming during the process. if you . to see ADD/ ERASE on pages 4 and 5. Press VOL+ to select only the...
... also select channels that are in the TV's memory. Press MENU to enter the Setup submenu. Press OK to see the main menu. Press INPUT repeatedly to get to highlight Auto Search. Before you start programming TV channels. You can set your TV to receive local TV channels (from the... set up channels that have Cable TV service). You cannot select the Setup menu if the TV is completed, the TV will go to a video input channel (FRNT). to stop channel programming during the process. if you . to see ADD/ ERASE on pages 4 and 5. Press VOL+ to select only the...
User Manual
Page 14
... Add/Erase Erase Manual Down Auto Search Favorite List Setup TV/CATV CATV Channel 60 Add/Erase Erase Manual Up Auto Search Favorite List Press INPUT repeatedly to get to exit the menu or the menu will automatically disappear within a few seconds if no buttons are pressed on page 11. ...want . Press VOL+ or VOL- Otherwise the search will stop at channel 60 and go up to 61, 62, 63, etc.). Press MENU to a video input channel (FRNT). when you find the channel you are on the remote control. Main Menu Picture Sound Preferences Time Setup Helpful Hints You cannot...
... Add/Erase Erase Manual Down Auto Search Favorite List Setup TV/CATV CATV Channel 60 Add/Erase Erase Manual Up Auto Search Favorite List Press INPUT repeatedly to get to exit the menu or the menu will automatically disappear within a few seconds if no buttons are pressed on page 11. ...want . Press VOL+ or VOL- Otherwise the search will stop at channel 60 and go up to 61, 62, 63, etc.). Press MENU to a video input channel (FRNT). when you find the channel you are on the remote control. Main Menu Picture Sound Preferences Time Setup Helpful Hints You cannot...

User Manual
Page 15
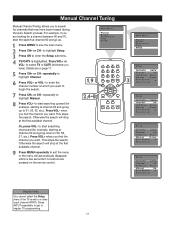
to select TV or CATV (whichever you want to store at this position, such as CATV 8. to a video input channel (FRNT). Favorite Channel Setting You can store five channels you prefer into the Favorite List and recall these channels easily by pressing the ... 2 CH3 CATV 3 CH4 CATV 4 CH5 CATV 5 Helpful Hints You cannot select the Setup menu if the TV is highlighted. to regular TV programming. 14 Press INPUT repeatedly to get to select CH1 (the first channel position), then Press VOL+ or VOL- Main Menu Picture Sound Preferences Time Setup Press CH...
to select TV or CATV (whichever you want to store at this position, such as CATV 8. to a video input channel (FRNT). Favorite Channel Setting You can store five channels you prefer into the Favorite List and recall these channels easily by pressing the ... 2 CH3 CATV 3 CH4 CATV 4 CH5 CATV 5 Helpful Hints You cannot select the Setup menu if the TV is highlighted. to regular TV programming. 14 Press INPUT repeatedly to get to select CH1 (the first channel position), then Press VOL+ or VOL- Main Menu Picture Sound Preferences Time Setup Press CH...

User Manual
Page 16
.... If you select Add, the channel will not be available when you press CH+ and CHto move through the channels in the TV memory. Press INPUT repeatedly to get to choose Add or Erase. Details are pressed on page 11. to add or erase. buttons. Press VOL+ or VOL- to ...have). Main Menu Picture Sound Preferences Time Setup Helpful Hints You cannot select the Setup menu if the TV is highlighted. Press OK to a video input channel (FRNT). buttons. Press MENU to exit the menu or the menu will remove the channel from the list in memory using the CH+/- ...
.... If you select Add, the channel will not be available when you press CH+ and CHto move through the channels in the TV memory. Press INPUT repeatedly to get to choose Add or Erase. Details are pressed on page 11. to add or erase. buttons. Press VOL+ or VOL- to ...have). Main Menu Picture Sound Preferences Time Setup Helpful Hints You cannot select the Setup menu if the TV is highlighted. Press OK to a video input channel (FRNT). buttons. Press MENU to exit the menu or the menu will remove the channel from the list in memory using the CH+/- ...

User Manual
Page 34
... to display the message at a specified time, select the icon and proceed with the cursor back at AM 7:30. After finishing message inputting and editing, if you want to remove the notepad from the screen. Press OK to enter letters, numbers, or some special symbols. The Notebook screen...
... to display the message at a specified time, select the icon and proceed with the cursor back at AM 7:30. After finishing message inputting and editing, if you want to remove the notepad from the screen. Press OK to enter letters, numbers, or some special symbols. The Notebook screen...

User Manual
Page 36
...while using S-Video remember to also connect the component's left and right audio output jacks to page 20 for more instructions. 35 Go to the INPUT button description on the front of the TV. Can't select certain channel • Channel may be corrected by plugging in your house may be ... press the VOL+ on the remote and the CH+ button on Master Enable (Go to unlock the TV • If you forget your RCA product, please visit www.rca.com/customersupport. Sound okay, picture poor • Check antenna connections. TV Problems TV won 't let me watch a program even though it is...
...while using S-Video remember to also connect the component's left and right audio output jacks to page 20 for more instructions. 35 Go to the INPUT button description on the front of the TV. Can't select certain channel • Channel may be corrected by plugging in your house may be ... press the VOL+ on the remote and the CH+ button on Master Enable (Go to unlock the TV • If you forget your RCA product, please visit www.rca.com/customersupport. Sound okay, picture poor • Check antenna connections. TV Problems TV won 't let me watch a program even though it is...

Brochure
Page 1
... INDIANAPOLIS, IN 46290 AV outputs simplify connection to prevent small children from changing settings. 14F512T 14" (Diagonal) Television w/ Front & Rear AV Features On-Screen Clock, Sleep, and Wake Timers Rear Stereo A/V Inputs with S-Video, Side Stereo AV Inputs, and Rear AV Outputs Electronic On-Screen Notepad Trilingual On-Screen Display Front Panel Lock...
... INDIANAPOLIS, IN 46290 AV outputs simplify connection to prevent small children from changing settings. 14F512T 14" (Diagonal) Television w/ Front & Rear AV Features On-Screen Clock, Sleep, and Wake Timers Rear Stereo A/V Inputs with S-Video, Side Stereo AV Inputs, and Rear AV Outputs Electronic On-Screen Notepad Trilingual On-Screen Display Front Panel Lock...

Brochure
Page 2
... On-Screen Yes Yes Clock/Sleep/Wake NTSC 1 L&R Audio, 1 Video 1 1 Set - TTE TECHNOLOGY, INC. 10330 N MERIDIAN ST INDIANAPOLIS, IN 46290 14F512T Technical Specifications Illustration of Thomson S.A. L&R Audio Fixed 1 1 1 L&R Audio, 1 Video Silver Diamond / Slate 16 1/2 x 14 1/4 x 15 1/2 18...SIDE PANEL: Audio/Video Inputs (Composite) SPECIFICATIONS Finish Product Size (WxHxD) inches Approx Carton Size (WxHxD) inches Approx Weight (Product / Packaged) lbs Power Options REMOTE CONTROL Remote Model Number Remote Type INCLUDED ACCESSORIES Instruction Book Languages RCA 14 Tabletop TV 4x3...
... On-Screen Yes Yes Clock/Sleep/Wake NTSC 1 L&R Audio, 1 Video 1 1 Set - TTE TECHNOLOGY, INC. 10330 N MERIDIAN ST INDIANAPOLIS, IN 46290 14F512T Technical Specifications Illustration of Thomson S.A. L&R Audio Fixed 1 1 1 L&R Audio, 1 Video Silver Diamond / Slate 16 1/2 x 14 1/4 x 15 1/2 18...SIDE PANEL: Audio/Video Inputs (Composite) SPECIFICATIONS Finish Product Size (WxHxD) inches Approx Carton Size (WxHxD) inches Approx Weight (Product / Packaged) lbs Power Options REMOTE CONTROL Remote Model Number Remote Type INCLUDED ACCESSORIES Instruction Book Languages RCA 14 Tabletop TV 4x3...


