PLR44MU Manual 1
Page 2
... Installation 3 Take out screw before installation......... 3 DIN Front-Mount (Method A 3 Installing the unit 3 Removing the unit 4 DIN Rear-Mount (Method B 5 Using the detachable front panel ...... 6 Wiring Connection 7 Operation 8 Location of keys 8 Switching on/off the unit 9 Faceplate release 9 Sound adjustment 9 Loudness 9 Display information 9 Liquid crystal display 9 Reset function 9 Radio operation 9 Switching...
... Installation 3 Take out screw before installation......... 3 DIN Front-Mount (Method A 3 Installing the unit 3 Removing the unit 4 DIN Rear-Mount (Method B 5 Using the detachable front panel ...... 6 Wiring Connection 7 Operation 8 Location of keys 8 Switching on/off the unit 9 Faceplate release 9 Sound adjustment 9 Loudness 9 Display information 9 Liquid crystal display 9 Reset function 9 Radio operation 9 Switching...
PLR44MU Manual 1
Page 3
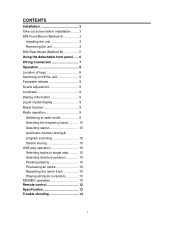
... system work properly. Use only the parts included with the normal driving function of the driver. Before finally installing the unit, connect the wiring temporarily and make sure it is all connections first, and then follow these steps to install the unit. 1. L Key Outer Trim Ring Sleeve Front Panel... and remove the control panel (see the steps of the outer trim ring then pull it out to the following illustrated installation methods. Disconnect the wire harness and the antenna. 3.
... system work properly. Use only the parts included with the normal driving function of the driver. Before finally installing the unit, connect the wiring temporarily and make sure it is all connections first, and then follow these steps to install the unit. 1. L Key Outer Trim Ring Sleeve Front Panel... and remove the control panel (see the steps of the outer trim ring then pull it out to the following illustrated installation methods. Disconnect the wire harness and the antenna. 3.
PLR44MU Manual 1
Page 4
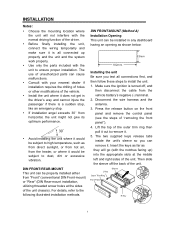
If necessary, bend the metal strap to pinch any wires or cables. 8. Insert both sides of the unit to secure the back of the dashboard. Mount the sleeve by inserting the sleeve into the slots ... unit out of the unit in place. Spring Washer Hex Nut Metal Strap Mounting Bolt Plain Washer Tapping Screw Dashboard Tabs Screwdriver 10. Reconnect the wire harness and the antenna and be careful not to fit your vehicle is turned off, then disconnect the cable from the vehicle battery's negative (-) terminal...
If necessary, bend the metal strap to pinch any wires or cables. 8. Insert both sides of the unit to secure the back of the dashboard. Mount the sleeve by inserting the sleeve into the slots ... unit out of the unit in place. Spring Washer Hex Nut Metal Strap Mounting Bolt Plain Washer Tapping Screw Dashboard Tabs Screwdriver 10. Reconnect the wire harness and the antenna and be careful not to fit your vehicle is turned off, then disconnect the cable from the vehicle battery's negative (-) terminal...
PLR44MU Manual 1
Page 7
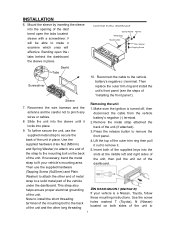
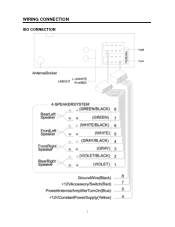
WIRING CONNECTION ISO CONNECTION 7
WIRING CONNECTION ISO CONNECTION 7
PLR44MU Manual 1
Page 9
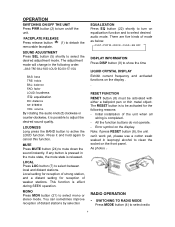
... INFORMATION Press DISP button (9) to turn on the display. Note: if press RESET button (8), the unit can sometimes improve reception of the unit when all wiring is completed. - SOUND ADJUSTMENT Press SEL button (5) shortly to select radio 9 This function is released. All the function buttons do not operate. - LOCAL Press LOC...
... INFORMATION Press DISP button (9) to turn on the display. Note: if press RESET button (8), the unit can sometimes improve reception of the unit when all wiring is completed. - SOUND ADJUSTMENT Press SEL button (5) shortly to select radio 9 This function is released. All the function buttons do not operate. - LOCAL Press LOC...
PLR44MU Manual 1
Page 14
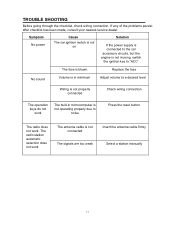
Replace the fuse No sound Volume is in minimum Adjust volume to a desired level Wiring is not properly connected Check wiring connection The operation keys do not work The built-in microcomputer is not operating properly due to "ACC" The fuse is not connected The ... . If any of the problems persist after checklist has been made, consult your nearest service dealer. TROUBLE SHOOTING Before going through the checklist, check wiring connection. Symptom No power Cause The car ignition switch is not on Solution If the power supply is connected to the car accessory circuits, but...
Replace the fuse No sound Volume is in minimum Adjust volume to a desired level Wiring is not properly connected Check wiring connection The operation keys do not work The built-in microcomputer is not operating properly due to "ACC" The fuse is not connected The ... . If any of the problems persist after checklist has been made, consult your nearest service dealer. TROUBLE SHOOTING Before going through the checklist, check wiring connection. Symptom No power Cause The car ignition switch is not on Solution If the power supply is connected to the car accessory circuits, but...


