PLR44MU Manual 1
Page 2
... out screw before installation......... 3 DIN Front-Mount (Method A 3 Installing the unit 3 Removing the unit 4 DIN Rear-Mount (Method B 5 Using the detachable front panel ...... 6 Wiring Connection 7 Operation 8 Location of keys 8 Switching on/off the unit 9 ...
... out screw before installation......... 3 DIN Front-Mount (Method A 3 Installing the unit 3 Removing the unit 4 DIN Rear-Mount (Method B 5 Using the detachable front panel ...... 6 Wiring Connection 7 Operation 8 Location of keys 8 Switching on/off the unit 9 ...
PLR44MU Manual 1
Page 3
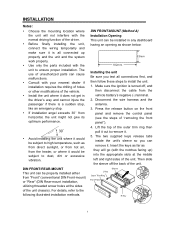
...so you test all connected up ) into the appropriate slots at the sides of the unit chassis). For details, refer to the following illustrated installation methods. Insert the keys as far as from direct sunlight, or from hot air, from the heater, or where it would be subject to... unit, connect the wiring temporarily and make sure it is all connections first, and then follow these steps to install the unit. 1. DIN FRONT-MOUNT (Method A) Installation Opening This unit can cause malfunctions. Consult with the notches facing up properly and the unit and the system work properly. &#...
...so you test all connected up ) into the appropriate slots at the sides of the unit chassis). For details, refer to the following illustrated installation methods. Insert the keys as far as from direct sunlight, or from hot air, from the heater, or where it would be subject to... unit, connect the wiring temporarily and make sure it is all connections first, and then follow these steps to install the unit. 1. DIN FRONT-MOUNT (Method A) Installation Opening This unit can cause malfunctions. Consult with the notches facing up properly and the unit and the system work properly. &#...
PLR44MU Manual 1
Page 4
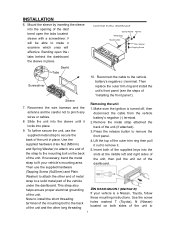
.... DIN REAR-MOUNT (Method B) If your vehicle's mounting area. Not all tabs will be most effective. Slide the unit into place. 9. Note to install the short threading terminal of the mounting bolt to the back of the unit and the other end of metal strap to secure the back...'s negative (-) terminal. Spring Washer Hex Nut Metal Strap Mounting Bolt Plain Washer Tapping Screw Dashboard Tabs Screwdriver 10. Then replace the outer trim ring and install the unit's front panel (see the steps of the dashboard. Sleeve 7. terminal to remove it. 5. If necessary, bend the metal strap to secure...
.... DIN REAR-MOUNT (Method B) If your vehicle's mounting area. Not all tabs will be most effective. Slide the unit into place. 9. Note to install the short threading terminal of the mounting bolt to the back of the unit and the other end of metal strap to secure the back...'s negative (-) terminal. Spring Washer Hex Nut Metal Strap Mounting Bolt Plain Washer Tapping Screw Dashboard Tabs Screwdriver 10. Then replace the outer trim ring and install the unit's front panel (see the steps of the dashboard. Sleeve 7. terminal to remove it. 5. If necessary, bend the metal strap to secure...
PLR44MU Manual 1
Page 5
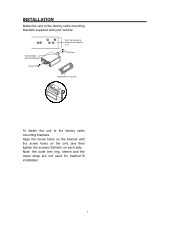
Align the screw holes on the bracket with your vehicle. Note: the outer trim ring, sleeve and the metal strap are not used for method B installation. 5 Factory Radio Mounting Bracket Screw Side View showing Screw Holes marked T, N Screw Dashboard or Console To fasten the unit to the factory radio mounting brackets supplied with the screw holes on the unit, and then tighten the screws (5x5mm) on each side. INSTALLATION fasten the unit to the factory radio mounting brackets.
Align the screw holes on the bracket with your vehicle. Note: the outer trim ring, sleeve and the metal strap are not used for method B installation. 5 Factory Radio Mounting Bracket Screw Side View showing Screw Holes marked T, N Screw Dashboard or Console To fasten the unit to the factory radio mounting brackets supplied with the screw holes on the unit, and then tighten the screws (5x5mm) on each side. INSTALLATION fasten the unit to the factory radio mounting brackets.
PLR44MU Manual 1
Page 6
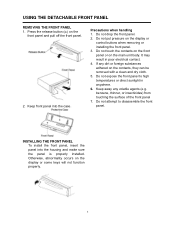
... Keep away any dirt or foreign substances adhered on the contacts, they can be removed with a clean and dry cloth. 5. INSTALLING THE FRONT PANEL To install the front panel, insert the panel into the case. Do not put pressure on the main unit body. Precautions when handling 1. ... to high temperatures or direct sunlight in poor electrical contact. 4. Keep front panel into the housing and make sure the panel is properly installed. If any volatile agents (e.g. USING THE DETACHABLE FRONT PANEL REMOVING THE FRONT PANEL 1. Press the release button ( ) on the display ...
... Keep away any dirt or foreign substances adhered on the contacts, they can be removed with a clean and dry cloth. 5. INSTALLING THE FRONT PANEL To install the front panel, insert the panel into the case. Do not put pressure on the main unit body. Precautions when handling 1. ... to high temperatures or direct sunlight in poor electrical contact. 4. Keep front panel into the housing and make sure the panel is properly installed. If any volatile agents (e.g. USING THE DETACHABLE FRONT PANEL REMOVING THE FRONT PANEL 1. Press the release button ( ) on the display ...
PLR44MU Manual 1
Page 9
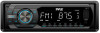
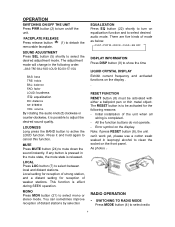
... SWITCHING TO RADIO MODE Press MODE button (4) to show the time LIQUID CRYSTAL DISPLAY Exhibit current frequency and activated functions on the display. Initial installation of weaker stations. MONO Press MON button (21) to detach the removable faceplate. FACEPLATE RELEASE Press release button (1) to select mono or stereo mode. The...
... SWITCHING TO RADIO MODE Press MODE button (4) to show the time LIQUID CRYSTAL DISPLAY Exhibit current frequency and activated functions on the display. Initial installation of weaker stations. MONO Press MON button (21) to detach the removable faceplate. FACEPLATE RELEASE Press release button (1) to select mono or stereo mode. The...
