PLPTS3 Manual 1
Page 1
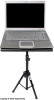
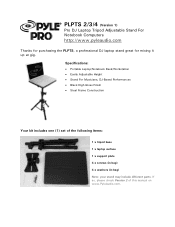
Specifications: Portable Laptop/Notebook Desk/Workstation Easily Adjustable Height Stand For Musicians, DJ-Based Performances Black High Gloss Finish Steel Frame Construction Your kit includes one (1) set of this manual on www.PyleAudio.com. PLPTS 2/3/4 (Version 1) Pro DJ Laptop Tripod Adjustable Stand For Notebook Computers http://www.pyleaudio.com Thanks for purchasing the PLPTS, a professional DJ laptop stand great for mixing it up at gig. If so, please check Version 2 of the following items: 1 x tripod base 1 x laptop surface 1 x support ...
Specifications: Portable Laptop/Notebook Desk/Workstation Easily Adjustable Height Stand For Musicians, DJ-Based Performances Black High Gloss Finish Steel Frame Construction Your kit includes one (1) set of this manual on www.PyleAudio.com. PLPTS 2/3/4 (Version 1) Pro DJ Laptop Tripod Adjustable Stand For Notebook Computers http://www.pyleaudio.com Thanks for purchasing the PLPTS, a professional DJ laptop stand great for mixing it up at gig. If so, please check Version 2 of the following items: 1 x tripod base 1 x laptop surface 1 x support ...
PLPTS3 Manual 1
Page 2
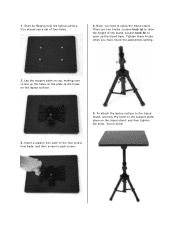
Loosen knob (b) to open up the holes on the plate to line up the tripod base. Tighten these knobs when you have found the appropriate setting. 2. To attach the laptop surface to the tripod stand, unscrew the knob on the support plate, place on top, making sure to the holes on the laptop surface. 5. 1. You're done! 3. Loosen knob (a) to setup the tripod stand. Start by flipping over the laptop surface. There are two knobs. Insert a washer into each screw. Next, we need to raise the height of the four screw hole beds, and then screw in each of the stand. You should ...
Loosen knob (b) to open up the holes on the plate to line up the tripod base. Tighten these knobs when you have found the appropriate setting. 2. To attach the laptop surface to the tripod stand, unscrew the knob on the support plate, place on top, making sure to the holes on the laptop surface. 5. 1. You're done! 3. Loosen knob (a) to setup the tripod stand. Start by flipping over the laptop surface. There are two knobs. Insert a washer into each screw. Next, we need to raise the height of the four screw hole beds, and then screw in each of the stand. You should ...
PLPTS3 Manual 2
Page 1
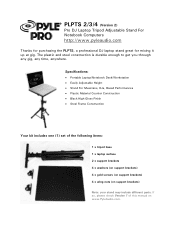
PLPTS 2/3/4 (Version 2) Pro DJ Laptop Tripod Adjustable Stand For Notebook Computers http://www.pyleaudio.com Thanks for purchasing the PLPTS, a professional DJ laptop stand great for mixing it up at gig. Specifications: Portable Laptop/Notebook Desk/Workstation Easily Adjustable Height Stand For Musicians, DJs, Based Performances Plastic Material Counter Construction Black High Gloss Finish Steel Frame Construction Your kit includes one (1) set of this manual on support brackets) Note: your stand may include different parts. If so, ...
PLPTS 2/3/4 (Version 2) Pro DJ Laptop Tripod Adjustable Stand For Notebook Computers http://www.pyleaudio.com Thanks for purchasing the PLPTS, a professional DJ laptop stand great for mixing it up at gig. Specifications: Portable Laptop/Notebook Desk/Workstation Easily Adjustable Height Stand For Musicians, DJs, Based Performances Plastic Material Counter Construction Black High Gloss Finish Steel Frame Construction Your kit includes one (1) set of this manual on support brackets) Note: your stand may include different parts. If so, ...
PLPTS3 Manual 2
Page 2
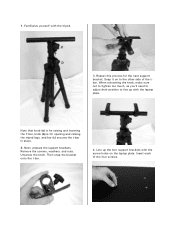
Remove the screws, washers, and nuts. Familiarize yourself with the screw holes on to the other side of the four screws. Then snap the bracket onto the t-bar. 4. Insert each of the tbar. Note that knob (a) is for raising and lowering the T-bar, knob (b) is for the next support bracket. Snap it on the laptop plate. Unscrew the knob. Line up with the laptop plate. Next, prepare the support brackets. When reinserting the knob, make sure not to tighten too much, as you'll need to adjust their position to line up the two support brackets with the tripod. 3. Repeat ...
Remove the screws, washers, and nuts. Familiarize yourself with the screw holes on to the other side of the four screws. Then snap the bracket onto the t-bar. 4. Insert each of the tbar. Note that knob (a) is for raising and lowering the T-bar, knob (b) is for the next support bracket. Snap it on the laptop plate. Unscrew the knob. Line up with the laptop plate. Next, prepare the support brackets. When reinserting the knob, make sure not to tighten too much, as you'll need to adjust their position to line up the two support brackets with the tripod. 3. Repeat ...
PLPTS3 Manual 2
Page 3
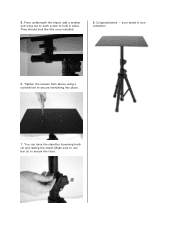
Make sure to use bar (c) to secure everything into place. 7. They should look like this once installed. 8. Tighten the screws from above using a screwdriver to secure the t-bar. You can raise the stand by loosening knob (a) and raising the stand. Congratulations - From underneath the tripod, add a washer and wing nut to each screw to hold in place. 5. your stand is now complete! 6.
Make sure to use bar (c) to secure everything into place. 7. They should look like this once installed. 8. Tighten the screws from above using a screwdriver to secure the t-bar. You can raise the stand by loosening knob (a) and raising the stand. Congratulations - From underneath the tripod, add a washer and wing nut to each screw to hold in place. 5. your stand is now complete! 6.