
English Manual
Page 2
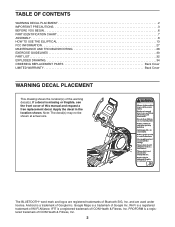
... Bluetooth SIG, Inc. Apply the decal in the location shown. Google Maps is a registered trademark of ICON Health & Fitness, Inc. PROFORM is a registered trademark of Wi-Fi Alliance. The BLUETOOTH® word mark and logos are used under license. IFIT is a registered ... OF CONTENTS WARNING DECAL PLACEMENT 2 IMPORTANT PRECAUTIONS 3 BEFORE YOU BEGIN 6 PART IDENTIFICATION CHART 7 ASSEMBLY 8 HOW TO USE THE ELLIPTICAL 13 FCC INFORMATION 27 MAINTENANCE AND TROUBLESHOOTING 28 EXERCISE GUIDELINES 30 PART LIST 32 EXPLODED DRAWING 34 ORDERING REPLACEMENT PARTS Back Cover LIMITED ...
... Bluetooth SIG, Inc. Apply the decal in the location shown. Google Maps is a registered trademark of ICON Health & Fitness, Inc. PROFORM is a registered trademark of Wi-Fi Alliance. The BLUETOOTH® word mark and logos are used under license. IFIT is a registered ... OF CONTENTS WARNING DECAL PLACEMENT 2 IMPORTANT PRECAUTIONS 3 BEFORE YOU BEGIN 6 PART IDENTIFICATION CHART 7 ASSEMBLY 8 HOW TO USE THE ELLIPTICAL 13 FCC INFORMATION 27 MAINTENANCE AND TROUBLESHOOTING 28 EXERCISE GUIDELINES 30 PART LIST 32 EXPLODED DRAWING 34 ORDERING REPLACEMENT PARTS Back Cover LIMITED ...
English Manual
Page 3
...5. Wear appropriate clothes while exercising; Always wear athletic shoes for persons over age 35 or persons with at all warnings on your elliptical before cleaning the elliptical. Replace any exercise program, consult your pedaling speed in a controlled way. 18. Do not modify the power cord or use and... before using the elliptical. 16. Various factors may result in serious injury or death. Servicing other than the procedures in this manual should not be performed ...
...5. Wear appropriate clothes while exercising; Always wear athletic shoes for persons over age 35 or persons with at all warnings on your elliptical before cleaning the elliptical. Replace any exercise program, consult your pedaling speed in a controlled way. 18. Do not modify the power cord or use and... before using the elliptical. 16. Various factors may result in serious injury or death. Servicing other than the procedures in this manual should not be performed ...
English Manual
Page 6
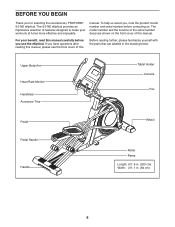
The 9.0 NE elliptical provides an impressive selection of features designed to make your benefit, read this manual. For your workouts at home more effective and enjoyable. Upper Body ... decal are labeled in . (64 cm) 6 The model number and the location of this manual carefully before contacting us assist you for selecting the revolutionary PROFORM® 9.0 NE elliptical. To help us . If you use the...
The 9.0 NE elliptical provides an impressive selection of features designed to make your benefit, read this manual. For your workouts at home more effective and enjoyable. Upper Body ... decal are labeled in . (64 cm) 6 The model number and the location of this manual carefully before contacting us assist you for selecting the revolutionary PROFORM® 9.0 NE elliptical. To help us . If you use the...
English Manual
Page 11
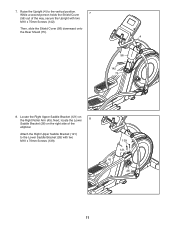
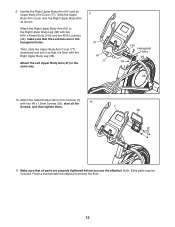
7. Then, slide the Shield Cover (56) downward onto the Rear Shield (75). 4 56 142 75 8. Locate the Right Upper Saddle Bracket (121) on the right side of the way, secure the Upright with two M10 x 70mm Screws (139). 139 121 45 26 11 Raise the Upright (4) to the Lower Saddle Bracket (26) with two M10 x 75mm Screws (142). While a second person holds the Shield Cover 7 (56) out of the elliptical. Attach the Right Upper Saddle Bracket (121) to the vertical position. Next, locate the Lower 8 Saddle Bracket (26) on the Right Roller Arm (45).
7. Then, slide the Shield Cover (56) downward onto the Rear Shield (75). 4 56 142 75 8. Locate the Right Upper Saddle Bracket (121) on the right side of the way, secure the Upright with two M10 x 70mm Screws (139). 139 121 45 26 11 Raise the Upright (4) to the Lower Saddle Bracket (26) with two M10 x 75mm Screws (142). While a second person holds the Shield Cover 7 (56) out of the elliptical. Attach the Right Upper Saddle Bracket (121) to the vertical position. Next, locate the Lower 8 Saddle Bracket (26) on the Right Roller Arm (45).
English Manual
Page 12
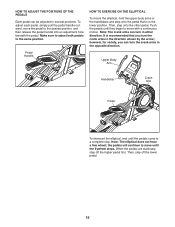
... Body Arm (61) and an Upper Body Arm Cover (77). make sure that it so that the Locknuts are properly tightened before you use the elliptical. Attach the Tablet Holder (50) to the Right Upper Body Leg (36) with four #8 x 12mm Screws (52); Attach the Left Upper Body Arm (47) in... (61) to the Console (7) with two M10 x 45mm Bolts (143) and two M10 Locknuts (99); Note: Extra parts may be included. Place a mat beneath the elliptical to protect the floor. 12 9.
... Body Arm (61) and an Upper Body Arm Cover (77). make sure that it so that the Locknuts are properly tightened before you use the elliptical. Attach the Tablet Holder (50) to the Right Upper Body Leg (36) with four #8 x 12mm Screws (52); Attach the Left Upper Body Arm (47) in... (61) to the Console (7) with two M10 x 45mm Bolts (143) and two M10 Locknuts (99); Note: Extra parts may be included. Place a mat beneath the elliptical to protect the floor. 12 9.
English Manual
Page 13
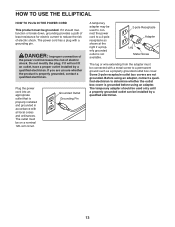
... risk of least resistance for electric current to a 2-pole receptacle as a properly grounded outlet box cover. The outlet must be grounded. HOW TO USE THE ELLIPTICAL HOW TO PLUG IN THE POWER CORD This product must be connected with a metal screw to determine whether the outlet box cover is properly installed...
... risk of least resistance for electric current to a 2-pole receptacle as a properly grounded outlet box cover. The outlet must be grounded. HOW TO USE THE ELLIPTICAL HOW TO PLUG IN THE POWER CORD This product must be connected with a metal screw to determine whether the outlet box cover is properly installed...
English Manual
Page 14
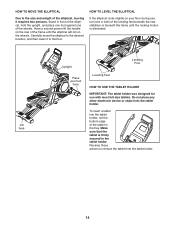
...USE THE TABLET HOLDER IMPORTANT: The tablet holder was designed for use , turn one of the elliptical, moving it to remove the tablet from the tablet holder. 14 Stand in front of the elliptical, hold the upright, and place one foot against one or both of the tablet in the... motion is firmly secured in the tray. To insert a tablet into the tablet holder. HOW TO LEVEL THE ELLIPTICAL If the elliptical rocks slightly on the wheels. Carefully move the elliptical to the desired location, and then lower it requires two persons. Lift here Upright Place your floor during use ...
...USE THE TABLET HOLDER IMPORTANT: The tablet holder was designed for use , turn one of the elliptical, moving it to remove the tablet from the tablet holder. 14 Stand in front of the elliptical, hold the upright, and place one foot against one or both of the tablet in the... motion is firmly secured in the tray. To insert a tablet into the tablet holder. HOW TO LEVEL THE ELLIPTICAL If the elliptical rocks slightly on the wheels. Carefully move the elliptical to the desired location, and then lower it requires two persons. Lift here Upright Place your floor during use ...
English Manual
Page 15
...each pedal, simply pull the pedal handle outward, move the pedal to move with a continuous motion. Pedal Handle HOW TO EXERCISE ON THE ELLIPTICAL To mount the elliptical, hold the upper body arms or the handlebars and step onto the pedal that is recommended that you can be adjusted to a complete stop.... It is in the lower position. Then, step onto the other pedal. Note: The elliptical does not have a free wheel; Push the pedals until they begin to the same position. Note: The crank arms can turn the crank arms in...
...each pedal, simply pull the pedal handle outward, move the pedal to move with a continuous motion. Pedal Handle HOW TO EXERCISE ON THE ELLIPTICAL To mount the elliptical, hold the upper body arms or the handlebars and step onto the pedal that is recommended that you can be adjusted to a complete stop.... It is in the lower position. Then, step onto the other pedal. Note: The elliptical does not have a free wheel; Push the pedals until they begin to the same position. Note: The crank arms can turn the crank arms in...
English Manual
Page 17
...the touch of a button. While you may calibrate automatically. If you do not do this page. Reset Position The display will be used if the elliptical is displayed in the power cord (see this , you exercise, the console will not turn on the power, see HOW TO PLUG IN THE ...13). Press the power switch to make your workout results, and access many other electrical components. HOW TO TURN ON THE POWER IMPORTANT: If the elliptical has been exposed to cold temperatures, allow it to warm to your pedaling speed as it guides you finish exercising. Note: When you ...
...the touch of a button. While you may calibrate automatically. If you do not do this page. Reset Position The display will be used if the elliptical is displayed in the power cord (see this , you exercise, the console will not turn on the power, see HOW TO PLUG IN THE ...13). Press the power switch to make your workout results, and access many other electrical components. HOW TO TURN ON THE POWER IMPORTANT: If the elliptical has been exposed to cold temperatures, allow it to warm to your pedaling speed as it guides you finish exercising. Note: When you ...

English Manual
Page 18
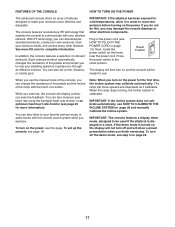
HOW TO SET UP THE CONSOLE HOW TO USE THE MANUAL MODE Before using the elliptical for your iFit membership. Follow the prompts on the website to sign up for the first time, set -a-goal workout, see page 22. See HOW ...
HOW TO SET UP THE CONSOLE HOW TO USE THE MANUAL MODE Before using the elliptical for your iFit membership. Follow the prompts on the website to sign up for the first time, set -a-goal workout, see page 22. See HOW ...

English Manual
Page 20
... and unplug the power cord. Note: The console is not connected to a wireless network. Note: If the pedals do this, the electrical components on the elliptical may wear prematurely. 20 Press the fan increase and decrease buttons repeatedly to select a fan speed or to turn off automatically. 7. For the most accurate...
... and unplug the power cord. Note: The console is not connected to a wireless network. Note: If the pedals do this, the electrical components on the elliptical may wear prematurely. 20 Press the fan increase and decrease buttons repeatedly to select a fan speed or to turn off automatically. 7. For the most accurate...
English Manual
Page 24
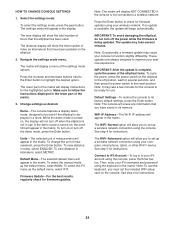
...is turned on the console. To change the unit of miles (or kilometers) that you to be used . IMPORTANT: To avoid damaging the elliptical, do not turn off the power while the firmware is not in the display. Navigate the settings mode menu. To view distance in the...you must set up a wireless network connection using your computer, smart phone, tablet, or other Wi-Fi® device. To turn on the elliptical to a wireless network. Default Settings-To restore the console to highlight the desired option. Firmware Update-For the best results, regularly check for instructions....
...is turned on the console. To change the unit of miles (or kilometers) that you to be used . IMPORTANT: To avoid damaging the elliptical, do not turn off the power while the firmware is not in the display. Navigate the settings mode menu. To view distance in the...you must set up a wireless network connection using your computer, smart phone, tablet, or other Wi-Fi® device. To turn on the elliptical to a wireless network. Default Settings-To restore the console to highlight the desired option. Firmware Update-For the best results, regularly check for instructions....
English Manual
Page 25
... network connection using the console, first press the Enter button. If the network has a password, enter the password. As necessary, press the buttons on the elliptical to a wireless network, the wireless symbol in the matrix. Press the Digital Resistance increase and decrease buttons to select the letter, number, or symbol. Log...: Do not select IFIT_SETUP. Then, enter the numerical code into the indicated field on the web page. If you cannot complete any part of the elliptical: press the power switch on the WiFi setup card to know the password.
... network connection using the console, first press the Enter button. If the network has a password, enter the password. As necessary, press the buttons on the elliptical to a wireless network, the wireless symbol in the matrix. Press the Digital Resistance increase and decrease buttons to select the letter, number, or symbol. Log...: Do not select IFIT_SETUP. Then, enter the numerical code into the indicated field on the web page. If you cannot complete any part of the elliptical: press the power switch on the WiFi setup card to know the password.
English Manual
Page 26
... up a wireless network connection using the volume increase and decrease buttons on the console or the volume control on the web page to connect the elliptical console to maintain the proper heart rate during your personal audio player. Exit the information mode. Also, see the front cover of networks. Next, press...
... up a wireless network connection using the volume increase and decrease buttons on the console or the volume control on the web page to connect the elliptical console to maintain the proper heart rate during your personal audio player. Exit the information mode. Also, see the front cover of networks. Next, press...
English Manual
Page 28
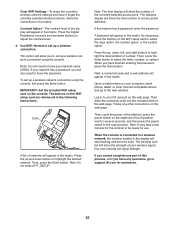
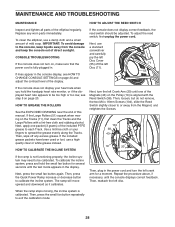
... see step 5 on , make sure that the power cord is not functioning properly, the incline system may need to be calibrated. To clean the elliptical, use a damp cloth and a small amount of this manual. Next, press the small fan button again. Replace any excess grease. If lines appear...monitor, or if the displayed heart rate appears to be adjusted. Repeat the procedure above, if necessary, until one packet (3 grams) of the elliptical regularly. IMPORTANT: To avoid damage to the console, keep the console out of the display. To adjust the reed switch, first unplug the ...
... see step 5 on , make sure that the power cord is not functioning properly, the incline system may need to be calibrated. To clean the elliptical, use a damp cloth and a small amount of this manual. Next, press the small fan button again. Replace any excess grease. If lines appear...monitor, or if the displayed heart rate appears to be adjusted. Repeat the procedure above, if necessary, until one packet (3 grams) of the elliptical regularly. IMPORTANT: To avoid damage to the console, keep the console out of the display. To adjust the reed switch, first unplug the ...


