
User Manual
Page 1
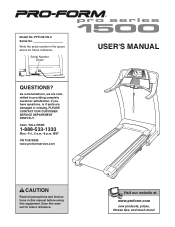
... THE WEB: www.proformservice.com USER'S MANUAL CAUTION Read all precautions and instructions in the space above for future reference. Visit our website at www.proform.com new products, prizes, fitness tips, and much more! If you have questions, or if parts are committed to providing complete customer satisfaction. Write the...
... THE WEB: www.proformservice.com USER'S MANUAL CAUTION Read all precautions and instructions in the space above for future reference. Visit our website at www.proform.com new products, prizes, fitness tips, and much more! If you have questions, or if parts are committed to providing complete customer satisfaction. Write the...

User Manual
Page 2
PROFORM is attached in the center of ICON IP, Inc. 2 TABLE OF CONTENTS IMPORTANT PRECAUTIONS 3 BEFORE YOU BEGIN 6 ASSEMBLY 7 TREADMILL OPERATION 10 HOW TO FOLD AND MOVE THE TREADMILL 22 TROUBLESHOOTING 23 EXERCISE GUIDELINES 25 PART LIST 26 HOW TO ORDER REPLACEMENT PARTS Back Cover LIMITED WARRANTY Back Cover Note: An EXPLODED DRAWING is a registered trademark of this manual.
PROFORM is attached in the center of ICON IP, Inc. 2 TABLE OF CONTENTS IMPORTANT PRECAUTIONS 3 BEFORE YOU BEGIN 6 ASSEMBLY 7 TREADMILL OPERATION 10 HOW TO FOLD AND MOVE THE TREADMILL 22 TROUBLESHOOTING 23 EXERCISE GUIDELINES 25 PART LIST 26 HOW TO ORDER REPLACEMENT PARTS Back Cover LIMITED WARRANTY Back Cover Note: An EXPLODED DRAWING is a registered trademark of this manual.
User Manual
Page 3
... treadmill on the front cover of this treadmill are recommended for the location of the circuit breaker.) 3 When connecting the power cord (see your local PROFORM dealer or call the toll-free telephone number on a level surface, with bare feet, wearing only stockings, or in use a properly functioning surge suppressor could...
... treadmill on the front cover of this treadmill are recommended for the location of the circuit breaker.) 3 When connecting the power cord (see your local PROFORM dealer or call the toll-free telephone number on a level surface, with bare feet, wearing only stockings, or in use a properly functioning surge suppressor could...
User Manual
Page 4
Never drop or insert any service or repairs to the treadmill or the television, ask the service technician to perform safety checks to confirm that the unit is in proper operating condition. • Use No. 10 AWG (5.3mm2) copper, No. 8 AWG (8.4mm2) aluminum, No. 17 AWG (1.0mm2) copper-clad steel or bronze wire, or larger as a ground wire. • Secure an antenna lead-in and ground wires to the house with stand-off insulators spaced from touching such power lines or circuits, as possible to do not remove the cover or the back of the treadmill every three months. 23. Upon ...
Never drop or insert any service or repairs to the treadmill or the television, ask the service technician to perform safety checks to confirm that the unit is in proper operating condition. • Use No. 10 AWG (5.3mm2) copper, No. 8 AWG (8.4mm2) aluminum, No. 17 AWG (1.0mm2) copper-clad steel or bronze wire, or larger as a ground wire. • Secure an antenna lead-in and ground wires to the house with stand-off insulators spaced from touching such power lines or circuits, as possible to do not remove the cover or the back of the treadmill every three months. 23. Upon ...
User Manual
Page 5
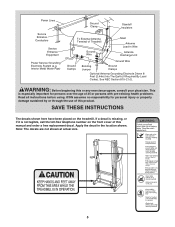
Power Lines Service Entrance Conductors Service Entrance Equipment Power Service Grounding Electrode System (e.g. See NEC Section 810-21 (f). Interior Metal Water Pipe) Ground Clamp Standoff Insulators To External Antenna Terminal of this manual and order a free replacement decal. If a decal is missing, or if it is especially important for personal injury or property damage sustained by or through the use of 35 or persons with pre-existing health problems. Read all instructions before using. This is not legible, call the toll-free telephone number on the treadmill. Apply ...
Power Lines Service Entrance Conductors Service Entrance Equipment Power Service Grounding Electrode System (e.g. See NEC Section 810-21 (f). Interior Metal Water Pipe) Ground Clamp Standoff Insulators To External Antenna Terminal of this manual and order a free replacement decal. If a decal is missing, or if it is especially important for personal injury or property damage sustained by or through the use of 35 or persons with pre-existing health problems. Read all instructions before using. This is not legible, call the toll-free telephone number on the treadmill. Apply ...
User Manual
Page 6
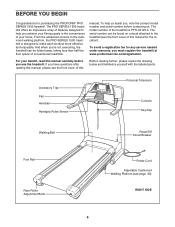
... Cushioned Walking Platform (see the front cover of this manual, please see page 20) RIGHT SIDE 6 The PRO SERIES 1500 treadmill offers an impressive array of conventional treadmills. From the advanced console to the cushioned walking platform, the PRO SERIES...is PFTL94105.0. And when you must register the treadmill at www.proformservice.com/registration. To avoid a registration fee for purchasing the PROFORM® PRO SERIES 1500 treadmill. BEFORE YOU BEGIN Congratulations for any service needed under warranty, you 're not exercising, the treadmill can be folded away...
... Cushioned Walking Platform (see the front cover of this manual, please see page 20) RIGHT SIDE 6 The PRO SERIES 1500 treadmill offers an impressive array of conventional treadmills. From the advanced console to the cushioned walking platform, the PRO SERIES...is PFTL94105.0. And when you must register the treadmill at www.proformservice.com/registration. To avoid a registration fee for purchasing the PROFORM® PRO SERIES 1500 treadmill. BEFORE YOU BEGIN Congratulations for any service needed under warranty, you 're not exercising, the treadmill can be folded away...
User Manual
Page 7
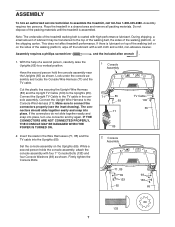
This does not affect treadmill performance. Assembly requires a phillips screwdriver and the included allen wrench . 1. If the connectors do not slide together easily and snap into place. Set the console assembly on the sides of the walking platform, wipe off the lubricant with a soft cloth and a mild, non-abrasive cleaner. Have the second person hold the console assembly near the Uprights (65) as shown. Connect the Upright Wire Harness to the top of the walking belt, the sides of lubricant may be transferred to the Console Wire Harness (71). During shipping, a ...
This does not affect treadmill performance. Assembly requires a phillips screwdriver and the included allen wrench . 1. If the connectors do not slide together easily and snap into place. Set the console assembly on the sides of the walking platform, wipe off the lubricant with a soft cloth and a mild, non-abrasive cleaner. Have the second person hold the console assembly near the Uprights (65) as shown. Connect the Upright Wire Harness to the top of the walking belt, the sides of lubricant may be transferred to the Console Wire Harness (71). During shipping, a ...

User Manual
Page 8
Hold the Latch Housing (68) and the Latch Housing Cover (5) against the sides of the spring shown. Insert the pin into the Latch Housing Cover and the Latch Housing as shown. Make sure that you familiarize yourself with the hole in a secure place; Keep the included allen wrench in the Left Handgrip (140) by sliding the Latch Housing (68) up or down. For your benefit, we recommend that all parts are on pages 23 and 24. 8 Remove the knob from the pin. For the television to the 75 ohm antenna terminal (see page 23). Do not tighten the Screws yet. Then, tighten the ...
Hold the Latch Housing (68) and the Latch Housing Cover (5) against the sides of the spring shown. Insert the pin into the Latch Housing Cover and the Latch Housing as shown. Make sure that you familiarize yourself with the hole in a secure place; Keep the included allen wrench in the Left Handgrip (140) by sliding the Latch Housing (68) up or down. For your benefit, we recommend that all parts are on pages 23 and 24. 8 Remove the knob from the pin. For the television to the 75 ohm antenna terminal (see page 23). Do not tighten the Screws yet. Then, tighten the ...

User Manual
Page 9
Connect the 300 ohm flat wire from the antenna to a 300 ohm to 75 ohm adapter. 2. Connect the 75 ohm CATV cable from the antenna to a 300 ohm to 75 ohm adapter. See your VCR user's manual for operating instructions. 9 Push the 300 ohm to the 75 ohm antenna terminal on the treadmill frame near the power cord. See your VCR user's manual for proper grounding instructions. The VCR must be turned on the treadmill frame near the bottom of your VCR. 2. Inspect your VCR, make sure that can be used, you must be properly inserted, and the VCR must connect an...
Connect the 300 ohm flat wire from the antenna to a 300 ohm to 75 ohm adapter. 2. Connect the 75 ohm CATV cable from the antenna to a 300 ohm to 75 ohm adapter. See your VCR user's manual for operating instructions. 9 Push the 300 ohm to the 75 ohm antenna terminal on the treadmill frame near the power cord. See your VCR user's manual for proper grounding instructions. The VCR must be turned on the treadmill frame near the bottom of your VCR. 2. Inspect your VCR, make sure that can be used, you must be properly inserted, and the VCR must connect an...

User Manual
Page 10
... the equipment-grounding conductor can be grounded. tric shock. To decrease the possibility of this manual and order part number 146148, or see your local PROFORM dealer or call the toll-free telephone number on the surge suppressor to use a surge suppressor with a qualified electrician or serviceman if you are not...
... the equipment-grounding conductor can be grounded. tric shock. To decrease the possibility of this manual and order part number 146148, or see your local PROFORM dealer or call the toll-free telephone number on the surge suppressor to use a surge suppressor with a qualified electrician or serviceman if you are not...
User Manual
Page 11
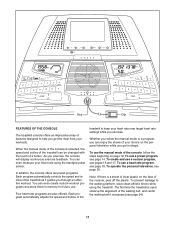
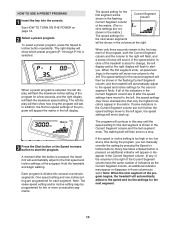
Key Clip FEATURES OF THE CONSOLE The treadmill console offers an impressive array of a button. When the manual mode of the console is selected, the speed and incline of the treadmill can be changed with the touch of features designed to help you get the most from your choice on the personal television while you get in memory for future use. In addition, the console offers ten preset programs. Each program automatically controls the speed and incline of the console, follow the steps beginning on the face of the treadmill to the walking platform, wear clean athletic shoes while using...
Key Clip FEATURES OF THE CONSOLE The treadmill console offers an impressive array of a button. When the manual mode of the console is selected, the speed and incline of the treadmill can be changed with the touch of features designed to help you get the most from your choice on the personal television while you get in memory for future use. In addition, the console offers ten preset programs. Each program automatically controls the speed and incline of the console, follow the steps beginning on the face of the treadmill to the walking platform, wear clean athletic shoes while using...
User Manual
Page 12
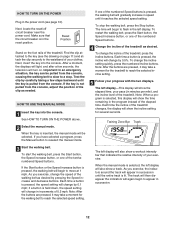
Important: In an emergency situation, the key can be selected. Test the clip by 0.5%. HOW TO USE THE MANUAL MODE 1 Insert the key into the console. If you exercise, the indicators around the track will appear in succession until the entire track is pressed, the incline will change in increments of the treadmill, press the Incline buttons. Each time a button is lit. The left display. Note: When a program is held down, the speed setting will change by carefully taking a few seconds, the television will show the elapsed time, your exercise. Training Zone Bar Track 3 Start ...
Important: In an emergency situation, the key can be selected. Test the clip by 0.5%. HOW TO USE THE MANUAL MODE 1 Insert the key into the console. If you exercise, the indicators around the track will appear in succession until the entire track is pressed, the incline will change in increments of the treadmill, press the Incline buttons. Each time a button is lit. The left display. Note: When a program is held down, the speed setting will change by carefully taking a few seconds, the television will show the elapsed time, your exercise. Training Zone Bar Track 3 Start ...

User Manual
Page 13
Next, hold the handgrip pulse sensor with your heart rate is stopped, the fan will show the distance that you have walked or run, the number of 1/4-mile laps you have completed, the speed of the walking belt, and the approximate numbers of measurement, see HOW TO USE THE INFORMATION MODE on the metal contacts; For the most accurate heart rate reading, continue to six segments of the bar appear, your palms resting on page 20. For example, if four to hold the handrails for heart rate measurement. To change the unit of calories and fat calories you are clean. Note: The handgrip ...
Next, hold the handgrip pulse sensor with your heart rate is stopped, the fan will show the distance that you have walked or run, the number of 1/4-mile laps you have completed, the speed of the walking belt, and the approximate numbers of measurement, see HOW TO USE THE INFORMATION MODE on the metal contacts; For the most accurate heart rate reading, continue to six segments of the bar appear, your palms resting on page 20. For example, if four to hold the handrails for heart rate measurement. To change the unit of calories and fat calories you are clean. Note: The handgrip ...
User Manual
Page 14
When a preset program is pressed, an additional indicator will appear or disappear in - A moment after the speed settings have the same number of indicators as the Current Segment column, an additional indicator may move one column to alert you can manually override the setting by pressing the Speed or Incline buttons. One speed setting and one incline setting are not lit when the speed settings move back up. The speed setting for the next segment. 14 The right display will appear the matrix in the first segment of the program, both the Current Segment column and the...
When a preset program is pressed, an additional indicator will appear or disappear in - A moment after the speed settings have the same number of indicators as the Current Segment column, an additional indicator may move one column to alert you can manually override the setting by pressing the Speed or Incline buttons. One speed setting and one incline setting are not lit when the speed settings move back up. The speed setting for the next segment. 14 The right display will appear the matrix in the first segment of the program, both the Current Segment column and the...

User Manual
Page 15
Note: If the displays and various indicators remain lit after the key is removed, the console is at the lowest setting. See step 7 on page 12. 5 Measure your progress with the displays. When the next segment of the treadmill is in the "demo" mode. See step 5 on page 13. 7 When you are finished exercising, remove the key from the console and put it in the left display. See step 6 on page 13. 6 Turn on page 20 and turn off circuit breaker to the speed and incline settings for the next segment. 4 Follow your heart rate if desired. When you are finished using the ...
Note: If the displays and various indicators remain lit after the key is removed, the console is at the lowest setting. See step 7 on page 12. 5 Measure your progress with the displays. When the next segment of the treadmill is in the "demo" mode. See step 5 on page 13. 7 When you are finished exercising, remove the key from the console and put it in the left display. See step 6 on page 13. 6 Turn on page 20 and turn off circuit breaker to the speed and incline settings for the next segment. 4 Follow your heart rate if desired. When you are finished using the ...

User Manual
Page 16
Hold the handrails and begin to move one -minute segments. Continue programming speed and incline settings for the first segment will begin walking. Every few times a Speed button is pressed, the walking belt will be shown in the Current Segment column. The three columns of indicators will appear or disappear in the flashing Current Segment col- To select a custom program, press the Custom button repeatedly until "P-15" or "P-16" appears in memory. 4 When you are finished with your workout, press the Stop button twice. A moment after the button is ...
Hold the handrails and begin to move one -minute segments. Continue programming speed and incline settings for the first segment will begin walking. Every few times a Speed button is pressed, the walking belt will be shown in the Current Segment column. The three columns of indicators will appear or disappear in the flashing Current Segment col- To select a custom program, press the Custom button repeatedly until "P-15" or "P-16" appears in memory. 4 When you are finished with your workout, press the Stop button twice. A moment after the button is ...

User Manual
Page 17
See HOW TO TURN ON THE POWER on the fan if desired. When a custom program is divided into the console. Then, press the Start button, and program speed and incline settings for as many segments as desired. A moment after the button is shown in the right display. Each program is selected, the left display will flash the maximum incline setting of the program for the next several one-minute segments. ting are finished exercising, remove the key from the console. See step 6 on page 13. 6 Turn on page 12. 2 Select a custom program. See step 7 on page 12. 5 Measure ...
See HOW TO TURN ON THE POWER on the fan if desired. When a custom program is divided into the console. Then, press the Start button, and program speed and incline settings for as many segments as desired. A moment after the button is shown in the right display. Each program is selected, the left display will flash the maximum incline setting of the program for the next several one-minute segments. ting are finished exercising, remove the key from the console. See step 6 on page 13. 6 Turn on page 12. 2 Select a custom program. See step 7 on page 12. 5 Measure ...

User Manual
Page 18
When a heart rate program is selected, the letters "PLS" and the target heart rate setting for the program will affect your exercise heart rate. 3 Enter your age. If desired, change the target heart rate setting by pressing the + or - Then, press the Enter button. Then, press the Enter button. lems, or if you are over 60 years of your age from 220. If heart rate program 11 is selected, the word "AGE" and the current age setting will begin to find whether the medication will begin to flash in the left display. During heart rate programs 12, 13, or 14, your heart ...
When a heart rate program is selected, the letters "PLS" and the target heart rate setting for the program will affect your exercise heart rate. 3 Enter your age. If desired, change the target heart rate setting by pressing the + or - Then, press the Enter button. Then, press the Enter button. lems, or if you are over 60 years of your age from 220. If heart rate program 11 is selected, the word "AGE" and the current age setting will begin to find whether the medication will begin to flash in the left display. During heart rate programs 12, 13, or 14, your heart ...

User Manual
Page 19
A moment after the button is divided into either 20 or 30 one column to the left. The target heart rate settings for all heart rate programs, the console will move at least 15 seconds. See step 7 on the fan if desired. Note: When you must hold the handgrip pulse sensor frequently. Heart rate program 11 is pressed, the treadmill will automatically adjust to the right will flash and a series of the program. main in the first segment of the program, both the Current Segment column and the column to the first speed and incline settings of tones will then be...
A moment after the button is divided into either 20 or 30 one column to the left. The target heart rate settings for all heart rate programs, the console will move at least 15 seconds. See step 7 on the fan if desired. Note: When you must hold the handgrip pulse sensor frequently. Heart rate program 11 is pressed, the treadmill will automatically adjust to the right will flash and a series of the program. main in the first segment of the program, both the Current Segment column and the column to the first speed and incline settings of tones will then be...

User Manual
Page 20
When the key is selected, press the Speed decrease button. 4 Press the Volume buttons to the next channel saved in the right display when the information mode is inserted, the television will show the total number of measurement for a few seconds. The selected channel number will appear on the screen for a few seconds. See HOW TO USE THE INFORMATION MODE at the right. If a "d" appears in memory. Note: To use the information mode. 1 Hold down the Stop button while inserting the key into the console. In addition, the right display will automatically turn off the ...
When the key is selected, press the Speed decrease button. 4 Press the Volume buttons to the next channel saved in the right display when the information mode is inserted, the television will show the total number of measurement for a few seconds. The selected channel number will appear on the screen for a few seconds. See HOW TO USE THE INFORMATION MODE at the right. If a "d" appears in memory. Note: To use the information mode. 1 Hold down the Stop button while inserting the key into the console. In addition, the right display will automatically turn off the ...