
User Manual
Page 2
...direction, which can affect the stability of a load, while on the slopes slow and gradual. Shut off blades, set parking brake, stop engine, and remove keys before and while backing. • Never direct discharged material toward the operator. Operation on all movement on a slope,... mow in . 2 If the tires lose traction, disengage the blades and proceed slowly straight down slopes. they can result in the manual before operating or storing the machine. The machine could overturn the machine. I. FAILURE TO OBSERVE THE FOLLOWING SAFETY INSTRUCTIONS COULD RESULT IN ...
...direction, which can affect the stability of a load, while on the slopes slow and gradual. Shut off blades, set parking brake, stop engine, and remove keys before and while backing. • Never direct discharged material toward the operator. Operation on all movement on a slope,... mow in . 2 If the tires lose traction, disengage the blades and proceed slowly straight down slopes. they can result in the manual before operating or storing the machine. The machine could overturn the machine. I. FAILURE TO OBSERVE THE FOLLOWING SAFETY INSTRUCTIONS COULD RESULT IN ...
User Manual
Page 4
It has been designed, engineered and manufactured to give you to service or repair this manual. In the state of the California Public Resources Code). Federal laws apply on federal lands. W/O Filter: 48 oz. CCA: 230 Case Size:... • Follow the instructions under "Maintenance" and "Stor- Should you experience any problem you cannot easily remedy, please contact your purchase of this manual. A spark arrester for and using your tractor properly. CONGRATULATIONS on your nearest authorized service center/ department. Please read and retain this tractor. The ...
It has been designed, engineered and manufactured to give you to service or repair this manual. In the state of the California Public Resources Code). Federal laws apply on federal lands. W/O Filter: 48 oz. CCA: 230 Case Size:... • Follow the instructions under "Maintenance" and "Stor- Should you experience any problem you cannot easily remedy, please contact your purchase of this manual. A spark arrester for and using your tractor properly. CONGRATULATIONS on your nearest authorized service center/ department. Please read and retain this tractor. The ...

User Manual
Page 7
... are shown for leveling). ✓ Check mower and drive belts. CHECK BRAKE SYSTEM After you start the engine. ✓ Be sure brake system is clear of this manual. TO ROLL TRACTOR OFF SKID (See Operation section for location and function of controls) • Raise attachment...before tightening adjustment knob. • Remove adjustment knob and flat washer securing seat to cardboard packing and set aside for assembly of this manual). 7 ASSEMBLY INSTALL SEAT (See Fig. 3) Adjust seat before you learn how to operate your tractor, check to its adjusted position....
... are shown for leveling). ✓ Check mower and drive belts. CHECK BRAKE SYSTEM After you start the engine. ✓ Be sure brake system is clear of this manual. TO ROLL TRACTOR OFF SKID (See Operation section for location and function of controls) • Raise attachment...before tightening adjustment knob. • Remove adjustment knob and flat washer securing seat to cardboard packing and set aside for assembly of this manual). 7 ASSEMBLY INSTALL SEAT (See Fig. 3) Adjust seat before you learn how to operate your tractor, check to its adjusted position....

User Manual
Page 9
... or other attachments mounted to your tractor. (F) IGNITION SWITCH - Used for braking the tractor and starting and controlling engine speed. (E) ATTACHMENT CLUTCH LEVER - Used for future reference. OPERATION KNOW YOUR TRACTOR READ THIS MANUAL AND SAFETY RULES BEFORE OPERATING YOUR TRACTOR Compare the illustrations with your tractor to familiarize yourself with the...
... or other attachments mounted to your tractor. (F) IGNITION SWITCH - Used for braking the tractor and starting and controlling engine speed. (E) ATTACHMENT CLUTCH LEVER - Used for future reference. OPERATION KNOW YOUR TRACTOR READ THIS MANUAL AND SAFETY RULES BEFORE OPERATING YOUR TRACTOR Compare the illustrations with your tractor to familiarize yourself with the...

User Manual
Page 12
... and formation of 30 days or longer. Acidic gas can attract moisture which leads to bottom of an engine while in this manual. Drain the gas tank, start the engine and let it to warm up period from the tank to run starter continuously for additional information. If ...operation you should be used during storage. Do not overfill. Do not store, spill or use engine or carburetor cleaner products in the Maintenance section of this manual). • To change oil for best engine performance. Do not run with gasoline. WARM WEATHER STARTING (50°F/10°C and above...
... and formation of 30 days or longer. Acidic gas can attract moisture which leads to bottom of an engine while in this manual. Drain the gas tank, start the engine and let it to warm up period from the tank to run starter continuously for additional information. If ...operation you should be used during storage. Do not overfill. Do not store, spill or use engine or carburetor cleaner products in the Maintenance section of this manual). • To change oil for best engine performance. Do not run with gasoline. WARM WEATHER STARTING (50°F/10°C and above...
User Manual
Page 13
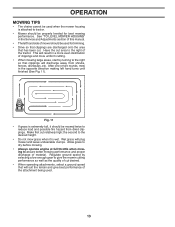
... assure better mowing performance and proper discharge of mower should be used for best mowing performance. Allow grass to dry before mowing. • Always operate engine at full throttle when mowing to reduce load and possible fire hazard from shrubs, fences, driveways, etc. After one or two rounds, mow in the... the opposite direction making left hand side of material. Fig. 11 • If grass is extremely tall, it is attached to the right of this manual. • The left hand turns until finished (See Fig. 11).
... assure better mowing performance and proper discharge of mower should be used for best mowing performance. Allow grass to dry before mowing. • Always operate engine at full throttle when mowing to reduce load and possible fire hazard from shrubs, fences, driveways, etc. After one or two rounds, mow in the... the opposite direction making left hand side of material. Fig. 11 • If grass is extremely tall, it is attached to the right of this manual. • The left hand turns until finished (See Fig. 11).
User Manual
Page 14
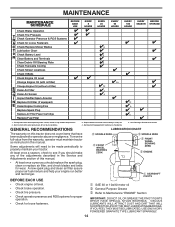
...Spark Arrester N Replace Oil Filter (If equipped) E Clean Engine Cooling Fins Replace Spark Plug Replace Air Filter Paper Cartridge Replace Fuel Filter 1,2 1,2 2 2 1, 2 2 2 1 - GENERAL RECOMMENDATIONS LUBRICATION CHART The warranty on this manual. ➁ SPINDLE ZERK ➁ FRONT WHEEL BEARING ZERK... ➁ SPINDLE ZERK ➁ FRONT WHEEL BEARING ZERK ➂ ENGINE • At least once a year you should replace the spark plug, clean...
...Spark Arrester N Replace Oil Filter (If equipped) E Clean Engine Cooling Fins Replace Spark Plug Replace Air Filter Paper Cartridge Replace Fuel Filter 1,2 1,2 2 2 1, 2 2 2 1 - GENERAL RECOMMENDATIONS LUBRICATION CHART The warranty on this manual. ➁ SPINDLE ZERK ➁ FRONT WHEEL BEARING ZERK... ➁ SPINDLE ZERK ➁ FRONT WHEEL BEARING ZERK ➂ ENGINE • At least once a year you should replace the spark plug, clean...
User Manual
Page 15
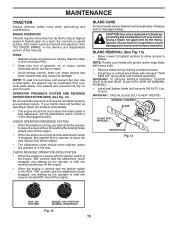
... to leave the seat without first setting the parking brake should shut off the engine. • When the engine is in all tires (See the sides of tires for proper PSI). • Keep tires free of this manual). Tire sealant also prevents tire dry rot and corrosion. BLADE REMOVAL (See Fig.... 13) • Raise mower to highest position to allow access to leave the seat should shut off the engine. torque). Replace bent or damaged blades. NOTE: Protect...
... to leave the seat without first setting the parking brake should shut off the engine. • When the engine is in all tires (See the sides of tires for proper PSI). • Keep tires free of this manual). Tire sealant also prevents tire dry rot and corrosion. BLADE REMOVAL (See Fig.... 13) • Raise mower to highest position to allow access to leave the seat should shut off the engine. torque). Replace bent or damaged blades. NOTE: Protect...
User Manual
Page 16
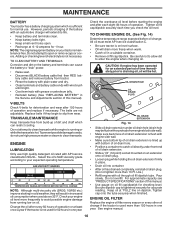
... used above 32°F. OIL DRAIN EXTENSION Fig. 14 • Slide oil drain extension under front end of this manual). ENGINE OIL FILTER Replace the engine oil filter every season or every other oil change . tery cable and remove battery from wear. OIL DRAIN HOLE OIL ... NOTE: The original equipment battery on oil. Do not attempt to enter the engine when changing oil. Check the crankcase oil level before oil change if the tractor is running low on your expected operating temperature. See engine manual. 16 Do not overfill. The belts are not adjustable.
... used above 32°F. OIL DRAIN EXTENSION Fig. 14 • Slide oil drain extension under front end of this manual). ENGINE OIL FILTER Replace the engine oil filter every season or every other oil change . tery cable and remove battery from wear. OIL DRAIN HOLE OIL ... NOTE: The original equipment battery on oil. Do not attempt to enter the engine when changing oil. Check the crankcase oil level before oil change if the tractor is running low on your expected operating temperature. See engine manual. 16 Do not overfill. The belts are not adjustable.
User Manual
Page 17
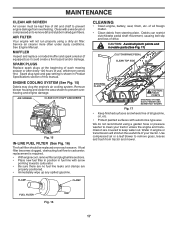
...gasoline, oil, etc. • Protect painted surfaces with a wire brush or compressed air to remove grass, leaves and trash from overheating. See Engine Manual. Remove blower housing and clean the area shown to keep water out. AIR SCREEN CLEAN OUT CHAFF AND DEBRIS 02744 Fig. 15 IN-LINE ...under dusty conditions. SPARK PLUGS Replace spark plugs at the beginning of each season. Spark plug type and gap setting is required. • With engine cool, remove filter and plug fuel line sections. • Place new fuel filter in position in fuel line with arrow pointing towards carburetor. ...
...gasoline, oil, etc. • Protect painted surfaces with a wire brush or compressed air to remove grass, leaves and trash from overheating. See Engine Manual. Remove blower housing and clean the area shown to keep water out. AIR SCREEN CLEAN OUT CHAFF AND DEBRIS 02744 Fig. 15 IN-LINE ...under dusty conditions. SPARK PLUGS Replace spark plugs at the beginning of each season. Spark plug type and gap setting is required. • With engine cool, remove filter and plug fuel line sections. • Place new fuel filter in position in fuel line with arrow pointing towards carburetor. ...
User Manual
Page 19
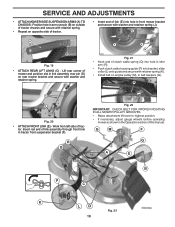
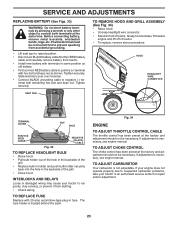
...rear corner of mower and position slot in belt keepers (G). M C D Fig. 20 • ATTACH FRONT LINK (E) - Insert rod end of this manual. Work from left side of link (E) into bracket, slide collar (L) onto guide and secure with retainer spring (K). • Install belt on rear mower bracket... and secure with washer and retainer spring (J). Position hole in arm over pin (D) on engine pulley (M), in link assembly over pin (B) on outside of tractor chassis and secure with retainer spring. • Repeat on opposite side of ...
...rear corner of mower and position slot in belt keepers (G). M C D Fig. 20 • ATTACH FRONT LINK (E) - Insert rod end of this manual. Work from left side of link (E) into bracket, slide collar (L) onto guide and secure with retainer spring (K). • Install belt on rear mower bracket... and secure with washer and retainer spring (J). Position hole in arm over pin (D) on engine pulley (M), in link assembly over pin (B) on outside of tractor chassis and secure with retainer spring. • Repeat on opposite side of ...
User Manual
Page 21
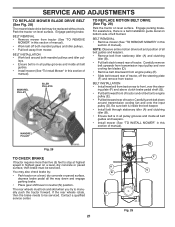
...8226; Install mower (See "To Install Mower" in highest gear on bottom side of manual). • Work belt off the steering plate (F) and remove from engine pulley (E). • Slide belt toward rear of manual). ing plate (F) and above clutch brake pedal shaft (G). • Pull belt toward ...front of tractor and roll belt onto engine pulley (E). • Pull belt toward rear of manual). You may be serviced. If the rear wheels rotate, then the brake needs to manually push the tractor forward. A B D E F G 02954 Manual Fig. 29 21 leys. • Ensure belt is...
...8226; Install mower (See "To Install Mower" in highest gear on bottom side of manual). • Work belt off the steering plate (F) and remove from engine pulley (E). • Slide belt toward rear of manual). ing plate (F) and above clutch brake pedal shaft (G). • Pull belt toward ...front of tractor and roll belt onto engine pulley (E). • Pull belt toward rear of manual). You may be serviced. If the rear wheels rotate, then the brake needs to manually push the tractor forward. A B D E F G 02954 Manual Fig. 29 21 leys. • Ensure belt is...
User Manual
Page 22
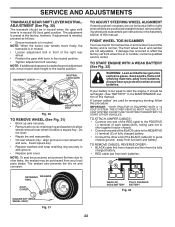
...TRANSAXLE GEAR SHIFT LEVER NEUTRALADJUSTMENT (See Fig. 30) The transaxle should be recharged. (See "BATTERY" in the MAINTENANCE section of this manual). NOTE: To seal tire punctures and prevent flat tires due to the lowest position. Keep sparks, flame and smoking materials away from both... adjustment bolt securely. however, if adjustment is needed to get to adjustment bolt, move freely, the transaxle is in neutral. TO START ENGINE WITH A WEAK BATTERY (See Fig. 32) WARNING: Lead-acid batteries generate explosive gases. TO ADJUST STEERING WHEEL ALIGNMENT If steering wheel crossbars...
...TRANSAXLE GEAR SHIFT LEVER NEUTRALADJUSTMENT (See Fig. 30) The transaxle should be recharged. (See "BATTERY" in the MAINTENANCE section of this manual). NOTE: To seal tire punctures and prevent flat tires due to the lowest position. Keep sparks, flame and smoking materials away from both... adjustment bolt securely. however, if adjustment is needed to get to adjustment bolt, move freely, the transaxle is in neutral. TO START ENGINE WITH A WEAK BATTERY (See Fig. 32) WARNING: Lead-acid batteries generate explosive gases. TO ADJUST STEERING WHEEL ALIGNMENT If steering wheel crossbars...
User Manual
Page 23
... hood. TO ADJUST CARBURETOR Your carburetor is located behind the dash. The fuse holder is not adjustable. If adjustment is necessary, see engine manual. If adjustment is necessary, see engne manual. SERVICE AND ADJUSTMENTS REPLACING BATTERY (See Figs. 33) WARNING: Do not short battery terminals by allowing a wrench or any other object to...
... hood. TO ADJUST CARBURETOR Your carburetor is located behind the dash. The fuse holder is not adjustable. If adjustment is necessary, see engine manual. If adjustment is necessary, see engne manual. SERVICE AND ADJUSTMENTS REPLACING BATTERY (See Figs. 33) WARNING: Do not short battery terminals by allowing a wrench or any other object to...

User Manual
Page 24
... Maintenance section of this manual. • Be sure that does not retain moisture. CYLINDER(S) • Remove spark plug(s). • Pour one season to another. • Replace your gasoline can if your can starts to rust. IMPORTANT: NEVER COVER TRACTOR WHILE ENGINE AND EXHAUST AREAS ARE STILL... WARM. 24 Store in a clean, dry area. • Clean entire tractor (See "CLEANING" in the Maintenance section of this manual). • Inspect and replace belts, if necessary (See belt ...
... Maintenance section of this manual. • Be sure that does not retain moisture. CYLINDER(S) • Remove spark plug(s). • Pour one season to another. • Replace your gasoline can if your can starts to rust. IMPORTANT: NEVER COVER TRACTOR WHILE ENGINE AND EXHAUST AREAS ARE STILL... WARM. 24 Store in a clean, dry area. • Clean entire tractor (See "CLEANING" in the Maintenance section of this manual). • Inspect and replace belts, if necessary (See belt ...
User Manual
Page 26
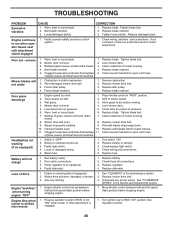
...clean all connections. 3. Replace regulator. 4. Turn ignition key to run when operator leaves seat with blades listed in parts manual. 11. Tighten loose part(s). Buildupofgrass,leaves,ortrashundermower. 4. Frozen blade mandrel. 1. Clean around mandrels. 1. Replace mower ...cut - Blades improperly installed. 9. Check wiring, switches and connections. Level mower deck. 3. Clean underside of drive Engine "backfires" when turning engine "OFF" Engine dies when tractor is shifted into reverse 1. Tighten blade bolt. 7. Check wiring and connections. 5. See "CLEANING...
...clean all connections. 3. Replace regulator. 4. Turn ignition key to run when operator leaves seat with blades listed in parts manual. 11. Tighten loose part(s). Buildupofgrass,leaves,ortrashundermower. 4. Frozen blade mandrel. 1. Clean around mandrels. 1. Replace mower ...cut - Blades improperly installed. 9. Check wiring, switches and connections. Level mower deck. 3. Clean underside of drive Engine "backfires" when turning engine "OFF" Engine dies when tractor is shifted into reverse 1. Tighten blade bolt. 7. Check wiring and connections. 5. See "CLEANING...

Parts Manual
Page 2
HOW TO USE THIS MANUAL This manual is not recommended to use this manual as a guide to assemble or disassemble the tractor. Some hardware and parts are drawn larger in order to identify the parts on the fender under ... NUMBER - The model number for your tractor can be found on his/her tractor when ordering repair parts. "PXT195G42 (96046002200)" • Part Number • Part Description TABLE OF CONTENTS SCHEMATIC ...3 ELECTRICAL ...4-5 CHASSIS ...6-7 DRIVE...8-9 ENGINE ...10-11 STEERING ...12-13 MOWER DECK ...14-15 MOWER LIFT...16 SEAT ...17 DECALS...18 WARRANTY BACK...
HOW TO USE THIS MANUAL This manual is not recommended to use this manual as a guide to assemble or disassemble the tractor. Some hardware and parts are drawn larger in order to identify the parts on the fender under ... NUMBER - The model number for your tractor can be found on his/her tractor when ordering repair parts. "PXT195G42 (96046002200)" • Part Number • Part Description TABLE OF CONTENTS SCHEMATIC ...3 ELECTRICAL ...4-5 CHASSIS ...6-7 DRIVE...8-9 ENGINE ...10-11 STEERING ...12-13 MOWER DECK ...14-15 MOWER LIFT...16 SEAT ...17 DECALS...18 WARRANTY BACK...

Parts Manual
Page 15
PXT195G42 (96046002200), PRODUCT NO. 960 46 00-22 MOWER DECK KEY PART NO. NO. Keeper Belt Engine LH Keeper Belt Engine RH Keeper Belt Pulley, Idler, Flat Spring Return Manual Clutch Cable Stud Fastener Nut Lock Hex Flange Bracket Brake Stand LH Screw 3/8-16 x 3/4 Mandrel Assembly (Includes housing, shaft ...Guard, Tuv Idler Arm Brake Mower Bolt Rd Hd Sq Nk 3/8-16 unc x 2 Arm Brake Mower Link Brake Handle Clutch Cable V-Belt Bolt Clutch Asm Manual Screw 5/16-18 Washer 13/32 x 7/8 x 14 Ga. TRACTOR - - pulley/nut/washer and blade bolt/washers not included) Replacement Mower, Complete...
PXT195G42 (96046002200), PRODUCT NO. 960 46 00-22 MOWER DECK KEY PART NO. NO. Keeper Belt Engine LH Keeper Belt Engine RH Keeper Belt Pulley, Idler, Flat Spring Return Manual Clutch Cable Stud Fastener Nut Lock Hex Flange Bracket Brake Stand LH Screw 3/8-16 x 3/4 Mandrel Assembly (Includes housing, shaft ...Guard, Tuv Idler Arm Brake Mower Bolt Rd Hd Sq Nk 3/8-16 unc x 2 Arm Brake Mower Link Brake Handle Clutch Cable V-Belt Bolt Clutch Asm Manual Screw 5/16-18 Washer 13/32 x 7/8 x 14 Ga. TRACTOR - - pulley/nut/washer and blade bolt/washers not included) Replacement Mower, Complete...

Parts Manual
Page 18
...-37 8 532 17 05-63 9 532 14 50-05 12 DESCRIPTION Decal, Operators Decal, Wheel Steering Decal, Hood Side Panel Decal, Engine Decal, Replacement Decal, Cutfinger Decal, Battery Dnge/Poi KEY PART NO. NO. 12 532 16 03-96 16 532 43 91-12 17...V-Belt Schematic Decal, Hood Decal, Fender Service Pad, Footrest, LH Pad, Footrest, RH Manual (Span) Manual (Eng) WHEELS AND TIRES 1 2 11 3 4 7 10 6 wheel_art_1-tex 5 9 8 KEY PART NO. inches 1 inch = 25.4 mm 18 Tube) NOTE: All component dimensions given in U.S. PXT195G42 (96046002200), PRODUCT NO. 960 46 00-22 DECALS 6 16 16 2 15 4 ...
...-37 8 532 17 05-63 9 532 14 50-05 12 DESCRIPTION Decal, Operators Decal, Wheel Steering Decal, Hood Side Panel Decal, Engine Decal, Replacement Decal, Cutfinger Decal, Battery Dnge/Poi KEY PART NO. NO. 12 532 16 03-96 16 532 43 91-12 17...V-Belt Schematic Decal, Hood Decal, Fender Service Pad, Footrest, LH Pad, Footrest, RH Manual (Span) Manual (Eng) WHEELS AND TIRES 1 2 11 3 4 7 10 6 wheel_art_1-tex 5 9 8 KEY PART NO. inches 1 inch = 25.4 mm 18 Tube) NOTE: All component dimensions given in U.S. PXT195G42 (96046002200), PRODUCT NO. 960 46 00-22 DECALS 6 16 16 2 15 4 ...


