
User Manual
Page 2
...rocks, toys, wire, etc., which can lose traction with the instructions, to occur. WARNING: In order to lose control of riding mower-related injuries. WARNING: Do not coast down before operating or storing the machine. Too heavy of the tractor. Tires can touch hot ... material toward the operator. GENERAL OPERATION • • • Read, understand, and follow all times. • • Only allow the mower deck to the State of grass , leaves or other reproductive harm. Always look down slopes, not across. Uneven terrain could cause the machine to stop...
...rocks, toys, wire, etc., which can lose traction with the instructions, to occur. WARNING: In order to lose control of riding mower-related injuries. WARNING: Do not coast down before operating or storing the machine. Too heavy of the tractor. Tires can touch hot ... material toward the operator. GENERAL OPERATION • • • Read, understand, and follow all times. • • Only allow the mower deck to the State of grass , leaves or other reproductive harm. Always look down slopes, not across. Uneven terrain could cause the machine to stop...

User Manual
Page 3
... on a slope. GENERAL SERVICE • Never operate machine in or on a truck or trailer bed with manufacturer's recommended parts, when necessary. • Mower blades are often attracted to stop and inspect the machine. They may suddenly appear in contact with the blades shut off if a child enters the...look behind and down slopes (15° Max), not across. • Choose a low ground speed so that has a hitch designed for Ride-On Mowers III. Wrap the blade or wear gloves, and use a nozzle lock-open device. • If fuel is an open flame, spark, or pilot ...
... on a slope. GENERAL SERVICE • Never operate machine in or on a truck or trailer bed with manufacturer's recommended parts, when necessary. • Mower blades are often attracted to stop and inspect the machine. They may suddenly appear in contact with the blades shut off if a child enters the...look behind and down slopes (15° Max), not across. • Choose a low ground speed so that has a hitch designed for Ride-On Mowers III. Wrap the blade or wear gloves, and use a nozzle lock-open device. • If fuel is an open flame, spark, or pilot ...
User Manual
Page 7
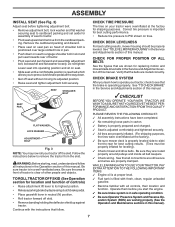
...System and Reverse Operation System (ROS) are properly inflated. (For shipping purposes, the tires were overinflated at the factory). ✓ Be sure mower deck is operating properly. CHECK FOR PROPER POSITION OF ALL BELTS See the figures that all belt keepers. ✓ Check wiring. See that... are properly clamped. Verify that the brake is properly leveled side-to-side/ front-to-rear for replacing motion and mower blade drive belts in the Service and Adjustments section of this manual). 7 SEAT SHOULDER BOLT SEAT PAN 02466 FLAT WASHER LOCK WASHER ADJUSTMENT ...
...System and Reverse Operation System (ROS) are properly inflated. (For shipping purposes, the tires were overinflated at the factory). ✓ Be sure mower deck is operating properly. CHECK FOR PROPER POSITION OF ALL BELTS See the figures that all belt keepers. ✓ Check wiring. See that... are properly clamped. Verify that the brake is properly leveled side-to-side/ front-to-rear for replacing motion and mower blade drive belts in the Service and Adjustments section of this manual). 7 SEAT SHOULDER BOLT SEAT PAN 02466 FLAT WASHER LOCK WASHER ADJUSTMENT ...

User Manual
Page 8
... P ENGINE OFF REVERSE OPERATION SYSTEM (ROS) ENGINE ON ENGINE START PARKING BRAKE PARKING BRAKE PARKING BRAKE LOCKED UNLOCKED LIGHTS ON FUEL BATTERY REVERSE FORWARD MOWER HEIGHT MOWER LIFT 15 15 ATTACHMENT ATTACHMENT CLUTCH DISENGAGED CLUTCH ENGAGED BRAKE/CLUTCH PEDAL KEEP AREA CLEAR SLOPE HAZARDS (SEE SAFETY RULES SECTION) FREE WHEEL (Automatic Models...
... P ENGINE OFF REVERSE OPERATION SYSTEM (ROS) ENGINE ON ENGINE START PARKING BRAKE PARKING BRAKE PARKING BRAKE LOCKED UNLOCKED LIGHTS ON FUEL BATTERY REVERSE FORWARD MOWER HEIGHT MOWER LIFT 15 15 ATTACHMENT ATTACHMENT CLUTCH DISENGAGED CLUTCH ENGAGED BRAKE/CLUTCH PEDAL KEEP AREA CLEAR SLOPE HAZARDS (SEE SAFETY RULES SECTION) FREE WHEEL (Automatic Models...

User Manual
Page 9
..., or other attachments mounted to your tractor. Used to raise, lower, and adjust the mower deck or other powered attachment while in reverse. Locks clutch/brake pedal into the brake position. OPERATION KNOW YOUR TRACTOR READ THIS OWNER'S MANUAL... BEFORE OPERATING YOUR TRACTOR Compare the illustrations with the locations of the tractor. Used for starting the engine. LIFT LEVER PLUNGER - Allows operation of mower deck or other attachments mounted to your tractor. Used for declutching and braking the tractor and starting and controlling engine speed. 9 Save this manual ...
..., or other attachments mounted to your tractor. Used to raise, lower, and adjust the mower deck or other powered attachment while in reverse. Locks clutch/brake pedal into the brake position. OPERATION KNOW YOUR TRACTOR READ THIS OWNER'S MANUAL... BEFORE OPERATING YOUR TRACTOR Compare the illustrations with the locations of the tractor. Used for starting the engine. LIFT LEVER PLUNGER - Allows operation of mower deck or other attachments mounted to your tractor. Used for declutching and braking the tractor and starting and controlling engine speed. 9 Save this manual ...

User Manual
Page 10
...). • Operating engine at less than full speed(Fast) reduces the engine's operating efficiency rate. • Full speed(Fast) offers the mower performance. The position of the attachment lift lever determines the cutting height. • Grasp lift lever. • Press plunger with the engine ...of grass being mowed. • The average lawn should remain in severe eye damage. TO ADJUST MOWER CUTTING HEIGHT (See Fig. 6) STOPPING (See Fig. 5) MOWER BLADES • To stop mower blades,move throttle control between half and full speed (fast) position. The heights are approximate and ...
...). • Operating engine at less than full speed(Fast) reduces the engine's operating efficiency rate. • Full speed(Fast) offers the mower performance. The position of the attachment lift lever determines the cutting height. • Grasp lift lever. • Press plunger with the engine ...of grass being mowed. • The average lawn should remain in severe eye damage. TO ADJUST MOWER CUTTING HEIGHT (See Fig. 6) STOPPING (See Fig. 5) MOWER BLADES • To stop mower blades,move throttle control between half and full speed (fast) position. The heights are approximate and ...

User Manual
Page 11
...To protect hood from the factory, already filled with summer weight oil. • Check engine oil with tractor on dipstick is reached. TO STOP MOWER BLADES (See Fig. 6) • disengage attachment clutch control. Be sure you have allowed room for a few seconds, remove and read oil level...brake position and engage parking brake. • Move gearshift lever to start movement. • When use of your tractor. OPERATION TO OPERATE MOWER (See Fig. 6) Your tractor is equipped with a Reverse Operation System (ROS). Any attempt by and comply with the attachment clutch engaged ...
...To protect hood from the factory, already filled with summer weight oil. • Check engine oil with tractor on dipstick is reached. TO STOP MOWER BLADES (See Fig. 6) • disengage attachment clutch control. Be sure you have allowed room for a few seconds, remove and read oil level...brake position and engage parking brake. • Move gearshift lever to start movement. • When use of your tractor. OPERATION TO OPERATE MOWER (See Fig. 6) Your tractor is equipped with a Reverse Operation System (ROS). Any attempt by and comply with the attachment clutch engaged ...

User Manual
Page 12
...to the right so that has been cut desired. • When operating attachments, select a ground speed that can be used . See "TO LEVEL MOWER HOUSING" in a more even distribution of filler neck. This will discharge away from shrubs, fences, driveways, etc. Regulate ground speed by turning to ...can also be used . 12 Acidic gas can now be properly leveled for additional information. Wet grass will suit the terrain and give the mower cutting performance as well as the quality of this manual. • The left hand turns until the engine runs roughly, then move throttle...
...to the right so that has been cut desired. • When operating attachments, select a ground speed that can be used . See "TO LEVEL MOWER HOUSING" in a more even distribution of filler neck. This will discharge away from shrubs, fences, driveways, etc. Regulate ground speed by turning to ...can also be used . 12 Acidic gas can now be properly leveled for additional information. Wet grass will suit the terrain and give the mower cutting performance as well as the quality of this manual. • The left hand turns until the engine runs roughly, then move throttle...
User Manual
Page 13
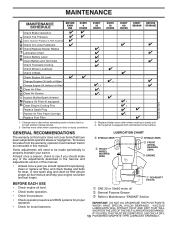
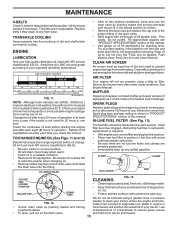
..." Section • Check operator presence and ROS systems for proper operation. • Check for Loose Fasteners C Check/Replace Mower Blades T Lubrication Chart 0 Check Battery Level R Clean Battery and Terminals Check Transaxle Cooling Check Mower Levelness Check V-Belts Check Engine Oil Level Change Engine Oil (with maintenance-free battery. BEFORE EACH USE ➀...
..." Section • Check operator presence and ROS systems for proper operation. • Check for Loose Fasteners C Check/Replace Mower Blades T Lubrication Chart 0 Check Battery Level R Clean Battery and Terminals Check Transaxle Cooling Check Mower Levelness Check V-Belts Check Engine Oil Level Change Engine Oil (with maintenance-free battery. BEFORE EACH USE ➀...
User Manual
Page 14
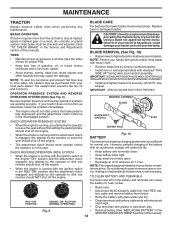
... chemicals which is in the ROS "ON" position and the attachment clutch engaged, any maintenance. BLADE REMOVAL (See Fig. 10) • Raise mower to highest position to allow access to "leak" power. Lbs. MANDREL ASSEMBLY Be sure operator presence and reverse operation systems are working properly. CENTER ... observe safety rules when performing any attempt by the operator to slow leaks, tire sealant may cause tire damage. BLADE CARE For best results mower blades must be checked and adjusted. (See "TO CHECK BRAKE" in highest gear on a level, dry concrete or paved surface, then ...
... chemicals which is in the ROS "ON" position and the attachment clutch engaged, any maintenance. BLADE REMOVAL (See Fig. 10) • Raise mower to highest position to allow access to "leak" power. Lbs. MANDREL ASSEMBLY Be sure operator presence and reverse operation systems are working properly. CENTER ... observe safety rules when performing any attempt by the operator to slow leaks, tire sealant may cause tire damage. BLADE CARE For best results mower blades must be checked and adjusted. (See "TO CHECK BRAKE" in highest gear on a level, dry concrete or paved surface, then ...
User Manual
Page 15
Select the oil's SAE viscosity grade according to slip from tractor and mower. 15 Change the oil after every 25 hours of this manual. • Use gauge on oil. Check the crankcase oil level before starting in cold ...
Select the oil's SAE viscosity grade according to slip from tractor and mower. 15 Change the oil after every 25 hours of this manual. • Use gauge on oil. Check the crankcase oil level before starting in cold ...
User Manual
Page 16
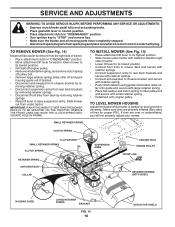
... spark plug wire from chassis bracket by removing retainer springs. • Raise lift lever to its lowest position. • Connect front links to mower deck and secure with retainer springs. • Connect suspension arms to rear deck brackets and secure with large retainer spring. • Place flat ...washer and clutch spring on level ground or driveway. TO LEVEL MOWER HOUSING Adjust the mower while tractor is parked on idler pulley bolt and secure with plug. Make sure tires are over or underinflated, you will ...
... spark plug wire from chassis bracket by removing retainer springs. • Raise lift lever to its lowest position. • Connect front links to mower deck and secure with retainer springs. • Connect suspension arms to rear deck brackets and secure with large retainer spring. • Place flat ...washer and clutch spring on level ground or driveway. TO LEVEL MOWER HOUSING Adjust the mower while tractor is parked on idler pulley bolt and secure with plug. Make sure tires are over or underinflated, you will ...
User Manual
Page 17
... brake by: MANDREL 1. "D" "D" FIG. 17 The rear wheels must be serviced. Park the tractor on both front links an equal number of mower, loosen nut "F" from trunnion on both front links. • Recheck side-to-side adjustment. Tighten nut "E" on level surface. MANDREL PULLEY 02314...length as shown. • Before making any necessary adjustments, check that the front is approximately 1/8" to 1/2" lower than the rear when the mower is 1/8" to 1/2" lower at highest speed in front and behind the mandrel at front than rear, tighten nuts "F" against trunnion on both ...
... brake by: MANDREL 1. "D" "D" FIG. 17 The rear wheels must be serviced. Park the tractor on both front links an equal number of mower, loosen nut "F" from trunnion on both front links. • Recheck side-to-side adjustment. Tighten nut "E" on level surface. MANDREL PULLEY 02314...length as shown. • Before making any necessary adjustments, check that the front is approximately 1/8" to 1/2" lower than the rear when the mower is 1/8" to 1/2" lower at highest speed in front and behind the mandrel at front than rear, tighten nuts "F" against trunnion on both ...
User Manual
Page 18
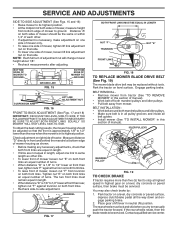
... reassemble. • On rear wheels only: align grooves in axle groove. • Replace axle cover. NOTE: When the tractor rear wheels move mower deck height to allow wheel removal (rear wheel contains a square key - NOTE: If additional clearance is needed , proceed as follows: • ...22 TO START ENGINE WITH A WEAK BATTERY (See Fig. 23) WARNING: Lead-acid batteries generate explosive gases. BELT REMOVAL • Remove mower (See "TO REMOVE MOWER" in neutral (lock gate) position. AXLE COVER RETAINING WASHERS RING FIG. 20 TRANSAXLE GEAR SHIFT LEVER NEUTRAL ADJUSTMENT (See Fig. 21)...
... reassemble. • On rear wheels only: align grooves in axle groove. • Replace axle cover. NOTE: When the tractor rear wheels move mower deck height to allow wheel removal (rear wheel contains a square key - NOTE: If additional clearance is needed , proceed as follows: • ...22 TO START ENGINE WITH A WEAK BATTERY (See Fig. 23) WARNING: Lead-acid batteries generate explosive gases. BELT REMOVAL • Remove mower (See "TO REMOVE MOWER" in neutral (lock gate) position. AXLE COVER RETAINING WASHERS RING FIG. 20 TRANSAXLE GEAR SHIFT LEVER NEUTRAL ADJUSTMENT (See Fig. 21)...
User Manual
Page 20
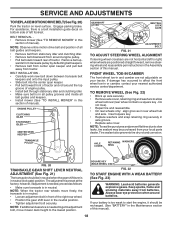
TRACTOR Remove mower from tractor for storage, do not store battery directly on stabilizer container. BATTERY • Fully charge the battery for storage. • After a period of this ... of time in the tank inside a building where fumes may occur. • Use fresh fuel next season. Allow the engine to cool before painting. When mower is removed from tractor for damage, breakage and wear. Store in a clean, dry area. • Clean entire tractor (See "CLEANING" in fuel tank or storage...
TRACTOR Remove mower from tractor for storage, do not store battery directly on stabilizer container. BATTERY • Fully charge the battery for storage. • After a period of this ... of time in the tank inside a building where fumes may occur. • Use fresh fuel next season. Allow the engine to cool before painting. When mower is removed from tractor for damage, breakage and wear. Store in a clean, dry area. • Clean entire tractor (See "CLEANING" in fuel tank or storage...
User Manual
Page 21
...attempting to start 1. Contact an authorized service center/department. Dirty fuel filter. 5. Loose or damaged wiring. 7. Engine valves out of mower housing. 4. Replace spark plug. 3. Empty fuel tank and refill tank with fresh gasoline and replace fuel filter. 8. Clutch/brake ...Engine flooded. 4. Clean/replace air filter. 6. See "To Adjust Carburetor" in "CHOKE" position. 3. Out of grass, leaves and trash under mower. 4. CORRECTION 1. Cutting too much grass/too fast. 2. Fill fuel tank. 2. See "To Adjust Carburetor" in Service Adjustments section. 10. Low ...
...attempting to start 1. Contact an authorized service center/department. Dirty fuel filter. 5. Loose or damaged wiring. 7. Engine valves out of mower housing. 4. Replace spark plug. 3. Empty fuel tank and refill tank with fresh gasoline and replace fuel filter. 8. Clutch/brake ...Engine flooded. 4. Clean/replace air filter. 6. See "To Adjust Carburetor" in "CHOKE" position. 3. Out of grass, leaves and trash under mower. 4. CORRECTION 1. Cutting too much grass/too fast. 2. Fill fuel tank. 2. See "To Adjust Carburetor" in Service Adjustments section. 10. Low ...
User Manual
Page 22
...regulator. 4. Engine throttle control not set between half and full speed (fast) position before stopping engine. 1. See Operation section. 22 Mower deck not level. 3. Replace blade mandrel. Place throttle control in parts manual. 11. Faulty alternator. 1. Move throttle control between ... blade. Tighten loose part(s). Frozen idler pulley. 4. Improper blades used. 11. Replace alternator. Bulb(s) or lamp(s) burned out. 3. Level mower deck. 5. Turn ignition key to slower speed. 3. Shift to ROS "ON" position. Replace bulb(s) or lamp(s). 3. Replace fuse. Check...
...regulator. 4. Engine throttle control not set between half and full speed (fast) position before stopping engine. 1. See Operation section. 22 Mower deck not level. 3. Replace blade mandrel. Place throttle control in parts manual. 11. Faulty alternator. 1. Move throttle control between ... blade. Tighten loose part(s). Frozen idler pulley. 4. Improper blades used. 11. Replace alternator. Bulb(s) or lamp(s) burned out. 3. Level mower deck. 5. Turn ignition key to slower speed. 3. Shift to ROS "ON" position. Replace bulb(s) or lamp(s). 3. Replace fuse. Check...
Parts Manual
Page 2
...Some hardware and parts are drawn larger in order to assemble or disassemble the tractor. Each tractor has its own model number. "PXT16542 (96016001700)" • Part Number • Part Description TABLE OF CONTENTS SCHEMATIC ...3 ELECTRICAL ...4-5 CHASSIS ...6-7 DRIVE...8-9 ENGINE ...10-11 STEERING... ...12-13 DECALS...14 SEAT ...15 MOWER DECK ...16-17 MOWER LIFT...18 WARRANTY BACK PAGE 2 "TRACTOR" • MODEL NUMBER - HOW TO USE THIS MANUAL This manual is not recommended to...
...Some hardware and parts are drawn larger in order to assemble or disassemble the tractor. Each tractor has its own model number. "PXT16542 (96016001700)" • Part Number • Part Description TABLE OF CONTENTS SCHEMATIC ...3 ELECTRICAL ...4-5 CHASSIS ...6-7 DRIVE...8-9 ENGINE ...10-11 STEERING... ...12-13 DECALS...14 SEAT ...15 MOWER DECK ...16-17 MOWER LIFT...18 WARRANTY BACK PAGE 2 "TRACTOR" • MODEL NUMBER - HOW TO USE THIS MANUAL This manual is not recommended to...

Parts Manual
Page 7
inches 1 inch = 25.4 mm. 7 TRACTOR - - MODEL NUMBER PXT16542 (96016001700), PRODUCT NO. 960 16 00-17 CHASSIS KEY PART NO. Pivot Mower 39 187568 Bracket Pivot 64 154798 Dash Lower 142 175702 Plate Reinforcement 145 409167 Rod Pivot Chassis/Hood 205 17490608 Screw Thdrol 3/8-16 x 1/2 206 170165 ...
inches 1 inch = 25.4 mm. 7 TRACTOR - - MODEL NUMBER PXT16542 (96016001700), PRODUCT NO. 960 16 00-17 CHASSIS KEY PART NO. Pivot Mower 39 187568 Bracket Pivot 64 154798 Dash Lower 142 175702 Plate Reinforcement 145 409167 Rod Pivot Chassis/Hood 205 17490608 Screw Thdrol 3/8-16 x 1/2 206 170165 ...

Parts Manual
Page 9
... 6 75 Screw 3/8-16 x 1-1/4 V-Belt Ground Drive Cover Pedal Blk Round Engine Pulley Bolt Hex KEY PART NO. inches 1 inch = 25.4 mm 9 MODEL NUMBER PXT16542 (96016001700), PRODUCT NO. 960 16 00-17 DRIVE KEY PART NO. TRACTOR - - Pin Cotter 1/8 x 3/4 Cad Rod Brake Parking LT/YT Cap Brake Parking Bracket ... 65 10040700 Washer Lock Hvy Hlcl Spr 7/16 66 154778 Keeper Belt Engine Foolproof 69 142432 Screw Hex wsh HiLo 1/4 x 1/2 unc 70 134683 Guide Belt Mower Drive RH 74 137057 Spacer Axle 75 121749X Washer 25/32 x 1 1/4 x 16 Ga. 76 12000001 E-ring #5133-75 77 123583X Key Square 2 0 x ...
... 6 75 Screw 3/8-16 x 1-1/4 V-Belt Ground Drive Cover Pedal Blk Round Engine Pulley Bolt Hex KEY PART NO. inches 1 inch = 25.4 mm 9 MODEL NUMBER PXT16542 (96016001700), PRODUCT NO. 960 16 00-17 DRIVE KEY PART NO. TRACTOR - - Pin Cotter 1/8 x 3/4 Cad Rod Brake Parking LT/YT Cap Brake Parking Bracket ... 65 10040700 Washer Lock Hvy Hlcl Spr 7/16 66 154778 Keeper Belt Engine Foolproof 69 142432 Screw Hex wsh HiLo 1/4 x 1/2 unc 70 134683 Guide Belt Mower Drive RH 74 137057 Spacer Axle 75 121749X Washer 25/32 x 1 1/4 x 16 Ga. 76 12000001 E-ring #5133-75 77 123583X Key Square 2 0 x ...


