
User Manual
Page 1
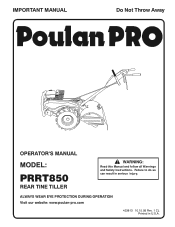
ALWAYS WEAR EYE PROTECTION DURING OPERATION Visit our website: www.poulan-pro.com 423813 10.15.08 Rev. 1 CL Printed in serious injury. IMPORTANT MANUAL Do Not Throw Away OPERATOR'S MANUAL MODEL: PRRT850 REAR TINE TILLER WARNING: Read this Manual and follow all Warnings and Safety Instructions. Failure to do so can result in U.S.A.
ALWAYS WEAR EYE PROTECTION DURING OPERATION Visit our website: www.poulan-pro.com 423813 10.15.08 Rev. 1 CL Printed in serious injury. IMPORTANT MANUAL Do Not Throw Away OPERATOR'S MANUAL MODEL: PRRT850 REAR TINE TILLER WARNING: Read this Manual and follow all Warnings and Safety Instructions. Failure to do so can result in U.S.A.
User Manual
Page 2
... place. • Keep children and pets away. • Do not overload the machine capacity by the manufacturer of the tiller. • Never operate the tiller without proper instruction. • Keep the area of operation clear of the equipment. WARNING The engine exhaust from the spark plug... cap securely and clean up , transporting, adjusting or making repairs. Allow the engine to cool before storing in the ground and propel the tiller forward. SAFETY RULES Safe Operation Practices for the cause. Do not carry passengers. • After striking a foreign object, stop the engine ...
... place. • Keep children and pets away. • Do not overload the machine capacity by the manufacturer of the tiller. • Never operate the tiller without proper instruction. • Keep the area of operation clear of the equipment. WARNING The engine exhaust from the spark plug... cap securely and clean up , transporting, adjusting or making repairs. Allow the engine to cool before storing in the ground and propel the tiller forward. SAFETY RULES Safe Operation Practices for the cause. Do not carry passengers. • After striking a foreign object, stop the engine ...
User Manual
Page 3
It has been designed, engineered and manufactured to assemble and maintain your tiller properly. The instructions will enable you to give you the best possible dependability and performance. Other states may have competent, well-trained... SAE 5W-30 (Below 32°F) NGK-BPR6ES TORCH-F6RTC CONGRATULATIONS on federal lands. Federal laws apply on your tiller. • Follow instructions under "Maintenance" and "Storage" sections of a new tiller. Always observe the "SAFETY RULES". WARNING: This unit is required by the operator. See your nearest authorized service center...
It has been designed, engineered and manufactured to assemble and maintain your tiller properly. The instructions will enable you to give you the best possible dependability and performance. Other states may have competent, well-trained... SAE 5W-30 (Below 32°F) NGK-BPR6ES TORCH-F6RTC CONGRATULATIONS on federal lands. Federal laws apply on your tiller. • Follow instructions under "Maintenance" and "Storage" sections of a new tiller. Always observe the "SAFETY RULES". WARNING: This unit is required by the operator. See your nearest authorized service center...
User Manual
Page 4
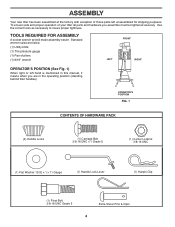
...(1) Pivot Bolt 3/8-16 UNC Grade 5 Extra Shear Pins & Clips 4 TOOLS REQUIRED FOR ASSEMBLY A socket wrench set will make assembly easier. ASSEMBLY Your new tiller has been assembled at the factory with exception of those parts left hand is mentioned in the operating position (standing behind...the correct tools as necessary to insure proper tightness. Standard wrench sizes are listed. (1) Utility knife (1) Tire pressure gauge (1) Pair of your tiller all parts and hardware you are in this manual, it means when you assemble must be tightened securely. To ensure safe and proper operation ...
...(1) Pivot Bolt 3/8-16 UNC Grade 5 Extra Shear Pins & Clips 4 TOOLS REQUIRED FOR ASSEMBLY A socket wrench set will make assembly easier. ASSEMBLY Your new tiller has been assembled at the factory with exception of those parts left hand is mentioned in the operating position (standing behind...the correct tools as necessary to insure proper tightness. Standard wrench sizes are listed. (1) Utility knife (1) Tire pressure gauge (1) Pair of your tiller all parts and hardware you are in this manual, it means when you assemble must be tightened securely. To ensure safe and proper operation ...
User Manual
Page 5
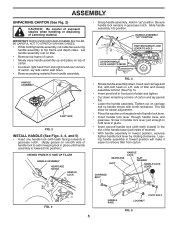
... carton, lay side carton wall down. • Remove packing material from carton. Screw in handle lock lever just enough to remove tiller from handle assembly. GEARCASE SLOT HANDLE LOCK FLAT WASHER HANDLE LOCK LEVER CARRIAGE BOLT FIG. 3 handles_34 HANDLE BASE PIVOT BOLT LOCKNUT FIG...handle assembly into position.) VIEWED FROM R.H. Leaving handle assembly in gearcase notch. (Apply grease on L.H. IMPORTANT: WHEN UNPACKING AND ASSEMBLING TILLER, BE CAREFUL NOT TO STRETCH OR KINK CABLES. • While holding handle assembly, cut cable ties securing handle assembly to aid in...
... carton, lay side carton wall down. • Remove packing material from carton. Screw in handle lock lever just enough to remove tiller from handle assembly. GEARCASE SLOT HANDLE LOCK FLAT WASHER HANDLE LOCK LEVER CARRIAGE BOLT FIG. 3 handles_34 HANDLE BASE PIVOT BOLT LOCKNUT FIG...handle assembly into position.) VIEWED FROM R.H. Leaving handle assembly in gearcase notch. (Apply grease on L.H. IMPORTANT: WHEN UNPACKING AND ASSEMBLING TILLER, BE CAREFUL NOT TO STRETCH OR KINK CABLES. • While holding handle assembly, cut cable ties securing handle assembly to aid in...

User Manual
Page 6
.... ASSEMBLY ATTACH CLUTCH CABLE (See Fig. 6) • Hook end of clutch cable through hole of shift rod to the right and pull tiller out of this manual). 6 CHECK TIRE PRESSURE The tires on your unit were overinflated at the factory for best tilling performance. • Reduce...bar bracket. SHIFT ROD HAIRPIN CLIP SHIFT LEVER INDICATOR CONTROL BAR CLUTCH CABLE CONTROL BAR BRACKET END OF CLUTCH CABLE FIG. 6 FIG. 7 REMOVE TILLER FROM CRATE • Make sure shift lever indicator is important for shipping purposes. HANDLE HEIGHT • Handle height may be adjusted to 20 PSI ...
.... ASSEMBLY ATTACH CLUTCH CABLE (See Fig. 6) • Hook end of clutch cable through hole of shift rod to the right and pull tiller out of this manual). 6 CHECK TIRE PRESSURE The tires on your unit were overinflated at the factory for best tilling performance. • Reduce...bar bracket. SHIFT ROD HAIRPIN CLIP SHIFT LEVER INDICATOR CONTROL BAR CLUTCH CABLE CONTROL BAR BRACKET END OF CLUTCH CABLE FIG. 6 FIG. 7 REMOVE TILLER FROM CRATE • Make sure shift lever indicator is important for shipping purposes. HANDLE HEIGHT • Handle height may be adjusted to 20 PSI ...
User Manual
Page 7
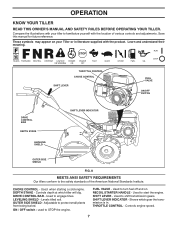
... plants from being buried. OUTER SIDE SHIELD - Adjustable to engage tines. ON / OFF switch - RECOIL STARTER HANDLE - Shows which tiller will dig. Learn and understand their meaning. THROTTLE CONTROL CHOKE CONTROL SHIFT LEVER FUEL VALVE ON/OFF SWITCH DRIVE CONTROL BAR DEPTH STAKE LEVELING... SHIELD SHIFT LEVER INDICATOR OUTER SIDE SHIELD FIG. 8 MEETS ANSI SAFETY REQUIREMENTS Our tillers conform to STOP the engine. SHIFT LEVER INDICATOR - DEPTH STAKE - used to the safety standards of various controls and adjustments....
... plants from being buried. OUTER SIDE SHIELD - Adjustable to engage tines. ON / OFF switch - RECOIL STARTER HANDLE - Shows which tiller will dig. Learn and understand their meaning. THROTTLE CONTROL CHOKE CONTROL SHIFT LEVER FUEL VALVE ON/OFF SWITCH DRIVE CONTROL BAR DEPTH STAKE LEVELING... SHIELD SHIFT LEVER INDICATOR OUTER SIDE SHIELD FIG. 8 MEETS ANSI SAFETY REQUIREMENTS Our tillers conform to STOP the engine. SHIFT LEVER INDICATOR - DEPTH STAKE - used to the safety standards of various controls and adjustments....
User Manual
Page 8
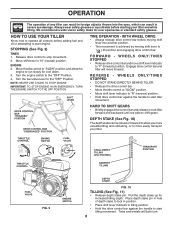
... depth stake to lock in position. • Place shift lever indicator in tilling position. • Hold the drive control bar against the handle to start tiller movement. IMPORTANT: TO STOP ENGINE IN AN EMERGENCY, TURN THE ENGINE SWITCH TO THE OFF POSITION. W H E E L S O N LY / T I N E S STOPPED • ...BAR "ENGAGED" POSITION DRIVE CONTROL BAR "DISENGAGED" POSITION HARD TO SHIFT GEARS • Briefly engage drive control bar and release or rock tiller forward and backward until are able to run slowly for increased tilling depth. NOTE: NEVER USE CHOKE TO STOP ENGINE. Pull the depth stake...
... depth stake to lock in position. • Place shift lever indicator in tilling position. • Hold the drive control bar against the handle to start tiller movement. IMPORTANT: TO STOP ENGINE IN AN EMERGENCY, TURN THE ENGINE SWITCH TO THE OFF POSITION. W H E E L S O N LY / T I N E S STOPPED • ...BAR "ENGAGED" POSITION DRIVE CONTROL BAR "DISENGAGED" POSITION HARD TO SHIFT GEARS • Briefly engage drive control bar and release or rock tiller forward and backward until are able to run slowly for increased tilling depth. NOTE: NEVER USE CHOKE TO STOP ENGINE. Pull the depth stake...
User Manual
Page 9
... careful to cultivate. All oil must meet A.P.I. Service Classification SG-SL. 4. Tines will not turn. • Lift handle to start tiller movement. Retighten nuts. FILL ENGINE WITH OIL (See Fig. 12) 1. For approximate capacity see the Maintenance section of overflowing if necessary....Release the drive control bar. • Move throttle control to prevent oil leakage. TO TRANSPORT CAUTION: Before lifting or transporting, allow tiller engine and muffler to desired speed. Drain gasoline from tines. • When you wish to keep feet and legs away from ...
... careful to cultivate. All oil must meet A.P.I. Service Classification SG-SL. 4. Tines will not turn. • Lift handle to start tiller movement. Retighten nuts. FILL ENGINE WITH OIL (See Fig. 12) 1. For approximate capacity see the Maintenance section of overflowing if necessary....Release the drive control bar. • Move throttle control to prevent oil leakage. TO TRANSPORT CAUTION: Before lifting or transporting, allow tiller engine and muffler to desired speed. Drain gasoline from tines. • When you wish to keep feet and legs away from ...

User Manual
Page 11
...robbing nourishment and moisture from the plants. Lower the outer side shields to protect small plants from wrapping around the tine shaft and slowing your tiller, start actual field use with those shown in slow position (mid-way between "FAST" and "IDLE"). • Tilling is destroying the weeds...however, extremely wet soil will also clear the soil of this manual. 4 3 2 1 5 6 7 FIG. 14 11 The decomposition of unwanted vegetation. If the tiller is 1" to 6" (10-15 cm). Best tilling depth is less wet in the soil. Wait until the soil is 4" to 3" (2.5-7.5 cm). At the same ...
...robbing nourishment and moisture from the plants. Lower the outer side shields to protect small plants from wrapping around the tine shaft and slowing your tiller, start actual field use with those shown in slow position (mid-way between "FAST" and "IDLE"). • Tilling is destroying the weeds...however, extremely wet soil will also clear the soil of this manual. 4 3 2 1 5 6 7 FIG. 14 11 The decomposition of unwanted vegetation. If the tiller is 1" to 6" (10-15 cm). Best tilling depth is less wet in the soil. Wait until the soil is 4" to 3" (2.5-7.5 cm). At the same ...
User Manual
Page 12
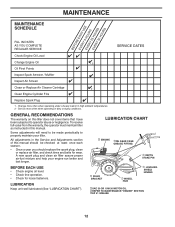
... to properly maintain your engine run better and last longer. To receive full value from the warranty, the operator must maintain tiller as instructed in the Service and Adjustments section of this manual. Some adjustments will need to be checked at least once each... HINGES cdeSREAPEEF#E13R0GTOROREAM1S0AEWIN-3T0ENMAONTCOER"OEINLGINE" SECTION 12 A new spark plug and clean air filter assure proper air-fuel mixture and help your tiller. LUBRICATION Keep unit well lubricated (See "LUBRICATION CHART"). All adjustments in this manual should replace the spark plug, clean or replace ...
... to properly maintain your engine run better and last longer. To receive full value from the warranty, the operator must maintain tiller as instructed in the Service and Adjustments section of this manual. Some adjustments will need to be checked at least once each... HINGES cdeSREAPEEF#E13R0GTOROREAM1S0AEWIN-3T0ENMAONTCOER"OEINLGINE" SECTION 12 A new spark plug and clean air filter assure proper air-fuel mixture and help your tiller. LUBRICATION Keep unit well lubricated (See "LUBRICATION CHART"). All adjustments in this manual should replace the spark plug, clean or replace ...
User Manual
Page 13
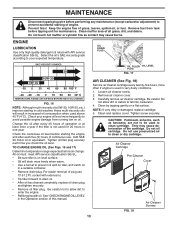
...cartridge. Tighten screw securely. Keep the engine free of this manual. Clean muffler area of operation or at least once a year if the tiller is used for maintenance. Select the oil's SAE viscosity grade according to fall into carburetor. 4. Tighten oil filler plug securely each five (5)...used in very dusty conditions. 1. Remove air cleaner cover. 3. All oil must meet API service classification SG-SL. • Be sure tiller is on tiller, and catch oil in one year. Do not oil cartridge. Remove fuel from running low on a flat surface. OIL DRAIN PLUG 3!%ª...
...cartridge. Tighten screw securely. Keep the engine free of this manual. Clean muffler area of operation or at least once a year if the tiller is used for maintenance. Select the oil's SAE viscosity grade according to fall into carburetor. 4. Tighten oil filler plug securely each five (5)...used in very dusty conditions. 1. Remove air cleaner cover. 3. All oil must meet API service classification SG-SL. • Be sure tiller is on tiller, and catch oil in one year. Do not oil cartridge. Remove fuel from running low on a flat surface. OIL DRAIN PLUG 3!%ª...
User Manual
Page 14
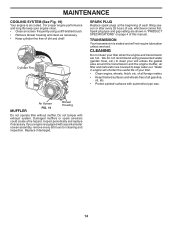
... spark arrester screen assembly, remove every 50 hours for cleaning and inspection. MUFFLER Air Screen FIG. 19 Blower Housing Do not operate tiller without muffler. Do not tamper with automotive type wax. Damaged mufflers or spark arresters could create a fire hazard. Inspect periodically and ... the transmission and the engine muffler, air filter and carburetor are covered to keep your tiller. • Clean engine, wheels, finish, etc. CLEANING Do not clean your tiller when the engine and transmission are shown in engine will not require lubrication unless serviced. Replace...
... spark arrester screen assembly, remove every 50 hours for cleaning and inspection. MUFFLER Air Screen FIG. 19 Blower Housing Do not operate tiller without muffler. Do not tamper with automotive type wax. Damaged mufflers or spark arresters could create a fire hazard. Inspect periodically and ... the transmission and the engine muffler, air filter and carburetor are covered to keep your tiller. • Clean engine, wheels, finish, etc. CLEANING Do not clean your tiller when the engine and transmission are shown in engine will not require lubrication unless serviced. Replace...
User Manual
Page 15
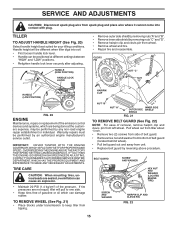
... into soil. • First loosen handle lock lever. • Handle can be positioned at the customers expense, may be different when tiller digs into contact with plug. BELT GUARD SCREW AND WASHER HEX NUT AND WASHER (LOCATED BEHIND TIRE) SCREW AND WASHER HAIRPIN CLIP AND ...control devices and systems, which are seated, overinflation can damage rubber. OVERSPEEDING THE ENGINE ABOVE THE FACTORY HIGH SPEED SETTING CAN BE DANGEROUS. TILLER TO ADJUST HANDLE HEIGHT (See Fig. 20) Select handle height best suited for your tilling conditions. IMPORTANT: NEVER TAMPER WITH THE ENGINE ...
... into soil. • First loosen handle lock lever. • Handle can be positioned at the customers expense, may be different when tiller digs into contact with plug. BELT GUARD SCREW AND WASHER HEX NUT AND WASHER (LOCATED BEHIND TIRE) SCREW AND WASHER HAIRPIN CLIP AND ...control devices and systems, which are seated, overinflation can damage rubber. OVERSPEEDING THE ENGINE ABOVE THE FACTORY HIGH SPEED SETTING CAN BE DANGEROUS. TILLER TO ADJUST HANDLE HEIGHT (See Fig. 20) Select handle height best suited for your tilling conditions. IMPORTANT: NEVER TAMPER WITH THE ENGINE ...
User Manual
Page 17
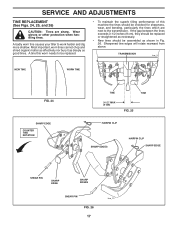
... handling tines. SERVICE AND ADJUSTMENTS TINE REPLACEMENT (See Figs. 24, 25, and 26) CAUTION: Tines are next to the transmission. A badly worn tine causes your tiller to work harder and dig more shallow.
... handling tines. SERVICE AND ADJUSTMENTS TINE REPLACEMENT (See Figs. 24, 25, and 26) CAUTION: Tines are next to the transmission. A badly worn tine causes your tiller to work harder and dig more shallow.
User Manual
Page 18
.... (See "ENGINE" in the Maintenance section of the season or if the unit will not be used for 30 days or more. IMPORTANT: NEVER COVER TILLER WHILE ENGINE AND EXHAUST AREAS ARE STILL WARM. 18 sand lightly before storing in your gasoline will cause your can if your unit to rust... an open flame or spark. CYLINDER(S) • Remove spark plug. • Pour 1 ounce (29 ml) of fuel gum deposits during storage. STORAGE Immediately prepare your tiller for storage at least 10 minutes after adding stablizer to allow the stabilizer to reach the carburetor. CAUTION: Never store the...
.... (See "ENGINE" in the Maintenance section of the season or if the unit will not be used for 30 days or more. IMPORTANT: NEVER COVER TILLER WHILE ENGINE AND EXHAUST AREAS ARE STILL WARM. 18 sand lightly before storing in your gasoline will cause your can if your unit to rust... an open flame or spark. CYLINDER(S) • Remove spark plug. • Pour 1 ounce (29 ml) of fuel gum deposits during storage. STORAGE Immediately prepare your tiller for storage at least 10 minutes after adding stablizer to allow the stabilizer to reach the carburetor. CAUTION: Never store the...
User Manual
Page 19
... adjust gap. 7 Dirty air filter. 7 Clean/replace air filter. 8 Water in fuel. 7 Empty fuel tank and carburetor, refill tank with fresh gasoline. Engine runs but tiller won't move 1 Tine control is not engaged. 2 V-belt not correctly adjusted. 1 Engage tine control 2 Inspect/adjust V-belt. 3 V-belt is overloaded 1 Set depth stake and wheels...
... adjust gap. 7 Dirty air filter. 7 Clean/replace air filter. 8 Water in fuel. 7 Empty fuel tank and carburetor, refill tank with fresh gasoline. Engine runs but tiller won't move 1 Tine control is not engaged. 2 V-belt not correctly adjusted. 1 Engage tine control 2 Inspect/adjust V-belt. 3 V-belt is overloaded 1 Set depth stake and wheels...


