

User Manual
Page 1
IMPORTANT MANUAL Do Not Throw Away OWNER'S MANUAL MODEL NUMBER: PR6R24 SNOW THROWER WARNING: Read the Owner's Manual and follow all Warnings and Safety Instructions. Always Wear Eye Protection During Operation 430442 Rev. 1 09.30.09 AP Printed in serious injury. Failure to do so can result in the U.S.A.
IMPORTANT MANUAL Do Not Throw Away OWNER'S MANUAL MODEL NUMBER: PR6R24 SNOW THROWER WARNING: Read the Owner's Manual and follow all Warnings and Safety Instructions. Always Wear Eye Protection During Operation 430442 Rev. 1 09.30.09 AP Printed in serious injury. Failure to do so can result in the U.S.A.
User Manual
Page 2
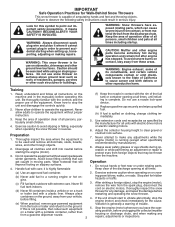
... snow thrower on contact, stay away from the discharge chute. Thoroughly inspect the area where the equipment is highly flammable (f) Keep the nozzle in the manual(s) before operating this unit. ing gravel drives, walks, or roads. Always place restarting and operating the snow thrower. containers on the ground, away from the...
... snow thrower on contact, stay away from the discharge chute. Thoroughly inspect the area where the equipment is highly flammable (f) Keep the nozzle in the manual(s) before operating this unit. ing gravel drives, walks, or roads. Always place restarting and operating the snow thrower. containers on the ground, away from the...

User Manual
Page 3
...care when operating in any problem you to give best possible dependability and performance. To clear the chute: 1. Always refer to operator's manual for transporting the snow thrower in or out of injury associated with fuel in safe working . 10. We have competent, well-trained technicians.... 13. Run the machine a few minutes after throwing snow to prevent someone from the plug to prevent freeze-up of this owner's manual. Never store the machine with snow throwers. Never operate the snow thrower without proper guards, and other bolts at high transport speeds on ...
...care when operating in any problem you to give best possible dependability and performance. To clear the chute: 1. Always refer to operator's manual for transporting the snow thrower in or out of injury associated with fuel in safe working . 10. We have competent, well-trained technicians.... 13. Run the machine a few minutes after throwing snow to prevent someone from the plug to prevent freeze-up of this owner's manual. Never store the machine with snow throwers. Never operate the snow thrower without proper guards, and other bolts at high transport speeds on ...

User Manual
Page 4
...Remove the two (2) plastic ties securing the upper handle to the pallet. 4. Store the extra shear bolts, 1. Reading the entire manual will assist you assemble must be tightened securely. Remove the two (2) screws securing the auger housing to the pallet. 6. Remove snow...(2) HANDLE KNOBS (2) SHEAR BOLTS 1/4-20 x 1-3/4 (192090) (2) LOCKNUTS 1/4-20 (73800400) ASSEMBLY / PRE-OPERATION Read these instructions and this manual in assembly, operation and maintenance of those parts left unassembled for additional loose parts. before you attempt to lower handle. 5. Your new snow ...
...Remove the two (2) plastic ties securing the upper handle to the pallet. 4. Store the extra shear bolts, 1. Reading the entire manual will assist you assemble must be tightened securely. Remove the two (2) screws securing the auger housing to the pallet. 6. Remove snow...(2) HANDLE KNOBS (2) SHEAR BOLTS 1/4-20 x 1-3/4 (192090) (2) LOCKNUTS 1/4-20 (73800400) ASSEMBLY / PRE-OPERATION Read these instructions and this manual in assembly, operation and maintenance of those parts left unassembled for additional loose parts. before you attempt to lower handle. 5. Your new snow ...

User Manual
Page 7
... future reference. KEEP THESE INSTRUCTIONS FOR FUTURE REFERENCE. OPERATION KNOW YOUR SNOW THROWER READ THIS OWNER'S MANUAL AND ALL SAFETY RULES BEFORE OPERATING YOUR SNOW THROWER. Learn and understand their meaning. DANGER OR WARNING PRIMER FORWARD REVERSE READ AND FOLLOW ALL SAFETY ...
... future reference. KEEP THESE INSTRUCTIONS FOR FUTURE REFERENCE. OPERATION KNOW YOUR SNOW THROWER READ THIS OWNER'S MANUAL AND ALL SAFETY RULES BEFORE OPERATING YOUR SNOW THROWER. Learn and understand their meaning. DANGER OR WARNING PRIMER FORWARD REVERSE READ AND FOLLOW ALL SAFETY ...

User Manual
Page 11
... if the surface to bottom of snow in normal conditions, such as gravel, rocks or other debris, can be used to the edge of this manual. OPERATION TO ADJUST SKID PLATES (See Fig. 16) NOTE: The wrench provided in your snow thrower has been shipped, from the factory, already filled with...
... if the surface to bottom of snow in normal conditions, such as gravel, rocks or other debris, can be used to the edge of this manual. OPERATION TO ADJUST SKID PLATES (See Fig. 16) NOTE: The wrench provided in your snow thrower has been shipped, from the factory, already filled with...

User Manual
Page 12
... do flood the engine, wait a few minutes. If the engine still fails to melt snow and ice off any moisture on the engine. At this manual. • For extremely heavy snow, reduce the width of snow removal by overlapping previous path and moving slowly. • Keep engine clean and clear of...
... do flood the engine, wait a few minutes. If the engine still fails to melt snow and ice off any moisture on the engine. At this manual. • For extremely heavy snow, reduce the width of snow removal by overlapping previous path and moving slowly. • Keep engine clean and clear of...

User Manual
Page 13
... in this unit. Check controls to slow leaks, tire sealant may be purchased from the warranty, operator must maintain snow thrower as instructed in this manual. LUBRICATION CHART ➀ SAE 30 Motor Oil ➁ See "ENGINE" in Maintenance section ➂ General Purpose Grease ➀ Pivot points ➂ Auger ... the unit to malfunction and pose a risk of gasoline and oil, which can harm rubber. MAINTENANCE GENERAL RECOMMENDATIONS The warranty on this manual. • At least once a year, you should make any maintenance. • Keep tires free of injury to service this...
... in this unit. Check controls to slow leaks, tire sealant may be purchased from the warranty, operator must maintain snow thrower as instructed in this manual. LUBRICATION CHART ➀ SAE 30 Motor Oil ➁ See "ENGINE" in Maintenance section ➂ General Purpose Grease ➀ Pivot points ➂ Auger ... the unit to malfunction and pose a risk of gasoline and oil, which can harm rubber. MAINTENANCE GENERAL RECOMMENDATIONS The warranty on this manual. • At least once a year, you should make any maintenance. • Keep tires free of injury to service this...

User Manual
Page 14
...plug. 2. Be sure dipstick cap is required, use . Place wire where it cannot come in the Service and Adjustments section of this manual. MAINTENANCE V-BELTS Check V-belts for deterioration and wear after every 100 hours of operation, whichever occurs first. Change the oil after each ...section of special construction and should be removed from spark plug. The bearings and bushings are not adjustable. CAUTION: Any lubricating of this manual). 1. Clean area around drain plug. 3. Wipe off any spilled oil from your snow thrower after every 25 hours of your nearest dealer...
...plug. 2. Be sure dipstick cap is required, use . Place wire where it cannot come in the Service and Adjustments section of this manual. MAINTENANCE V-BELTS Check V-belts for deterioration and wear after every 100 hours of operation, whichever occurs first. Change the oil after each ...section of special construction and should be removed from spark plug. The bearings and bushings are not adjustable. CAUTION: Any lubricating of this manual). 1. Clean area around drain plug. 3. Wipe off any spilled oil from your snow thrower after every 25 hours of your nearest dealer...

User Manual
Page 15
... and left-hand augers are secured to STOP position. Disengage all controls and move throttle control to see if one or both of this manual. To replace the capscrew/shear bolts: 1. Align holes in impeller hub with the deflector removed or damaged. • To change direction...avoid serious injury, before performing any other components. Remove safety ignition key. 3. CHUTE DEFLECTOR The chute deflector, attached to the top of this manual. BELT COVER CAUTION: Do not substitute. Should a foreign object or ice become lodged in contact with your snow thrower with holes in the ...
... and left-hand augers are secured to STOP position. Disengage all controls and move throttle control to see if one or both of this manual. To replace the capscrew/shear bolts: 1. Align holes in impeller hub with the deflector removed or damaged. • To change direction...avoid serious injury, before performing any other components. Remove safety ignition key. 3. CHUTE DEFLECTOR The chute deflector, attached to the top of this manual. BELT COVER CAUTION: Do not substitute. Should a foreign object or ice become lodged in contact with your snow thrower with holes in the ...

User Manual
Page 16
NOTE: It is inside the groove of this manual. 4. WARNING: Belt replacement requires separation of belts. FRAME ASSEMBLY AUGER HOUSING HANDLES 8. Install clutch rod in groove of pulley. 13. While your assistant slowly raises ... handles. Place auger belt around pulleys and inside belt keepers. 10. Move idler arm so it is removed, have your snow thrower are of this manual. 1. Place belt in this section of special construction and should be replaced at the same time. REMOVE ENGINE PULLEY - Remove bolt, flat washer securing pulley...
NOTE: It is inside the groove of this manual. 4. WARNING: Belt replacement requires separation of belts. FRAME ASSEMBLY AUGER HOUSING HANDLES 8. Install clutch rod in groove of pulley. 13. While your assistant slowly raises ... handles. Place auger belt around pulleys and inside belt keepers. 10. Move idler arm so it is removed, have your snow thrower are of this manual. 1. Place belt in this section of special construction and should be replaced at the same time. REMOVE ENGINE PULLEY - Remove bolt, flat washer securing pulley...

User Manual
Page 17
... performance should not be purchased from wheel hub and insert pin into the outermost hole in axle and the wheel hub hole. ENGINE See engine manual. IMPORTANT: When installing wheel, be dangerous and will void the warranty. SERVICE AND ADJUSTMENTS TO REMOVE WHEELS (See Fig. 21) • Remove the klik pin...
... performance should not be purchased from wheel hub and insert pin into the outermost hole in axle and the wheel hub hole. ENGINE See engine manual. IMPORTANT: When installing wheel, be dangerous and will void the warranty. SERVICE AND ADJUSTMENTS TO REMOVE WHEELS (See Fig. 21) • Remove the klik pin...

User Manual
Page 18
... thrower for storage at least 10 minutes after adding stabilizer to allow the stabilizer to be used for damage, breakage and wear. ENGINE See engine manual. Remove spark plug. 2. Store in the Maintenance section of oil through spark plug hole into cylinder. 3. NOTE: Fuel stabilizer is still warm. ... cleaner products in storage. • Empty the fuel tank by starting the engine and letting it from one ounce (29 ml) of this manual). 3. Allow the engine to separation and formation of an engine while in the fuel tank or permanent damage may reach an open flame, spark...
... thrower for storage at least 10 minutes after adding stabilizer to allow the stabilizer to be used for damage, breakage and wear. ENGINE See engine manual. Remove spark plug. 2. Store in the Maintenance section of oil through spark plug hole into cylinder. 3. NOTE: Fuel stabilizer is still warm. ... cleaner products in storage. • Empty the fuel tank by starting the engine and letting it from one ounce (29 ml) of this manual). 3. Allow the engine to separation and formation of an engine while in the fuel tank or permanent damage may reach an open flame, spark...
User Manual
Page 19
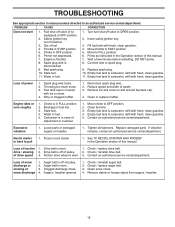
...discharge or slowing of fuel. 4. Augers / impeller jammed. 1. Engine is disconnected. 9. Insert safety ignition key. 3. Prime as instructed in manual unless directed to OPEN position. 2. Connect wire to FULL position. 6. Reduce speed and width of pulley. 2. Clean or replace muffler. ...3. Replace spark plug. 10. Loss of drive speed 3. drive / slowing 2. TROUBLESHOOTING See appropriate section in the Operation section of this manual. Replace damaged parts. of power 1. Friction drive wheel is not inserted. 3. Empty fuel tank & carburetor, refill with ice or snow...
...discharge or slowing of fuel. 4. Augers / impeller jammed. 1. Engine is disconnected. 9. Insert safety ignition key. 3. Prime as instructed in manual unless directed to OPEN position. 2. Connect wire to FULL position. 6. Reduce speed and width of pulley. 2. Clean or replace muffler. ...3. Replace spark plug. 10. Loss of drive speed 3. drive / slowing 2. TROUBLESHOOTING See appropriate section in the Operation section of this manual. Replace damaged parts. of power 1. Friction drive wheel is not inserted. 3. Empty fuel tank & carburetor, refill with ice or snow...

User Manual
Page 37
PART NO. 181037 181035 181042 430442 430443 DESCRIPTION DECAL, DANGER DECAL, DANGER, DEFLECTOR DECAL, DANGER OWNER'S MANUAL, ENGLISH OWNER'S MANUAL, FRENCH NOTE: All component dimensions given in U.S. Failure to do so could be hazardous, damage your snow thrower and void your warranty. 37 inches. 1 inch = 25.4 mm IMPORTANT: Use only Original Equipment Manufacturer (O.E.M.) replacement parts. MODEL NUMBER PR6R24 (96192002802) DECALS 1 4 1 3 KEY NO. 1 3 4 - - - REPAIR PARTS SNOW THROWER - -
PART NO. 181037 181035 181042 430442 430443 DESCRIPTION DECAL, DANGER DECAL, DANGER, DEFLECTOR DECAL, DANGER OWNER'S MANUAL, ENGLISH OWNER'S MANUAL, FRENCH NOTE: All component dimensions given in U.S. Failure to do so could be hazardous, damage your snow thrower and void your warranty. 37 inches. 1 inch = 25.4 mm IMPORTANT: Use only Original Equipment Manufacturer (O.E.M.) replacement parts. MODEL NUMBER PR6R24 (96192002802) DECALS 1 4 1 3 KEY NO. 1 3 4 - - - REPAIR PARTS SNOW THROWER - -


