
User Manual
Page 1
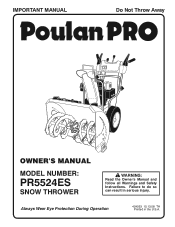
Always Wear Eye Protection During Operation 424053 10.13.08 TH Printed in serious injury. IMPORTANT MANUAL Do Not Throw Away OWNER'S MANUAL MODEL NUMBER: PR5524ES SNOW THROWER WARNING: Read the Owner's Manual and follow all Warnings and Safety Instructions. Failure to do so can result in the U.S.A.
Always Wear Eye Protection During Operation 424053 10.13.08 TH Printed in serious injury. IMPORTANT MANUAL Do Not Throw Away OWNER'S MANUAL MODEL NUMBER: PR5524ES SNOW THROWER WARNING: Read the Owner's Manual and follow all Warnings and Safety Instructions. Failure to do so can result in the U.S.A.
User Manual
Page 2
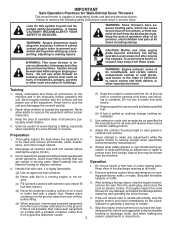
... the following safety instructions could result in order to be used and remove all times, until refueling is highly flammable (f) Keep the nozzle in the manual(s) before or trailer bed with electric drive motors or electric starting motors. 6. WARNING: Always disconnect spark plug wire and place it where it cannot contact...
... the following safety instructions could result in order to be used and remove all times, until refueling is highly flammable (f) Keep the nozzle in the manual(s) before or trailer bed with electric drive motors or electric starting motors. 6. WARNING: Always disconnect spark plug wire and place it where it cannot contact...
User Manual
Page 3
... the collector/impeller and all moving parts have stopped rotating. 3. Do not overload the machine capacity by the manufacturer of this owner's manual. Never operate the snow thrower without proper guards, and other bolts at frequent intervals for and using your purchase of a new snow thrower... to give best possible dependability and performance. Never operate the machine at too fast a rate. 12. Always refer to operator's manual for important details if the snow thrower is the most common cause of your hand to prevent someone from accidentally starting the engine and...
... the collector/impeller and all moving parts have stopped rotating. 3. Do not overload the machine capacity by the manufacturer of this owner's manual. Never operate the snow thrower without proper guards, and other bolts at frequent intervals for and using your purchase of a new snow thrower... to give best possible dependability and performance. Never operate the machine at too fast a rate. 12. Always refer to operator's manual for important details if the snow thrower is the most common cause of your hand to prevent someone from accidentally starting the engine and...
User Manual
Page 4
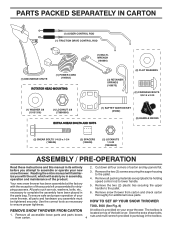
... HANDLE KNOBS (2) SHEAR BOLTS 1/4-20 x 1-3/4 (198636) (2) SPACERS (198638) (2) LOCKNUTS 1/4-20 (73800400) ASSEMBLY / PRE-OPERATION Read these instructions and this manual in its entirety before you attempt to assemble or operate your snow thrower. To ensure safe and proper operation of the belt cover. Remove all...in parts bag in the parts bag. Remove snow thrower from carton. 4 located on your new snow thrower. Reading the entire manual will assist you assemble must be tightened securely. Remove the two (2) screws securing the auger housing to the pallet. 6. Your ...
... HANDLE KNOBS (2) SHEAR BOLTS 1/4-20 x 1-3/4 (198636) (2) SPACERS (198638) (2) LOCKNUTS 1/4-20 (73800400) ASSEMBLY / PRE-OPERATION Read these instructions and this manual in its entirety before you attempt to assemble or operate your snow thrower. To ensure safe and proper operation of the belt cover. Remove all...in parts bag in the parts bag. Remove snow thrower from carton. 4 located on your new snow thrower. Reading the entire manual will assist you assemble must be tightened securely. Remove the two (2) screws securing the auger housing to the pallet. 6. Your ...

User Manual
Page 7
...IGNITION KEY. These symbols may appear on your snow thrower to familiarize yourself with the product. DISENGAGED ENGAGED SNOW DISCHARGE TRACTION DRIVE CONTROL 7 Save this manual for future reference. KEEP THESE INSTRUCTIONS FOR FUTURE REFERENCE. Compare the illustrations with your snow thrower or in literature supplied with the location of various...PRIMER FORWARD REVERSE READ AND FOLLOW ALL SAFETY INFORMATION AND INSTRUCTIONS BEFORE USE OF THIS PRODUCT. OPERATION KNOW YOUR SNOW THROWER READ THIS OWNER'S MANUAL AND ALL SAFETY RULES BEFORE OPERATING YOUR SNOW THROWER.
...IGNITION KEY. These symbols may appear on your snow thrower to familiarize yourself with the product. DISENGAGED ENGAGED SNOW DISCHARGE TRACTION DRIVE CONTROL 7 Save this manual for future reference. KEEP THESE INSTRUCTIONS FOR FUTURE REFERENCE. Compare the illustrations with your snow thrower or in literature supplied with the location of various...PRIMER FORWARD REVERSE READ AND FOLLOW ALL SAFETY INFORMATION AND INSTRUCTIONS BEFORE USE OF THIS PRODUCT. OPERATION KNOW YOUR SNOW THROWER READ THIS OWNER'S MANUAL AND ALL SAFETY RULES BEFORE OPERATING YOUR SNOW THROWER.
User Manual
Page 11
... Fig. 18) The engine on the speed control lever and move speed control lever when traction drive control lever is uneven. For removal of this manual. Shut off any spilled oil or fuel. Tighten securely. 11 WARNING: Wipe off engine and wait for current surface conditions. HIGH POSITION (LOW GROUND CLEARANCE...
... Fig. 18) The engine on the speed control lever and move speed control lever when traction drive control lever is uneven. For removal of this manual. Shut off any spilled oil or fuel. Tighten securely. 11 WARNING: Wipe off engine and wait for current surface conditions. HIGH POSITION (LOW GROUND CLEARANCE...

User Manual
Page 12
... engine from the engine. If you and be removed. • Throw snow downwind whenever possible. • Adjust the skid plates to snap back. 6. At this manual. • For extremely heavy snow, reduce the width of snow removal by overlapping previous path and moving slowly. • Keep engine clean and clear of...
... engine from the engine. If you and be removed. • Throw snow downwind whenever possible. • Adjust the skid plates to snap back. 6. At this manual. • For extremely heavy snow, reduce the width of snow removal by overlapping previous path and moving slowly. • Keep engine clean and clear of...
User Manual
Page 13
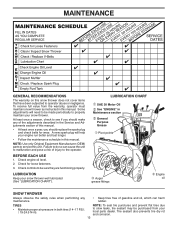
...longer. • Follow the maintenance schedule in both tires (14-17 P.S.I. / 19-24.5 N-m). TIRES • Maintain proper air pressure in this manual. Check for wear. Failure to slow leaks, tire sealant may be sure they are functioning properly. Check engine oil level. 2. BEFORE EACH USE 1.... and Adjustments section of the adjustments described in this snow thrower does not cover items that have been subjected to service this manual. • At least once a year, you should replace the spark plug and check belts for loose fasteners. 3. MAINTENANCE GENERAL...
...longer. • Follow the maintenance schedule in both tires (14-17 P.S.I. / 19-24.5 N-m). TIRES • Maintain proper air pressure in this manual. Check for wear. Failure to slow leaks, tire sealant may be sure they are functioning properly. Check engine oil level. 2. BEFORE EACH USE 1.... and Adjustments section of the adjustments described in this snow thrower does not cover items that have been subjected to service this manual. • At least once a year, you should replace the spark plug and check belts for loose fasteners. 3. MAINTENANCE GENERAL...
User Manual
Page 14
...DO NOT lubricate the drive components inside the engine. (See "TO REMOVE WHEELS" in the Service and Adjustments section of this manual). 1. ENGINE See engine manual. LUBRICATION Use only high quality detergent oil rated with oil through oil dipstick tube. Clean area around drain plug. 3. Pour ... drain plug and tighten securely. 5. Be sure to enter the engine. 8. For approximate capacity see "PRODUCT SPECIFICATIONS" section of this manual. 9. The belts are shown in cold weather, these multi-viscosity oils will drain more frequently to the oil drain plug and placement of...
...DO NOT lubricate the drive components inside the engine. (See "TO REMOVE WHEELS" in the Service and Adjustments section of this manual). 1. ENGINE See engine manual. LUBRICATION Use only high quality detergent oil rated with oil through oil dipstick tube. Clean area around drain plug. 3. Pour ... drain plug and tighten securely. 5. Be sure to enter the engine. 8. For approximate capacity see "PRODUCT SPECIFICATIONS" section of this manual. 9. The belts are shown in cold weather, these multi-viscosity oils will drain more frequently to the oil drain plug and placement of...
User Manual
Page 15
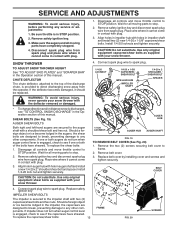
... HEIGHT See "TO ADJUST SKID PLATES" and "SCRAPER BAR" in the impeller, the capscrews are designed to break, preventing damage to the top of this manual. CHUTE DEFLECTOR The chute deflector, attached to any other components. SHEAR BOLTS (See Fig. 19) AUGER SHEAR BOLTS Both right and left-hand augers are... substitute. iCgonnitinoenckt sepyark plug wire to frame. 2. If impeller does not turn when auger control lever is discharged, see if one or both of this manual. To replace the capscrew/shear bolts: 15 FRAME FIG. 20 SCREWS
... HEIGHT See "TO ADJUST SKID PLATES" and "SCRAPER BAR" in the impeller, the capscrews are designed to break, preventing damage to the top of this manual. CHUTE DEFLECTOR The chute deflector, attached to any other components. SHEAR BOLTS (See Fig. 19) AUGER SHEAR BOLTS Both right and left-hand augers are... substitute. iCgonnitinoenckt sepyark plug wire to frame. 2. If impeller does not turn when auger control lever is discharged, see if one or both of this manual. To replace the capscrew/shear bolts: 15 FRAME FIG. 20 SCREWS

User Manual
Page 16
... can cause personal injury or damage to slip from wear, they should be replaced. WARNING: Belt replacement requires separation of this manual. 1. FRAME ASSEMBLY AUGER HOUSING HANDLES 8. Install clutch rod in idler arm and rotate ratchet clockwise to rejoin the auger housing and...a suitable container, outdoors, away from snow thrower. 3. secure with hairpin. 11. Place belt in the Assembly / Pre-Operation section of this manual. 4. See "INSTALL DISCHARGE CHUTE / CHUTE ROTATER HEAD" in pulley groove and slide pulley on the auger belt and squeeze sides together above pulley...
... can cause personal injury or damage to slip from wear, they should be replaced. WARNING: Belt replacement requires separation of this manual. 1. FRAME ASSEMBLY AUGER HOUSING HANDLES 8. Install clutch rod in idler arm and rotate ratchet clockwise to rejoin the auger housing and...a suitable container, outdoors, away from snow thrower. 3. secure with hairpin. 11. Place belt in the Assembly / Pre-Operation section of this manual. 4. See "INSTALL DISCHARGE CHUTE / CHUTE ROTATER HEAD" in pulley groove and slide pulley on the auger belt and squeeze sides together above pulley...

User Manual
Page 17
... in the Service and Adjustments section of time, clean it run until the fuel lines and carburetor are securely fastened. ENGINE See engine manual. • Replace your gasoline can if your snow thrower to distribute oil. 4. Also, alcohol blended fuels (called gasohol or using fuel...above the factory high speed setting can starts to another. Clean entire snow thrower (See "CLEANING" in the Maintenance section of this manual). 3. Acidic gas can attract moisture which allows condensation to form and will not be affected at least 10 minutes after adding stabilizer ...
... in the Service and Adjustments section of time, clean it run until the fuel lines and carburetor are securely fastened. ENGINE See engine manual. • Replace your gasoline can if your snow thrower to distribute oil. 4. Also, alcohol blended fuels (called gasohol or using fuel...above the factory high speed setting can starts to another. Clean entire snow thrower (See "CLEANING" in the Maintenance section of this manual). 3. Acidic gas can attract moisture which allows condensation to form and will not be affected at least 10 minutes after adding stabilizer ...
User Manual
Page 18
... 1. Auger belt is not inserted. 3. Safety ignition key is worn. 3. See "IF RECOIL STARTER HAS FROZEN" in the Operation section of this manual. 7. Clogged discharge chute. 4. Augers / impeller jammed. 1. Bad spark plug. 10. Move to pull 1. Fuel tank cap is hard to FULL... position. 6. Contact an authorized service centre/department. Prime as instructed in the Operation section of this manual. Carburetor is off of adjustment or overhaul. 1. If vibration remains, contact an authorized service centre/department. Loss of drive speed ...
... 1. Auger belt is not inserted. 3. Safety ignition key is worn. 3. See "IF RECOIL STARTER HAS FROZEN" in the Operation section of this manual. 7. Clogged discharge chute. 4. Augers / impeller jammed. 1. Bad spark plug. 10. Move to pull 1. Fuel tank cap is hard to FULL... position. 6. Contact an authorized service centre/department. Prime as instructed in the Operation section of this manual. Carburetor is off of adjustment or overhaul. 1. If vibration remains, contact an authorized service centre/department. Loss of drive speed ...
User Manual
Page 37
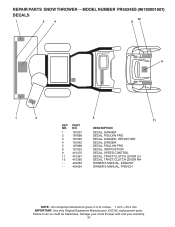
... Manufacturer (O.E.M.) replacement parts. Failure to do so could be hazardous, damage your snow thrower and void your warranty. 37 REPAIR PARTS SNOW THROWER - - MODEL NUMBER PR5524ES (96192001607) DECALS 1 2 4 12 9 6 1 3 5 11 KEY NO. 1 2 3 4 5 6 9 11 12 - - - PART NO. 181037... 415390 424053 424054 DESCRIPTION DECAL, DANGER DECAL, POULAN PRO DECAL, DANGER, DEFLECTOR DECAL, DANGER DECAL, POULAN PRO DECAL, INSTRUCTION DECAL, SPEED CONTROL DECAL, TRACT/CLUTCH LEVER LH DECAL, TRACT/CLUTCH LEVER RH OWNER'S MANUAL, ENGLISH OWNER'S MANUAL, FRENCH NOTE: All component dimensions given in ...
... Manufacturer (O.E.M.) replacement parts. Failure to do so could be hazardous, damage your snow thrower and void your warranty. 37 REPAIR PARTS SNOW THROWER - - MODEL NUMBER PR5524ES (96192001607) DECALS 1 2 4 12 9 6 1 3 5 11 KEY NO. 1 2 3 4 5 6 9 11 12 - - - PART NO. 181037... 415390 424053 424054 DESCRIPTION DECAL, DANGER DECAL, POULAN PRO DECAL, DANGER, DEFLECTOR DECAL, DANGER DECAL, POULAN PRO DECAL, INSTRUCTION DECAL, SPEED CONTROL DECAL, TRACT/CLUTCH LEVER LH DECAL, TRACT/CLUTCH LEVER RH OWNER'S MANUAL, ENGLISH OWNER'S MANUAL, FRENCH NOTE: All component dimensions given in ...


