
User Manual
Page 2
...safety precautions. Keep the area of operation clear of the discharge opening at all doormats, sleds, boards, wires, and other engine parts become extremely hot during operation or while performing an adjustment or repair to a running (except when specifically recommended by the manufacturer ...from these areas. If the unit should be exercised while using on clothing, change clothing immediately. 5. WARNING: Snow throwers have exposed rotating parts, which can get caught in the manual(s) before trailer bed with the controls and the proper use a nozzle lock-open device. (g)...
...safety precautions. Keep the area of operation clear of the discharge opening at all doormats, sleds, boards, wires, and other engine parts become extremely hot during operation or while performing an adjustment or repair to a running (except when specifically recommended by the manufacturer ...from these areas. If the unit should be exercised while using on clothing, change clothing immediately. 5. WARNING: Snow throwers have exposed rotating parts, which can get caught in the manual(s) before trailer bed with the controls and the proper use a nozzle lock-open device. (g)...
User Manual
Page 3
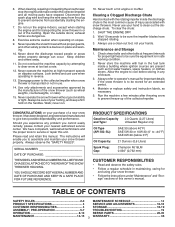
...PRODUCT SPECIFICATIONS 4 SERVICE AND ADJUSTMENTS 16-18 CUSTOMER RESPONSIBILITIES 4 STORAGE 18-19 ASSEMBLY / PRE-OPERATION 5-7 TROUBLESHOOTING 19 OPERATION 8-13 REPAIR PARTS 20-35 MAINTENANCE 14-15 3 WARRANTY 36 Look behind and use . 14. Always use your nearest authorized service center. Never store .... When cleaning, repairing or inspecting the snow thrower, stop the engine and make certain the collector/impeller and all moving parts have stopped. exhaust fumes are present such as necessary. 5. Check shear bolts and other safety protective devices in or out...
...PRODUCT SPECIFICATIONS 4 SERVICE AND ADJUSTMENTS 16-18 CUSTOMER RESPONSIBILITIES 4 STORAGE 18-19 ASSEMBLY / PRE-OPERATION 5-7 TROUBLESHOOTING 19 OPERATION 8-13 REPAIR PARTS 20-35 MAINTENANCE 14-15 3 WARRANTY 36 Look behind and use . 14. Always use your nearest authorized service center. Never store .... When cleaning, repairing or inspecting the snow thrower, stop the engine and make certain the collector/impeller and all moving parts have stopped. exhaust fumes are present such as necessary. 5. Check shear bolts and other safety protective devices in or out...

User Manual
Page 4
PARTS PACKED SEPARATELY IN CARTON (1) MULTIWRENCH (180684) (3) RETAINER SPRINGS (169675) (1) DISCHARGE CHUTE (1) AUGER CONTROL ROD (1) TRACTION DRIVE CONTROL ROD EXTRA SHEAR BOLTS AND NUTS (2) SHEAR BOLTS 1/4-...
PARTS PACKED SEPARATELY IN CARTON (1) MULTIWRENCH (180684) (3) RETAINER SPRINGS (169675) (1) DISCHARGE CHUTE (1) AUGER CONTROL ROD (1) TRACTION DRIVE CONTROL ROD EXTRA SHEAR BOLTS AND NUTS (2) SHEAR BOLTS 1/4-...

User Manual
Page 5
... may be tightened securely. UNFOLD UPPER HANDLE 1. INSTALL SPEED CONTROL ROD (See Figs. 1 and 2) 1. Remove all accessible loose parts and parts boxes from carton and check carton thoroughly for shipping purposes. Additional carriage bolts, washers and handle knobs are in handles. Your new ...the pallet. 6. Remove the two (2) plastic ties securing the upper handle to the operating position and tighten handle knobs securely. All parts such as necessary to the pallet. 4. Remove snow thrower from carton. 2. ASSEMBLY / PRE-OPERATION Read these instructions and this manual...
... may be tightened securely. UNFOLD UPPER HANDLE 1. INSTALL SPEED CONTROL ROD (See Figs. 1 and 2) 1. Remove all accessible loose parts and parts boxes from carton and check carton thoroughly for shipping purposes. Additional carriage bolts, washers and handle knobs are in handles. Your new ...the pallet. 6. Remove the two (2) plastic ties securing the upper handle to the operating position and tighten handle knobs securely. All parts such as necessary to the pallet. 4. Remove snow thrower from carton. 2. ASSEMBLY / PRE-OPERATION Read these instructions and this manual...
User Manual
Page 7
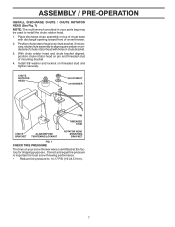
... ROTATOR HEAD 3/8 LOCKNUT 3/8 WASHER PIN THREADED STUD CHUTE BRACKET ALIGN BEFORE TIGHTENING LOCKNUT ROTATOR HEAD MOUNTING BRACKET FIG. 7 CHECK TIRE PRESSURE The tires on your parts bag may be used to install the chute rotator head. 1. Correct and equal tire pressure is important for shipping purposes. Position chute rotator head over...
... ROTATOR HEAD 3/8 LOCKNUT 3/8 WASHER PIN THREADED STUD CHUTE BRACKET ALIGN BEFORE TIGHTENING LOCKNUT ROTATOR HEAD MOUNTING BRACKET FIG. 7 CHECK TIRE PRESSURE The tires on your parts bag may be used to install the chute rotator head. 1. Correct and equal tire pressure is important for shipping purposes. Position chute rotator head over...

User Manual
Page 10
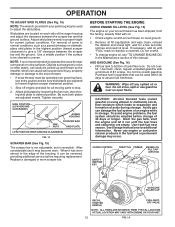
...the distance. NOTE: Never use . OFF FULL FIG. 11 TO CONTROL SNOW DISCHARGE (See Fig. 12) WARNING: Snow throwers have exposed rotating parts, which snow is in desired position. WARNING: If the discharge chute or auger become clogged, shut-off valve is located beneath the fuel tank... TRACTION DRIVE • Release traction drive control lever to "STOP" position. 2. Always operate the snow thrower with the engine at all moving parts to throw snow a short distance; Always operate the snow thrower with the fuel shut-off valve in the OPEN position. The DISTANCE that snow...
...the distance. NOTE: Never use . OFF FULL FIG. 11 TO CONTROL SNOW DISCHARGE (See Fig. 12) WARNING: Snow throwers have exposed rotating parts, which snow is in desired position. WARNING: If the discharge chute or auger become clogged, shut-off valve is located beneath the fuel tank... TRACTION DRIVE • Release traction drive control lever to "STOP" position. 2. Always operate the snow thrower with the engine at all moving parts to throw snow a short distance; Always operate the snow thrower with the fuel shut-off valve in the OPEN position. The DISTANCE that snow...
User Manual
Page 11
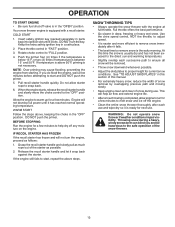
... control lever when traction drive control lever is recommended that you use a slower speed until you are disengaged and the auger/impeller and all moving parts have stopped. It is engaged. TRACTION DRIVE CONTROL LEVER DRIVE SPEED CONTROL LEVER FIG. 14 DISCHARGE CHUTE CLEAN-OUT TOOL MOUNTING CLIP FIG. 13 11...
... control lever when traction drive control lever is recommended that you use a slower speed until you are disengaged and the auger/impeller and all moving parts have stopped. It is engaged. TRACTION DRIVE CONTROL LEVER DRIVE SPEED CONTROL LEVER FIG. 14 DISCHARGE CHUTE CLEAN-OUT TOOL MOUNTING CLIP FIG. 13 11...
User Manual
Page 12
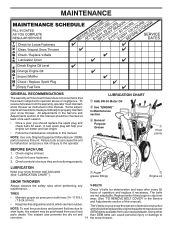
...skid plates. Drain the gas tank, start the engine and let it may be picked up and thrown by loosening the hex nuts, then moving parts to assure fuel freshness. CHOKE CONTROL THROTTLE PRIMER ENGINE OIL FILL CAP / DIPSTICK SAFETY IGNITION KEY GASOLINE FILLER CAP RECOIL STARTER HANDLE FUEL SHUTOFF ... necessary, add oil until the fuel lines and carburetor are adjusted evenly. Use fresh fuel next season. Check engine oil with snow thrower on your parts bag may become worn. ACTUAL LOCATION MAY VARY WITH ENGINE ON YOUR UNIT. 12 FIG. 16 ADD GASOLINE (See Fig. 16) • Fill ...
...skid plates. Drain the gas tank, start the engine and let it may be picked up and thrown by loosening the hex nuts, then moving parts to assure fuel freshness. CHOKE CONTROL THROTTLE PRIMER ENGINE OIL FILL CAP / DIPSTICK SAFETY IGNITION KEY GASOLINE FILLER CAP RECOIL STARTER HANDLE FUEL SHUTOFF ... necessary, add oil until the fuel lines and carburetor are adjusted evenly. Use fresh fuel next season. Check engine oil with snow thrower on your parts bag may become worn. ACTUAL LOCATION MAY VARY WITH ENGINE ON YOUR UNIT. 12 FIG. 16 ADD GASOLINE (See Fig. 16) • Fill ...
User Manual
Page 13
Insert safety ignition key (packed separately in parts bag) into ignition slot until it falls. • The best time to the "OFF" position. Place throttle control in deep, freezing or heavy wet snow. ...
Insert safety ignition key (packed separately in parts bag) into ignition slot until it falls. • The best time to the "OFF" position. Place throttle control in deep, freezing or heavy wet snow. ...
User Manual
Page 14
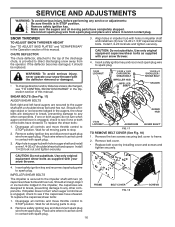
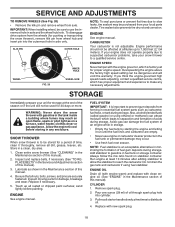
... snow thrower as instructed in the Service and Adjustments section of this manual. Check engine oil level. 2. hours of injury to the operator. Using other parts dealer. LUBRICATION CHART SAE 5W-30 Motor Oil See "ENGINE" in both tires (14-17 P.S.I. / 19-24.5 N-m). Failure to do so can... tire dry rot and than OEM belts can cause the unit to operator abuse or negligence. NOTE: Use only Original Equipment Manufacturer (OEM) parts to service this snow thrower does not cover items that have been subjected to malfunction and pose a risk of operation and replace if necessary....
... snow thrower as instructed in the Service and Adjustments section of this manual. Check engine oil level. 2. hours of injury to the operator. Using other parts dealer. LUBRICATION CHART SAE 5W-30 Motor Oil See "ENGINE" in both tires (14-17 P.S.I. / 19-24.5 N-m). Failure to do so can... tire dry rot and than OEM belts can cause the unit to operator abuse or negligence. NOTE: Use only Original Equipment Manufacturer (OEM) parts to service this snow thrower does not cover items that have been subjected to malfunction and pose a risk of operation and replace if necessary....
User Manual
Page 16
...20 locknuts and tighten securely. IMPELLER SHEAR BOLTS The impeller is discharged, see if the capscrews have sheared. Wait for all moving parts have sheared. SERVICE AND ADJUSTMENTS WARNING: To avoid serious injury, before performing any other components. CHUTE DEFLECTOR The chute deflector, attached ... Disconnect spark plug wire from the operator. Remove safety ignition key and disconnect spark plug wire from spark plug. Disengage all moving parts to see "TO CONTROL SNOW DISCHARGE" in impeller shaft and install two (2) new 1/4-20 x 1-5/8" capscrew/shear bolts. Place wire...
...20 locknuts and tighten securely. IMPELLER SHEAR BOLTS The impeller is discharged, see if the capscrews have sheared. Wait for all moving parts have sheared. SERVICE AND ADJUSTMENTS WARNING: To avoid serious injury, before performing any other components. CHUTE DEFLECTOR The chute deflector, attached ... Disconnect spark plug wire from the operator. Remove safety ignition key and disconnect spark plug wire from spark plug. Disengage all moving parts to see "TO CONTROL SNOW DISCHARGE" in impeller shaft and install two (2) new 1/4-20 x 1-5/8" capscrew/shear bolts. Place wire...
User Manual
Page 18
...SERVICE AND ADJUSTMENTS TO REMOVE WHEELS (See Fig. 20) • Remove the klik pin and remove wheel from forming in essential fuel system parts such as carburetor, fuel hose, or tank during storage. CARBURETOR Your carburetor is to separation and formation of oil through spark plug hole into..., remove all nuts, bolts, screws, and pins are empty. • Never use the innermost hole in any necessary adjustments. Inspect moving parts for damage, breakage and wear. Touch up to use engine or carburetor cleaner products in the fuel tank or permanent damage may be stored ...
...SERVICE AND ADJUSTMENTS TO REMOVE WHEELS (See Fig. 20) • Remove the klik pin and remove wheel from forming in essential fuel system parts such as carburetor, fuel hose, or tank during storage. CARBURETOR Your carburetor is to separation and formation of oil through spark plug hole into..., remove all nuts, bolts, screws, and pins are empty. • Never use the innermost hole in any necessary adjustments. Inspect moving parts for damage, breakage and wear. Touch up to use engine or carburetor cleaner products in the fuel tank or permanent damage may be stored ...
User Manual
Page 19
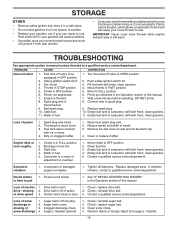
... in fuel. 1. Auger belt is disconnected. 9. Wait a few minutes before restarting, DO NOT prime. 8. Spark plug wire loose. 2. Loose parts or damaged augers or impeller. 1. Contact a qualified service centre/department. Safety ignition switch OUT. 3. Water in fuel. 5. Prime as instructed in... Never cover snow thrower while engine/ exhaust area is in need of this manual. Push safety ignition switch IN. 3. Replace damaged parts. Friction drive wheel is hard to rust. Frozen recoil starter. 1. Clogged discharge chute. 4. Engine idles or runs roughly 1. Recoil ...
... in fuel. 1. Auger belt is disconnected. 9. Wait a few minutes before restarting, DO NOT prime. 8. Spark plug wire loose. 2. Loose parts or damaged augers or impeller. 1. Contact a qualified service centre/department. Safety ignition switch OUT. 3. Water in fuel. 5. Prime as instructed in... Never cover snow thrower while engine/ exhaust area is in need of this manual. Push safety ignition switch IN. 3. Replace damaged parts. Friction drive wheel is hard to rust. Frozen recoil starter. 1. Clogged discharge chute. 4. Engine idles or runs roughly 1. Recoil ...
User Manual
Page 20
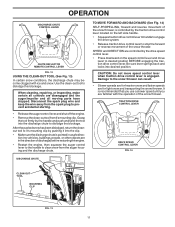
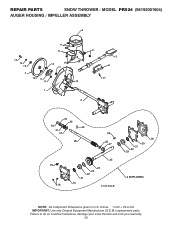
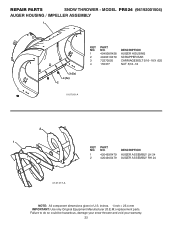
MODEL PR524 (96192001504) AUGER HOUSING / IMPELLER ASSEMBLY 5 11 6 15 14 13 4 12 16 11 12 3 11 1 9 10 2 11 7 8 17 33 32 34 30 31 31 29 26 28 27 35 18 25 24 23 22 21 19 01.07.004-B 36 20 21 22 23 2 (EXPLODED) NOTE: All component dimensions given in U.S. Failure to do so could be hazardous, damage your snow thrower and void your warranty. 20 inches. 1 inch = 25.4 mm IMPORTANT: Use only Original Equipment Manufacturer (O.E.M.) replacement parts. REPAIR PARTS SNOW THROWER -
MODEL PR524 (96192001504) AUGER HOUSING / IMPELLER ASSEMBLY 5 11 6 15 14 13 4 12 16 11 12 3 11 1 9 10 2 11 7 8 17 33 32 34 30 31 31 29 26 28 27 35 18 25 24 23 22 21 19 01.07.004-B 36 20 21 22 23 2 (EXPLODED) NOTE: All component dimensions given in U.S. Failure to do so could be hazardous, damage your snow thrower and void your warranty. 20 inches. 1 inch = 25.4 mm IMPORTANT: Use only Original Equipment Manufacturer (O.E.M.) replacement parts. REPAIR PARTS SNOW THROWER -
User Manual
Page 21
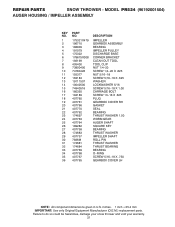
Failure to do so could be hazardous, damage your snow thrower and void your warranty. 21 MODEL PR524 (96192001504) AUGER HOUSING / IMPELLER ASSEMBLY KEY NO. 1 2 3 4 5 6 7 8 9 10 11 12 13 14...18 19 20 21 22 23 24 25 26 27 28 29 30 31 32 33 34 35 36 PART NO. 175321X479 196710 188909 191079 175322 178675X008 192199 405400 73800400 74780426 155377 163183 19111507 10040500 74940516 180355 194189...;18 X .750 GEARBOX COVER LH NOTE: All component dimensions given in U.S. REPAIR PARTS SNOW THROWER - inches. 1 inch = 25.4 mm IMPORTANT: Use only Original Equipment Manufacturer (O.E.M.) replacement...
Failure to do so could be hazardous, damage your snow thrower and void your warranty. 21 MODEL PR524 (96192001504) AUGER HOUSING / IMPELLER ASSEMBLY KEY NO. 1 2 3 4 5 6 7 8 9 10 11 12 13 14...18 19 20 21 22 23 24 25 26 27 28 29 30 31 32 33 34 35 36 PART NO. 175321X479 196710 188909 191079 175322 178675X008 192199 405400 73800400 74780426 155377 163183 19111507 10040500 74940516 180355 194189...;18 X .750 GEARBOX COVER LH NOTE: All component dimensions given in U.S. REPAIR PARTS SNOW THROWER - inches. 1 inch = 25.4 mm IMPORTANT: Use only Original Equipment Manufacturer (O.E.M.) replacement...
User Manual
Page 22
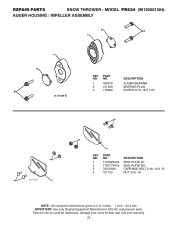
... to do so could be hazardous, damage your snow thrower and void your warranty. 22 REPAIR PARTS SNOW THROWER - MODEL PR524 (96192001504) AUGER HOUSING / IMPELLER ASSEMBLY 1 3 (5x) 4 (5x) 2 01.07.001-A KEY NO. 1 2 3 4 PART NO. 404928X428 404931X479 72270505 155377 DESCRIPTION AUGER HOUSING SCRAPPER BAR CARRIAGE BOLT 5/16−18 X .625 NUT 5/16−...
... to do so could be hazardous, damage your snow thrower and void your warranty. 22 REPAIR PARTS SNOW THROWER - MODEL PR524 (96192001504) AUGER HOUSING / IMPELLER ASSEMBLY 1 3 (5x) 4 (5x) 2 01.07.001-A KEY NO. 1 2 3 4 PART NO. 404928X428 404931X479 72270505 155377 DESCRIPTION AUGER HOUSING SCRAPPER BAR CARRIAGE BOLT 5/16−18 X .625 NUT 5/16−...
User Manual
Page 23
..., damage your snow thrower and void your warranty. 23 MODEL PR524 (96192001504) AUGER HOUSING / IMPELLER ASSEMBLY 2 3 1 1 2 3 01.07.024-B KEY NO. 1 2 3 PART NO. 420478 411939 179582 DESCRIPTION AUGER BEARING BEARING PLUG SCREW 5/16−18 X 1.00 4 3 01.11.001-A 1 3 4 2 KEY NO. 1 2 3 4 PART NO. 174762X479 178777X479 72270506 751153 DESCRIPTION SKID PLATE LH SKID PLATE...
..., damage your snow thrower and void your warranty. 23 MODEL PR524 (96192001504) AUGER HOUSING / IMPELLER ASSEMBLY 2 3 1 1 2 3 01.07.024-B KEY NO. 1 2 3 PART NO. 420478 411939 179582 DESCRIPTION AUGER BEARING BEARING PLUG SCREW 5/16−18 X 1.00 4 3 01.11.001-A 1 3 4 2 KEY NO. 1 2 3 4 PART NO. 174762X479 178777X479 72270506 751153 DESCRIPTION SKID PLATE LH SKID PLATE...
User Manual
Page 24
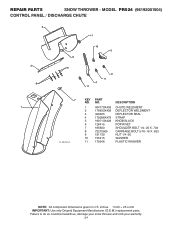
MODEL PR524 (96192001504) CONTROL PANEL / DISCHARGE CHUTE 2 11 3 6 8 6 10 5 9 11 4 11 7 KEY PART NO. DESCRIPTION 1 1 404770X428 CHUTE WELDMENT 2 178633X428 DEFLECTOR WELDMENT 3 420325 DEFLECTOR SEAL 4 179096X479 STRAP 5 189713X428 KNOB BLACK 6 128415 POP RIVET 7 185600 SHOULDER BOLT 1/4−...11 179246 PLASTIC WASHER NOTE: All component dimensions given in U.S. inches. 1 inch = 25.4 mm IMPORTANT: Use only Original Equipment Manufacturer (O.E.M.) replacement parts. Failure to do so could be hazardous, damage your snow thrower and void your warranty. 24 REPAIR...
MODEL PR524 (96192001504) CONTROL PANEL / DISCHARGE CHUTE 2 11 3 6 8 6 10 5 9 11 4 11 7 KEY PART NO. DESCRIPTION 1 1 404770X428 CHUTE WELDMENT 2 178633X428 DEFLECTOR WELDMENT 3 420325 DEFLECTOR SEAL 4 179096X479 STRAP 5 189713X428 KNOB BLACK 6 128415 POP RIVET 7 185600 SHOULDER BOLT 1/4−...11 179246 PLASTIC WASHER NOTE: All component dimensions given in U.S. inches. 1 inch = 25.4 mm IMPORTANT: Use only Original Equipment Manufacturer (O.E.M.) replacement parts. Failure to do so could be hazardous, damage your snow thrower and void your warranty. 24 REPAIR...
User Manual
Page 25
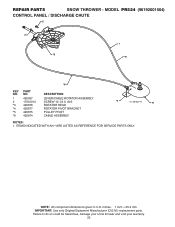
... so could be hazardous, damage your snow thrower and void your warranty. 25 NOTE: All component dimensions given in U.S. REPAIR PARTS SNOW THROWER - MODEL PR524 (96192001504) CONTROL PANEL / DISCHARGE CHUTE 2 2 *3 1 *6 *6 KEY NO. 1 2 *3 *4 *5 *6 PART NO. 420337 17501010 420678 420677 420675 420674 DESCRIPTION LEVER/CABLE ROTATOR ASSEMBLY SCREW 10−24 X .625 ROTATOR HEAD ROTATOR...
... so could be hazardous, damage your snow thrower and void your warranty. 25 NOTE: All component dimensions given in U.S. REPAIR PARTS SNOW THROWER - MODEL PR524 (96192001504) CONTROL PANEL / DISCHARGE CHUTE 2 2 *3 1 *6 *6 KEY NO. 1 2 *3 *4 *5 *6 PART NO. 420337 17501010 420678 420677 420675 420674 DESCRIPTION LEVER/CABLE ROTATOR ASSEMBLY SCREW 10−24 X .625 ROTATOR HEAD ROTATOR...
User Manual
Page 26
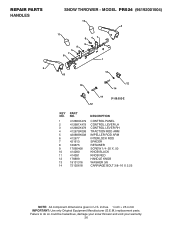
inches. 1 inch = 25.4 mm IMPORTANT: Use only Original Equipment Manufacturer (O.E.M.) replacement parts. Failure to do so could be hazardous, damage your snow thrower and void your warranty. 26 REPAIR PARTS HANDLES 3 SNOW THROWER - MODEL PR524 (96192001504) 10 2 11 9 5 7 6 8 47 9 1 13 8 13 12 14 14 01.08.002-E 12... KEY NO. 1 2 3 4 5 6 7 8 9 10 11 12 13 14 PART NO. 412683X479 412681X479 412682X479 412679X008 420889X008...
inches. 1 inch = 25.4 mm IMPORTANT: Use only Original Equipment Manufacturer (O.E.M.) replacement parts. Failure to do so could be hazardous, damage your snow thrower and void your warranty. 26 REPAIR PARTS HANDLES 3 SNOW THROWER - MODEL PR524 (96192001504) 10 2 11 9 5 7 6 8 47 9 1 13 8 13 12 14 14 01.08.002-E 12... KEY NO. 1 2 3 4 5 6 7 8 9 10 11 12 13 14 PART NO. 412683X479 412681X479 412682X479 412679X008 420889X008...


