

Owner Manual
Page 3
CUTTING EQUIPMENT Ref Part No Description 1 530 01 59-17 NUT 2 587 64 07-01 CLAMP ASSY 3 585 88 99-19 KIT 4 530 04 49-08 BAR 5 530 05 ... 530 09 61-82 LINER CO EXTRUDED 25 530 09 62-18 SHAFT 26 530 05 55-03 TUBE CAP 587 70 51-01 ATTACHMENT PR28PS, 967089801, 2016-09 Remark QTY KIT NUT 1 CLAMP ASSY POLE PRUNER BAR BLACK 1 "SAW CHAIN 90P, 3/8"" mini 1,1mm Chamf chisel, 1 34DL" "BAR 3/8"" 1,1 Micro Lite" 1 BAR...
CUTTING EQUIPMENT Ref Part No Description 1 530 01 59-17 NUT 2 587 64 07-01 CLAMP ASSY 3 585 88 99-19 KIT 4 530 04 49-08 BAR 5 530 05 ... 530 09 61-82 LINER CO EXTRUDED 25 530 09 62-18 SHAFT 26 530 05 55-03 TUBE CAP 587 70 51-01 ATTACHMENT PR28PS, 967089801, 2016-09 Remark QTY KIT NUT 1 CLAMP ASSY POLE PRUNER BAR BLACK 1 "SAW CHAIN 90P, 3/8"" mini 1,1mm Chamf chisel, 1 34DL" "BAR 3/8"" 1,1 Micro Lite" 1 BAR...

Owner Manual
Page 5
... 40 41 42 43 44 45 46 47 48 49 50 51 52 53 54 55 56 57 58 59 60 61 62 63 64 Part No 581 97 62-01 530 01 61-01 585 16 58-01 530 05 87-09 585 34 59-06 530 03 55-96... WASHER WASHER SCREW SCREW NUT SCREW HOUSING KIT CLUTCH RING FLYWHEEL CRANKCASE BEARING ASSY-CRANKSHAFT CIRCLIP RING KIT KIT SCREW KIT HOUSING COVER KIT DECAL PR28PS, 967089801, 2016-09 Remark QTY KIT CARBURETOR GASKET GASKET KIT GASKET KIT FUEL FILTER GASKET KIT FUEL TANK STARTER PULLEY GASKET KIT CLUTCH DRUM GASKET...
... 40 41 42 43 44 45 46 47 48 49 50 51 52 53 54 55 56 57 58 59 60 61 62 63 64 Part No 581 97 62-01 530 01 61-01 585 16 58-01 530 05 87-09 585 34 59-06 530 03 55-96... WASHER WASHER SCREW SCREW NUT SCREW HOUSING KIT CLUTCH RING FLYWHEEL CRANKCASE BEARING ASSY-CRANKSHAFT CIRCLIP RING KIT KIT SCREW KIT HOUSING COVER KIT DECAL PR28PS, 967089801, 2016-09 Remark QTY KIT CARBURETOR GASKET GASKET KIT GASKET KIT FUEL FILTER GASKET KIT FUEL TANK STARTER PULLEY GASKET KIT CLUTCH DRUM GASKET...

Owner Manual
Page 7
SHAFT & HANDLE Ref Part No Description 1 584 44 03-06 HOUSING 2 585 20 56-03 CABLE 3 545 18 76-01 HANDLE HALF 4 530 01 64-49 SCREW 5 530 01 ... 01 58-20 SCREW 21 530 01 61-52 WING NUT 22 545 01 74-04 DUST CAP 23 537 41 92-21 TRIMMER HEAD PR28PS, 967089801, 2016-09 Remark QTY KIT UPPER SHAFT KNOB & SCREW LOWER END SHIELD LIMITER
SHAFT & HANDLE Ref Part No Description 1 584 44 03-06 HOUSING 2 585 20 56-03 CABLE 3 545 18 76-01 HANDLE HALF 4 530 01 64-49 SCREW 5 530 01 ... 01 58-20 SCREW 21 530 01 61-52 WING NUT 22 545 01 74-04 DUST CAP 23 537 41 92-21 TRIMMER HEAD PR28PS, 967089801, 2016-09 Remark QTY KIT UPPER SHAFT KNOB & SCREW LOWER END SHIELD LIMITER

Instruction Manual
Page 3
...instructions and warnings on the unit and in daylight or good artificial light. Safety Requirements": Powerhead model Attachments PR28PS Trimmer head Type TNG 7 Cutting attachment / guard, part no. 537419221 / 530096106 952711828 Brushcutter attachment PP4000C SAFETY RULES (TRIMMER ATTACHMENT) When using unit! If ...support. UNIT / MAINTENANCE SAFETY S Disconnect the spark plug before each use blades with line trimmer attachment will follow all parts of your body. WARNING The engine exhaust from this unit. Always wear safety glasses or similar eye protection when operating,...
...instructions and warnings on the unit and in daylight or good artificial light. Safety Requirements": Powerhead model Attachments PR28PS Trimmer head Type TNG 7 Cutting attachment / guard, part no. 537419221 / 530096106 952711828 Brushcutter attachment PP4000C SAFETY RULES (TRIMMER ATTACHMENT) When using unit! If ...support. UNIT / MAINTENANCE SAFETY S Disconnect the spark plug before each use blades with line trimmer attachment will follow all parts of your body. WARNING The engine exhaust from this unit. Always wear safety glasses or similar eye protection when operating,...
Instruction Manual
Page 4
... in this manual. Keep others including children, animals, bystanders, and helpers at proper length. Use only recommended accessories and replacement parts. Have all warnings and instructions in manual and on a continual and regular basis TRANSPORTING AND STORAGE WARNING: For each optional attachment.... The unit can be hung by law that can ricochet, be serviced or replaced by starting engine. Replace trimmer head parts that your authorized service dealer. Maintain unit according to cool before removing fuel cap. Install required shield properly before using brushcutter...
... in this manual. Keep others including children, animals, bystanders, and helpers at proper length. Use only recommended accessories and replacement parts. Have all warnings and instructions in manual and on a continual and regular basis TRANSPORTING AND STORAGE WARNING: For each optional attachment.... The unit can be hung by law that can ricochet, be serviced or replaced by starting engine. Replace trimmer head parts that your authorized service dealer. Maintain unit according to cool before removing fuel cap. Install required shield properly before using brushcutter...
Instruction Manual
Page 5
... adjusting or making repairs except carburetor adjustments. Use only in good physical condition and mentally alert. Wearing safety leg guards is dusty. Keep all parts of the cut down . Keep firm footing and balance. Never try to use . Always replace bar S S S S S and chain ... and can cause serious or even fatal injury. MAINTAIN YOUR UNIT IN GOOD WORKING ORDER S Disconnect the spark plug before using the unit. S Replace parts that can be whipped toward you, pulling you have taken alcohol, drugs, or medication. S S S S INSTRUCTION MANUAL SAFETY INFORMATION ON THE UNIT ...
... adjusting or making repairs except carburetor adjustments. Use only in good physical condition and mentally alert. Wearing safety leg guards is dusty. Keep all parts of the cut down . Keep firm footing and balance. Never try to use . Always replace bar S S S S S and chain ... and can cause serious or even fatal injury. MAINTAIN YOUR UNIT IN GOOD WORKING ORDER S Disconnect the spark plug before using the unit. S Replace parts that can be whipped toward you, pulling you have taken alcohol, drugs, or medication. S S S S INSTRUCTION MANUAL SAFETY INFORMATION ON THE UNIT ...
Instruction Manual
Page 6
... the chain results in loss of surprise which stops the chain for an instant. S Make sure unit is suddenly stopped. S Use only recommended Poulan PRO accessories and replacement parts. The pruner is running . Allow engine to accidents. With a basic understanding of kickback, you can occur when the moving at the tip of...
... the chain results in loss of surprise which stops the chain for an instant. S Make sure unit is suddenly stopped. S Use only recommended Poulan PRO accessories and replacement parts. The pruner is running . Allow engine to accidents. With a basic understanding of kickback, you can occur when the moving at the tip of...
Instruction Manual
Page 7
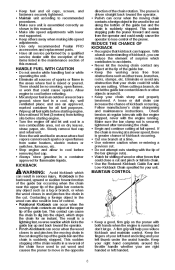
..., change in skin color or texture, or loss of feeling in otherwise healthy people. An anti-vibration system does not guarantee the avoidance of these parts. Prolonged use and follow all warnings and instructions in serious injury. S Stand with a small radius tip which reduces the size of the kickback danger zone...
..., change in skin color or texture, or loss of feeling in otherwise healthy people. An anti-vibration system does not guarantee the avoidance of these parts. Prolonged use and follow all warnings and instructions in serious injury. S Stand with a small radius tip which reduces the size of the kickback danger zone...
Instruction Manual
Page 8
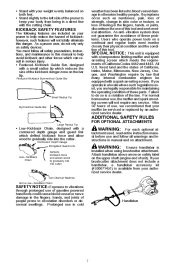
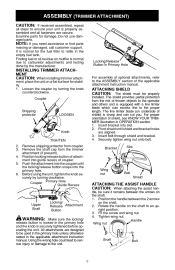
...Upper Shaft Locking/ Release Attachment Button WARNING: Make sure the locking/ release button is sharp and can cut you need assistance or find parts missing or damaged, call customer support. dle, be sure it remains between the 2 arrows on underside of coupler. 5. Fit the ...Hole For assembly of shield, see KNOW YOUR TRIMMER illustration in OPERATION section. 1. The line limiter blade (on the shaft. 2. Examine parts for stability. 1. INSTALLING TRIMMER ATTACHMENT CAUTION: When installing trimmer attach- Securely tighten wing nut onto bolt. Push the attachment into the ...
...Upper Shaft Locking/ Release Attachment Button WARNING: Make sure the locking/ release button is sharp and can cut you need assistance or find parts missing or damaged, call customer support. dle, be sure it remains between the 2 arrows on underside of coupler. 5. Fit the ...Hole For assembly of shield, see KNOW YOUR TRIMMER illustration in OPERATION section. 1. The line limiter blade (on the shaft. 2. Examine parts for stability. 1. INSTALLING TRIMMER ATTACHMENT CAUTION: When installing trimmer attach- Securely tighten wing nut onto bolt. Push the attachment into the ...

Instruction Manual
Page 9
... recess of the applicable attachment instruction manual. Place the upper shoulder strap clamp over the upper shaft. Locking/ Release Attachment Button 6. Examine parts for fit and balance before starting the engine or beginning a cutting operation. 2. TOOLS REQUIRED S Hex wrench (provided) NOTE: DO NOT use damaged... the tool to the right side of optional attachments, refer to rattle in the empty fuel tank. NOTE: If you need assistance or find parts missing or damaged, call 1-800-554-6723. WARNING: Make sure the locking/ release button is locked in the shoulder strap to allow it ...
... recess of the applicable attachment instruction manual. Place the upper shoulder strap clamp over the upper shaft. Locking/ Release Attachment Button 6. Examine parts for fit and balance before starting the engine or beginning a cutting operation. 2. TOOLS REQUIRED S Hex wrench (provided) NOTE: DO NOT use damaged... the tool to the right side of optional attachments, refer to rattle in the empty fuel tank. NOTE: If you need assistance or find parts missing or damaged, call 1-800-554-6723. WARNING: Make sure the locking/ release button is locked in the shoulder strap to allow it ...

Instruction Manual
Page 19
... Clean the unit and labels using a damp cloth with the Canadian standard ICES-002. 1. Always clean after every 5 hours of usage. Replace parts. Ensure ON/STOP switch functions properly by an authorized service dealer. WARNING: The muffler on the air filter cover to cause cancer. Press the tabs...under warranty. Wash the filter in the instruction manual performed by pushing and releasing the switch. Apply a few drops of damaged or worn parts. Replace with Champion RCJ-8Y spark plug and tighten securely with a clean dry cloth. As your unit is your authorized service dealer. Twist...
... Clean the unit and labels using a damp cloth with the Canadian standard ICES-002. 1. Always clean after every 5 hours of usage. Replace parts. Ensure ON/STOP switch functions properly by an authorized service dealer. WARNING: The muffler on the air filter cover to cause cancer. Press the tabs...under warranty. Wash the filter in the instruction manual performed by pushing and releasing the switch. Apply a few drops of damaged or worn parts. Replace with Champion RCJ-8Y spark plug and tighten securely with a clean dry cloth. As your unit is your authorized service dealer. Twist...
Instruction Manual
Page 20
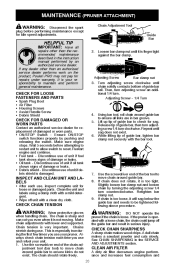
...ATTACHMENT) WARNING: Disconnect the spark plug before attempting to restart unit to allow switch to be tightened following above procedure. CHECK FOR LOOSE FASTENERS AND PARTS S S S S S Spark Plug Boot Air Filter Housing Screws Assist Handle Screw Debris Shield Adjusting Screw Bar clamp nut 3. Then, turn adjusting... dull chain makes a sawdust powder and cuts slowly. If any dealer other than an authorized service dealer performs work on the product, Poulan PRO may not pay for replacement of the chain adjustment tool (bar tool) to move chain around guide bar to move chain around guide...
...ATTACHMENT) WARNING: Disconnect the spark plug before attempting to restart unit to allow switch to be tightened following above procedure. CHECK FOR LOOSE FASTENERS AND PARTS S S S S S Spark Plug Boot Air Filter Housing Screws Assist Handle Screw Debris Shield Adjusting Screw Bar clamp nut 3. Then, turn adjusting... dull chain makes a sawdust powder and cuts slowly. If any dealer other than an authorized service dealer performs work on the product, Poulan PRO may not pay for replacement of the chain adjustment tool (bar tool) to move chain around guide bar to move chain around guide...

Instruction Manual
Page 21
...lubrication it to service your chain and make cutting difficult. Allow filter to restore square edges and sides. After 50 hours of operation. 1. Replace parts. harmful emissions. To maintain guide bar: S Disconnect spark plug. Ignition timing is used, carbon deposits build up on this product contains chemicals ... 25 hours of rail wear. Reinstall the spark plug boot. Twist, then pull off spark plug boot. 2. As your pruner in the repair parts list. Clean the cover and the area around it may be forced through the cut, or been run with a flat file. 21 S Loosen...
...lubrication it to service your chain and make cutting difficult. Allow filter to restore square edges and sides. After 50 hours of operation. 1. Replace parts. harmful emissions. To maintain guide bar: S Disconnect spark plug. Ignition timing is used, carbon deposits build up on this product contains chemicals ... 25 hours of rail wear. Reinstall the spark plug boot. Twist, then pull off spark plug boot. 2. As your pruner in the repair parts list. Clean the cover and the area around it may be forced through the cut, or been run with a flat file. 21 S Loosen...

Instruction Manual
Page 22
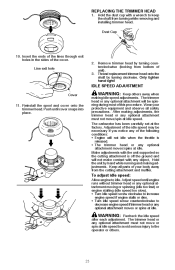
.... Guide slot WARNING: Never use wire, rope, string, etc., which can break off and become a dangerous projectile. 5. Cover Spool 8. Clean dirt and debris from all parts. Guide slot 2. Bend the line at the midpoint and insert the bend into position in a clockwise direction. Remove any remaining line. 3. With your finger between...
.... Guide slot WARNING: Never use wire, rope, string, etc., which can break off and become a dangerous projectile. 5. Cover Spool 8. Clean dirt and debris from all parts. Guide slot 2. Bend the line at the midpoint and insert the bend into position in a clockwise direction. Remove any remaining line. 3. With your finger between...
Instruction Manual
Page 23
... released. IDLE SPEED ADJUSTMENT Cover 11. REPLACING THE TRIMMER HEAD 1. The trimmer head or any optional attachment moves or spins at the factory. Keep all parts of unit). 3.
... released. IDLE SPEED ADJUSTMENT Cover 11. REPLACING THE TRIMMER HEAD 1. The trimmer head or any optional attachment moves or spins at the factory. Keep all parts of unit). 3.

Instruction Manual
Page 26
... call our customer assistance help line at this point. The chain is sharp and can cut you require further assistance or are in the repair parts list. See CHAIN TENSION section. Install bar clamp nut and finger tighten only. Do not tighten any further at 1-800-554-6723.
... call our customer assistance help line at this point. The chain is sharp and can cut you require further assistance or are in the repair parts list. See CHAIN TENSION section. Install bar clamp nut and finger tighten only. Do not tighten any further at 1-800-554-6723.

Instruction Manual
Page 27
... avoid serious injury to decrease engine speed if chain moves at the factory. S The chain moves at idle. Wear your protective equipment and observe all parts of the idle speed may be moving (idle too fast) or stalling (idle speed too slow). To adjust idle speed: Allow engine to increase engine...
... avoid serious injury to decrease engine speed if chain moves at the factory. S The chain moves at idle. Wear your protective equipment and observe all parts of the idle speed may be moving (idle too fast) or stalling (idle speed too slow). To adjust idle speed: Allow engine to increase engine...

Instruction Manual
Page 28
... fuel vapors cannot reach sparks or open flames from water heaters, electric motors or switches, furnaces, etc. We recommend that any damaged, broken, or worn parts. HELPFUL TIP ENGINE FUEL SYSTEM Under FUELING ENGINE in the OPERATION section of this manual, see message labeled IMPORTANT regarding the use only fresh fuel...
... fuel vapors cannot reach sparks or open flames from water heaters, electric motors or switches, furnaces, etc. We recommend that any damaged, broken, or worn parts. HELPFUL TIP ENGINE FUEL SYSTEM Under FUELING ENGINE in the OPERATION section of this manual, see message labeled IMPORTANT regarding the use only fresh fuel...


