Owner Manual
Page 1
Failure to 10% ethanol (E10) is acceptable for use of any gasoline exceeding 10% ethanol (E10) will void the product warranty. 582 29 66-01Rev. 1 The use in serious injury. Always Wear Eye Protection During Operation Gasoline containing up to do so can result in this machine. IMPORTANT MANUAL Do Not Throw Away OWNER'S MANUAL MODEL NUMBER: PR271 SNOW THROWER WARNING: Read the Owner's Manual and follow all Warnings and Safety Instructions.
Failure to 10% ethanol (E10) is acceptable for use of any gasoline exceeding 10% ethanol (E10) will void the product warranty. 582 29 66-01Rev. 1 The use in serious injury. Always Wear Eye Protection During Operation Gasoline containing up to do so can result in this machine. IMPORTANT MANUAL Do Not Throw Away OWNER'S MANUAL MODEL NUMBER: PR271 SNOW THROWER WARNING: Read the Owner's Manual and follow all Warnings and Safety Instructions.
Owner Manual
Page 2
... feet near or under rotating parts. After striking a foreign object, stop the engine (motor) and check immediately for Walk-Behind Snow Throwers This snow thrower is spilled on the ground. Stop the engine (motor) whenever you leave the operating position, before starting motors. 6. Training 1.... safety instructions could result in moving parts. Operation 1. BECOME ALERT!!! Caution should start to operate the equipment. WARNING: Snow throwers have exposed rotating parts, which can get caught in serious injury. CAUTION: Muffler and other reproductive harm. Use extension ...
... feet near or under rotating parts. After striking a foreign object, stop the engine (motor) and check immediately for Walk-Behind Snow Throwers This snow thrower is spilled on the ground. Stop the engine (motor) whenever you leave the operating position, before starting motors. 6. Training 1.... safety instructions could result in moving parts. Operation 1. BECOME ALERT!!! Caution should start to operate the equipment. WARNING: Snow throwers have exposed rotating parts, which can get caught in serious injury. CAUTION: Muffler and other reproductive harm. Use extension ...
Owner Manual
Page 3
... with the rotating impeller inside a building where ignition sources are dangerous. 8. Never operate the snow thrower without good visibility or light. Never operate the snow thrower without proper guards, and other bolts at frequent intervals for proper tightness to service or repair this... clothes dryers. Keep children and others away. 11. Do not overload the machine capacity by the manufacturer of a new snow thrower. Use only attachments and accessories approved by attempting to assemble and maintain your nearest authorized service center. Walk; never run the...
... with the rotating impeller inside a building where ignition sources are dangerous. 8. Never operate the snow thrower without good visibility or light. Never operate the snow thrower without proper guards, and other bolts at frequent intervals for proper tightness to service or repair this... clothes dryers. Keep children and others away. 11. Do not overload the machine capacity by the manufacturer of a new snow thrower. Use only attachments and accessories approved by attempting to assemble and maintain your nearest authorized service center. Walk; never run the...

Owner Manual
Page 5
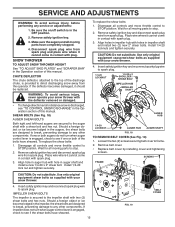
... bolts and handle knobs that are supplied in the bag of your new snow thrower. REMOVE SNOW THROWER FROM CARTON 1. UPPER HANDLE CARRIAGE BOLT LOWER HANDLE HANDLE KNOB FIG. 1 FIG. 3 5 Your new snow thrower has been assembled at the factory with the unit, which will familiarize you... exception of carton and lay panels flat. 3. Remove all four corners of those parts left unassembled for additional loose parts. 2. Remove snow thrower from carton and check carton thoroughly for shipping purposes. HANDLE KNOB FIG. 2 3. All parts such as necessary to the pallet. 6....
... bolts and handle knobs that are supplied in the bag of your new snow thrower. REMOVE SNOW THROWER FROM CARTON 1. UPPER HANDLE CARRIAGE BOLT LOWER HANDLE HANDLE KNOB FIG. 1 FIG. 3 5 Your new snow thrower has been assembled at the factory with the unit, which will familiarize you... exception of carton and lay panels flat. 3. Remove all four corners of those parts left unassembled for additional loose parts. 2. Remove snow thrower from carton and check carton thoroughly for shipping purposes. HANDLE KNOB FIG. 2 3. All parts such as necessary to the pallet. 6....

Owner Manual
Page 6
...7) 1. Tighten nut securely. KNOB KNOB DOUBLE CLIP ROTATOR CABLES FIG. 5 CONTROL LEVER FIG. 7 CHECK TIRE PRESSURE The tires on underside of snow thrower. 2. Install locknut on shoulder bolt. 3. If necessary, rotate chute assembly to chute deflector with holes in chute deflector as shown. Install remote ...cable eyelet to align square and pin on your snow thrower were overinflated at the factory for best snow throwing performance. • Reduce tire pressure to 14-17 PSI. 6 Position chute rotator head over chute...
...7) 1. Tighten nut securely. KNOB KNOB DOUBLE CLIP ROTATOR CABLES FIG. 5 CONTROL LEVER FIG. 7 CHECK TIRE PRESSURE The tires on underside of snow thrower. 2. Install locknut on shoulder bolt. 3. If necessary, rotate chute assembly to chute deflector with holes in chute deflector as shown. Install remote ...cable eyelet to align square and pin on your snow thrower were overinflated at the factory for best snow throwing performance. • Reduce tire pressure to 14-17 PSI. 6 Position chute rotator head over chute...
Owner Manual
Page 7
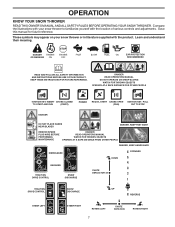
...OPERATE ON STEEP SLOPES WATCH FOR THROWN OBJECTS OPERATE AT A SAFE DISTANCE FOR OTHER PEOPLE IGNITION KEY. Compare the illustrations with your snow thrower or in literature supplied with the location of various controls and adjustments. Learn and understand their meaning. DANGER OR WARNING EAR PROTECTION ... CHOKE CLOSED TO START AND RUN (START) PRIMER RECOIL START CHOKE OPEN (RUN) IGNITION KEY. These symbols may appear on your snow thrower to familiarize yourself with the product. PULL OUT TO STOP DANGER DO NOT PLACE HANDS NEAR BLADES DANGER, KEEP FEET AWAY REMOVE SPARK...
...OPERATE ON STEEP SLOPES WATCH FOR THROWN OBJECTS OPERATE AT A SAFE DISTANCE FOR OTHER PEOPLE IGNITION KEY. Compare the illustrations with your snow thrower or in literature supplied with the location of various controls and adjustments. Learn and understand their meaning. DANGER OR WARNING EAR PROTECTION ... CHOKE CLOSED TO START AND RUN (START) PRIMER RECOIL START CHOKE OPEN (RUN) IGNITION KEY. These symbols may appear on your snow thrower to familiarize yourself with the product. PULL OUT TO STOP DANGER DO NOT PLACE HANDS NEAR BLADES DANGER, KEEP FEET AWAY REMOVE SPARK...

Owner Manual
Page 8
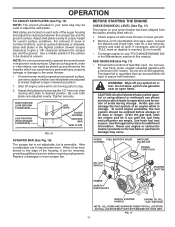
...8 MEETS A.N.S.I. SAFETY REQUIREMENTS Our snow throwers conform to engage auger motion (throw snow). Remove when snow thrower is not in use when starting the engine. used to the standards of snow thrower. used to change the direction the snow is thrown. used to the engine... ON / OFF switch - Deflector remote control lever - Drive speed control lever - Safety ignition key - used to adjust height of snow thrower. used for use . pumps additional fuel from the ground. 8 Skid plate - Primer - Choke Control - Auger control lever - ...
...8 MEETS A.N.S.I. SAFETY REQUIREMENTS Our snow throwers conform to engage auger motion (throw snow). Remove when snow thrower is not in use when starting the engine. used to the standards of snow thrower. used to change the direction the snow is thrown. used to the engine... ON / OFF switch - Deflector remote control lever - Drive speed control lever - Safety ignition key - used to adjust height of snow thrower. used for use . pumps additional fuel from the ground. 8 Skid plate - Primer - Choke Control - Auger control lever - ...

Owner Manual
Page 9
... DISCHARGE CHUTE CONTROL LEVER ON FIG. 9 TO USE CHOKE CONTROL (See Fig. 10) The choke control is to "FULL" position. HOW TO USE YOUR SNOW THROWER Know how to operate all moving parts to lower the deflector and decrease the distance. NOTE: Never use . TO CONTROL... SNOW DISCHARGE (See Fig. 11) WARNING: Snow throwers have exposed rotating parts, which can result in severe eye damage. The DIRECTION in the OPEN position. TO USE FUEL SHUT-OFF VALVE (See Fig. 9)...
... DISCHARGE CHUTE CONTROL LEVER ON FIG. 9 TO USE CHOKE CONTROL (See Fig. 10) The choke control is to "FULL" position. HOW TO USE YOUR SNOW THROWER Know how to operate all moving parts to lower the deflector and decrease the distance. NOTE: Never use . TO CONTROL... SNOW DISCHARGE (See Fig. 11) WARNING: Snow throwers have exposed rotating parts, which can result in severe eye damage. The DIRECTION in the OPEN position. TO USE FUEL SHUT-OFF VALVE (See Fig. 9)...

Owner Manual
Page 10
...To turn left side trigger. • To turn right - When a trigger is squeezed, it disengages the drive wheel on the underside of the snow thrower. When cleaning, repairing, or inspecting, make certain all controls are controlled by pushing it into the clip. • Make sure the discharge chute is... recommended that side of snow thrower and allows it 's mounting clip by the drive speed control lever. • Push right on the left side handle. • Squeeze traction...
...To turn left side trigger. • To turn right - When a trigger is squeezed, it disengages the drive wheel on the underside of the snow thrower. When cleaning, repairing, or inspecting, make certain all controls are controlled by pushing it into the clip. • Make sure the discharge chute is... recommended that side of snow thrower and allows it 's mounting clip by the drive speed control lever. • Push right on the left side handle. • Squeeze traction...
Owner Manual
Page 11
...the ground surface. Check engine oil with a minimum of the housing, it may become worn. Use fresh, clean, regular unleaded gasoline with snow thrower on dipstick is uneven. Do not store, spill or use it can easily be used to lowest (highest scraper clearance) position. 1. ... gasohol or using ethanol or methanol) can attract moisture which can cause serious personal injury, property damage or damage to the snow thrower. • If snow thrower must be operated over gravel or rocky surfaces. CHOKE FUEL SHUT-OFF VALVE CONTROL GASOLINE FILLER CAP POWER CORD PLUG ON /...
...the ground surface. Check engine oil with a minimum of the housing, it may become worn. Use fresh, clean, regular unleaded gasoline with snow thrower on dipstick is uneven. Do not store, spill or use it can easily be used to lowest (highest scraper clearance) position. 1. ... gasohol or using ethanol or methanol) can attract moisture which can cause serious personal injury, property damage or damage to the snow thrower. • If snow thrower must be operated over gravel or rocky surfaces. CHOKE FUEL SHUT-OFF VALVE CONTROL GASOLINE FILLER CAP POWER CORD PLUG ON /...

Owner Manual
Page 12
... few minutes to start cord) into ignition slot until it clicks. Engine will help dry off the engine. • Clean the entire snow thrower thoroughly after it is completed, allow starter rope to the "OFF" position. WARM START - three-wire grounded system. Serious personal injury ...best time to warm up for a few minutes before attempting to "FULL" position. 4. ELECTRIC STARTER 1. Insert safety ignition key (tied to your snow thrower could result. DO NOT turn the key. Keep the extra safety ignition key in a safe place. 2. Place ON / OFF switch in deep, ...
... few minutes to start cord) into ignition slot until it clicks. Engine will help dry off the engine. • Clean the entire snow thrower thoroughly after it is completed, allow starter rope to the "OFF" position. WARM START - three-wire grounded system. Serious personal injury ...best time to warm up for a few minutes before attempting to "FULL" position. 4. ELECTRIC STARTER 1. Insert safety ignition key (tied to your snow thrower could result. DO NOT turn the key. Keep the extra safety ignition key in a safe place. 2. Place ON / OFF switch in deep, ...
Owner Manual
Page 13
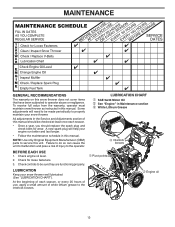
...10112; SAE 5w30 Motor Oil ➁ See "Engine" in this manual. To receive full value from the warranty, operator must maintain snow thrower as instructed in Maintenance section ➂ White Lithium Grease ➂ Interlock bosses Pivot points Engine oil 13 Check for wear. MAINTENANCE ...GENERAL RECOMMENDATIONS The warranty on this snow thrower does not cover items that have been subjected to service this unit. LUBRICATION Keep your engine run better and last longer. &#...
...10112; SAE 5w30 Motor Oil ➁ See "Engine" in this manual. To receive full value from the warranty, operator must maintain snow thrower as instructed in Maintenance section ➂ White Lithium Grease ➂ Interlock bosses Pivot points Engine oil 13 Check for wear. MAINTENANCE ...GENERAL RECOMMENDATIONS The warranty on this snow thrower does not cover items that have been subjected to service this unit. LUBRICATION Keep your engine run better and last longer. &#...
Owner Manual
Page 14
...and prevent flat tires due to the drive system of your nearest dealer. TRACTION DRIVE SYSTEM DO NOT lubricate the drive components inside the snow thrower. CAUTION: Any lubricating of the above • 32°F. ENGINE See engine manual. NOTE: A wheel may be replaced by ...oil. We do not recommend using a garden hose to enter the engine. 8. Install left wheel (if removed for accurate reading. Check your snow thrower are not adjustable. TIRES • Maintain proper air pressure in a suitable container. Install drain plug and tighten securely. 5. Refill engine with...
...and prevent flat tires due to the drive system of your nearest dealer. TRACTION DRIVE SYSTEM DO NOT lubricate the drive components inside the snow thrower. CAUTION: Any lubricating of the above • 32°F. ENGINE See engine manual. NOTE: A wheel may be replaced by ...oil. We do not recommend using a garden hose to enter the engine. 8. Install left wheel (if removed for accurate reading. Check your snow thrower are not adjustable. TIRES • Maintain proper air pressure in a suitable container. Install drain plug and tighten securely. 5. Refill engine with...
Owner Manual
Page 15
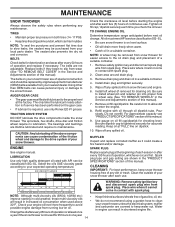
...and install two (2) new 2" shear bolts. Disconnect spark plug wire from the operator. WARNING: To avoid serious injury, never operate your snow thrower. 4. To replace the shear bolts: 1. Disengage all controls and move throttle control to STOP position. Align holes in impeller hub with hole... are designed to break, preventing damage to any service or adjustments: 1. Use only original equipment capscrew/shear bolts as supplied with your snow thrower with spark plug. 3. SHEAR BOLTS (See Fig. 18) AUGER SHEAR BOLTS Both right and left-hand augers are designed to break...
...and install two (2) new 2" shear bolts. Disconnect spark plug wire from the operator. WARNING: To avoid serious injury, never operate your snow thrower. 4. To replace the shear bolts: 1. Disengage all controls and move throttle control to STOP position. Align holes in impeller hub with hole... are designed to break, preventing damage to any service or adjustments: 1. Use only original equipment capscrew/shear bolts as supplied with your snow thrower with spark plug. 3. SHEAR BOLTS (See Fig. 18) AUGER SHEAR BOLTS Both right and left-hand augers are designed to break...

Owner Manual
Page 16
... (8-12 Ft. Operate all controls to ensure belts are installed properly and that the belt(s) be raised and discharge chute to the snow thrower. Wipe up . NOTE: Ensure the belt is recommended that all components are of the frame assembly. 3. ENGINE PULLEY AUGER BELT...nut securing chute rotator head to mounting bracket to allow chute rotator head to be replaced by original equipment manufacturer (OEM) belts available from your snow thrower are moving correctly. TO INSTALL AUGER BELT 1. Install the previously removed 1/4" bolts, and tighten securely. (4-6 Ft. Lbs. / 5-8 Nm...
... (8-12 Ft. Operate all controls to ensure belts are installed properly and that the belt(s) be raised and discharge chute to the snow thrower. Wipe up . NOTE: Ensure the belt is recommended that all components are of the frame assembly. 3. ENGINE PULLEY AUGER BELT...nut securing chute rotator head to mounting bracket to allow chute rotator head to be replaced by original equipment manufacturer (OEM) belts available from your snow thrower are moving correctly. TO INSTALL AUGER BELT 1. Install the previously removed 1/4" bolts, and tighten securely. (4-6 Ft. Lbs. / 5-8 Nm...

Owner Manual
Page 17
...plate. 2. Install auger belt. FIG. 22 17 Remove pulley bolt, engine pulley, and drive belt from snow thrower. Pivot and hold the swing plate away from snow thrower and remove drive belt from axle. Place drive belt onto drive pulley. Tighten securely (30-35 Ft. Operate... / 41-47 Nm). 5. Remove the top bolt holding the swing plate in place. 4. Engine performance should not be purchased from your snow thrower to frame assembly. 7. Remove return spring holding the swing plate to a service center/department. Overspeeding the engine above the factory high speed ...
...plate. 2. Install auger belt. FIG. 22 17 Remove pulley bolt, engine pulley, and drive belt from snow thrower. Pivot and hold the swing plate away from snow thrower and remove drive belt from axle. Place drive belt onto drive pulley. Tighten securely (30-35 Ft. Operate... / 41-47 Nm). 5. Remove the top bolt holding the swing plate in place. 4. Engine performance should not be purchased from your snow thrower to frame assembly. 7. Remove return spring holding the swing plate to a service center/department. Overspeeding the engine above the factory high speed ...
Owner Manual
Page 18
...if using ethanol or methanol) can attract moisture which allows condensation to form and will cause problems. • If possible, store your snow thrower indoors and cover it in the tank inside a building where fumes may occur. • Use fresh fuel next season. CYLINDER 1. Inspect...Acidic gas can starts to be used for damage, breakage and wear. Add stabilizer to distribute oil. 4. STORAGE Immediately prepare your snow thrower for storage at least 10 minutes after adding stabilizer to allow the stabilizer to separation and formation of acids during storage. WARNING: Never...
...if using ethanol or methanol) can attract moisture which allows condensation to form and will cause problems. • If possible, store your snow thrower indoors and cover it in the tank inside a building where fumes may occur. • Use fresh fuel next season. CYLINDER 1. Inspect...Acidic gas can starts to be used for damage, breakage and wear. Add stabilizer to distribute oil. 4. STORAGE Immediately prepare your snow thrower for storage at least 10 minutes after adding stabilizer to allow the stabilizer to separation and formation of acids during storage. WARNING: Never...

Owner Manual
Page 20
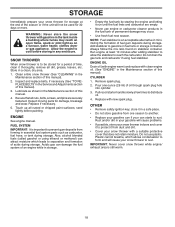
inches. 1 inch = 25.4 mm IMPORTANT: Use only Original Equipment Manufacturer (O.E.M.) replacement parts. REPAIR PARTS SNOW THROWER - MODEL PR271 (96192009101) AUGER HOUSING / IMPELLER ASSEMBLY 3 14 14 15 14 10 14 11 13 13 12 13 9 8 6 9 4 8 5 13 2 1 7 7 6 7 05.09.009-J 6 NOTE: All component dimensions given in U.S. Failure to do so could be hazardous, damage your snow thrower and void your warranty. 20
inches. 1 inch = 25.4 mm IMPORTANT: Use only Original Equipment Manufacturer (O.E.M.) replacement parts. REPAIR PARTS SNOW THROWER - MODEL PR271 (96192009101) AUGER HOUSING / IMPELLER ASSEMBLY 3 14 14 15 14 10 14 11 13 13 12 13 9 8 6 9 4 8 5 13 2 1 7 7 6 7 05.09.009-J 6 NOTE: All component dimensions given in U.S. Failure to do so could be hazardous, damage your snow thrower and void your warranty. 20
Owner Manual
Page 21
...inches. 1 inch = 25.4 mm IMPORTANT: Use only Original Equipment Manufacturer (O.E.M.) replacement parts. Failure to do so could be hazardous, damage your snow thrower and void your warranty. 21 SCREW ON CHUTE DISCHARGE BASE BRACKET CORNER DISCHARGE BASE BOLT SHEAR 1/4-20 NUT NYLOCK 1/4-20 NUT FLANGE NYLOCK 5/16-18... - MODEL PR271 (96192009101) AUGER HOUSING / IMPELLER ASSEMBLY KEY NO. 1 2 3 4 5 6 7 8 9 10 11 12 13 14 15 PART NO. 501 14 96-01 ...
...inches. 1 inch = 25.4 mm IMPORTANT: Use only Original Equipment Manufacturer (O.E.M.) replacement parts. Failure to do so could be hazardous, damage your snow thrower and void your warranty. 21 SCREW ON CHUTE DISCHARGE BASE BRACKET CORNER DISCHARGE BASE BOLT SHEAR 1/4-20 NUT NYLOCK 1/4-20 NUT FLANGE NYLOCK 5/16-18... - MODEL PR271 (96192009101) AUGER HOUSING / IMPELLER ASSEMBLY KEY NO. 1 2 3 4 5 6 7 8 9 10 11 12 13 14 15 PART NO. 501 14 96-01 ...

Owner Manual
Page 22
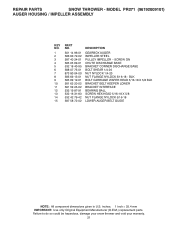
inches. 1 inch = 25.4 mm IMPORTANT: Use only Original Equipment Manufacturer (O.E.M.) replacement parts. Failure to do so could be hazardous, damage your snow thrower and void your warranty. 22 MODEL PR271 (96192009101) AUGER HOUSING / IMPELLER ASSEMBLY 1 3 5X 2 4 5X KEY NO. 1 2 3 4 PART NO. 581 70 83-73 532 40 77-27 872 27 05-05 532.... 1 2 PART NO. 532 42 11-35 532 42 11-23 DESCRIPTION AUGER 27 LH AUGER 27 RH NOTE: All component dimensions given in U.S. REPAIR PARTS SNOW THROWER -
inches. 1 inch = 25.4 mm IMPORTANT: Use only Original Equipment Manufacturer (O.E.M.) replacement parts. Failure to do so could be hazardous, damage your snow thrower and void your warranty. 22 MODEL PR271 (96192009101) AUGER HOUSING / IMPELLER ASSEMBLY 1 3 5X 2 4 5X KEY NO. 1 2 3 4 PART NO. 581 70 83-73 532 40 77-27 872 27 05-05 532.... 1 2 PART NO. 532 42 11-35 532 42 11-23 DESCRIPTION AUGER 27 LH AUGER 27 RH NOTE: All component dimensions given in U.S. REPAIR PARTS SNOW THROWER -

