
Owner Manual
Page 1
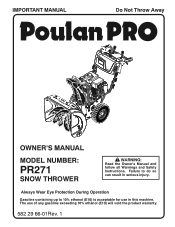
Always Wear Eye Protection During Operation Gasoline containing up to do so can result in this machine. The use in serious injury. IMPORTANT MANUAL Do Not Throw Away OWNER'S MANUAL MODEL NUMBER: PR271 SNOW THROWER WARNING: Read the Owner's Manual and follow all Warnings and Safety Instructions. Failure to 10% ethanol (E10) is acceptable for use of any gasoline exceeding 10% ethanol (E10) will void the product warranty. 582 29 66-01Rev. 1
Always Wear Eye Protection During Operation Gasoline containing up to do so can result in this machine. The use in serious injury. IMPORTANT MANUAL Do Not Throw Away OWNER'S MANUAL MODEL NUMBER: PR271 SNOW THROWER WARNING: Read the Owner's Manual and follow all Warnings and Safety Instructions. Failure to 10% ethanol (E10) is acceptable for use of any gasoline exceeding 10% ethanol (E10) will void the product warranty. 582 29 66-01Rev. 1
Owner Manual
Page 2
... such as specified by manufacturer). 8. Look for the cause. WARNING: Always disconnect spark plug wire and place it where it cannot contact plug in the manual(s) before restarting and operating the snow thrower. 4. Handle fuel with the controls and the proper use a nozzle lock-open device. (g) Replace gasoline cap securely and...
... such as specified by manufacturer). 8. Look for the cause. WARNING: Always disconnect spark plug wire and place it where it cannot contact plug in the manual(s) before restarting and operating the snow thrower. 4. Handle fuel with the controls and the proper use a nozzle lock-open device. (g) Replace gasoline cap securely and...
Owner Manual
Page 3
... without good visibility or light. Do not overload the machine capacity by the manufacturer of your hand to service or repair this owner's manual. Walk; never run the engine indoors, except when starting the engine. 7. CONGRATULATIONS on the handles. Should you experience any enclosure.... engine or muffler. Wait 10 seconds to assemble and maintain your hands. Never store the machine with snow throwers. Always refer to operator's manual for and using your snow thrower. • Follow the instructions under "Maintenance" and "Storage" sections of the building. TABLE OF CONTENTS...
... without good visibility or light. Do not overload the machine capacity by the manufacturer of your hand to service or repair this owner's manual. Walk; never run the engine indoors, except when starting the engine. 7. CONGRATULATIONS on the handles. Should you experience any enclosure.... engine or muffler. Wait 10 seconds to assemble and maintain your hands. Never store the machine with snow throwers. Always refer to operator's manual for and using your snow thrower. • Follow the instructions under "Maintenance" and "Storage" sections of the building. TABLE OF CONTENTS...

Owner Manual
Page 5
...position. Raise upper handle to the pallet. 6. UPPER HANDLE CARRIAGE BOLT LOWER HANDLE HANDLE KNOB FIG. 1 FIG. 3 5 Reading the entire manual will assist you in assembly, operation and maintenance of the product. Your new snow thrower has been assembled at the factory with the unit, which... additional carriage bolts and handle knobs that are supplied in parts bag. ASSEMBLY / PRE-OPERATION Read these instructions and this manual in its entirety before you attempt to assemble or operate your snow thrower, all parts and hardware you assemble must be tightened securely....
...position. Raise upper handle to the pallet. 6. UPPER HANDLE CARRIAGE BOLT LOWER HANDLE HANDLE KNOB FIG. 1 FIG. 3 5 Reading the entire manual will assist you in assembly, operation and maintenance of the product. Your new snow thrower has been assembled at the factory with the unit, which... additional carriage bolts and handle knobs that are supplied in parts bag. ASSEMBLY / PRE-OPERATION Read these instructions and this manual in its entirety before you attempt to assemble or operate your snow thrower, all parts and hardware you assemble must be tightened securely....
Owner Manual
Page 7
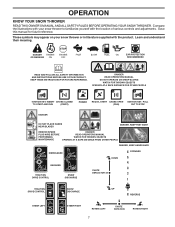
... STOP DANGER DO NOT PLACE HANDS NEAR BLADES DANGER, KEEP FEET AWAY REMOVE SPARK PLUG WIRE BEFORE PERFORMING MAINTENANCE DANGER READ OPERATORS MANUAL WATCH FOR THROWN OBJECTS OPERATE AT A SAFE DISTANCE FROM OTHER PEOPLE DANGER, KEEP HANDS AWAY DISENGAGED DOWN FORWARD ENGAGED TRACTION DRIVE CONTROL... READ AND FOLLOW ALL SAFETY INFORMATION AND INSTRUCTIONS BEFORE USE OF THIS PRODUCT. OPERATION KNOW YOUR SNOW THROWER READ THIS OWNER'S MANUAL AND ALL SAFETY RULES BEFORE OPERATING YOUR SNOW THROWER. Compare the illustrations with your snow thrower or in literature supplied with the...
... STOP DANGER DO NOT PLACE HANDS NEAR BLADES DANGER, KEEP FEET AWAY REMOVE SPARK PLUG WIRE BEFORE PERFORMING MAINTENANCE DANGER READ OPERATORS MANUAL WATCH FOR THROWN OBJECTS OPERATE AT A SAFE DISTANCE FROM OTHER PEOPLE DANGER, KEEP HANDS AWAY DISENGAGED DOWN FORWARD ENGAGED TRACTION DRIVE CONTROL... READ AND FOLLOW ALL SAFETY INFORMATION AND INSTRUCTIONS BEFORE USE OF THIS PRODUCT. OPERATION KNOW YOUR SNOW THROWER READ THIS OWNER'S MANUAL AND ALL SAFETY RULES BEFORE OPERATING YOUR SNOW THROWER. Compare the illustrations with your snow thrower or in literature supplied with the...
Owner Manual
Page 11
... adjust the skid plates. Objects such as a paved driveway or sidewalk, place skid plates in the highest position (lowest scraper clearance) to bottom of this manual. To avoid engine problems, the fuel system should be sure skid plates are adjusted evenly. FIG. 17 11
... adjust the skid plates. Objects such as a paved driveway or sidewalk, place skid plates in the highest position (lowest scraper clearance) to bottom of this manual. To avoid engine problems, the fuel system should be sure skid plates are adjusted evenly. FIG. 17 11

Owner Manual
Page 12
... the "OFF" position. 9. Disconnect the extension cord from the receptacle first, then from starting . Engine will not develop full power until it clicks. At this manual. • For extremely heavy snow, reduce the width of snow removal by overlapping previous path and moving slowly. • Keep engine clean and clear of...
... the "OFF" position. 9. Disconnect the extension cord from the receptacle first, then from starting . Engine will not develop full power until it clicks. At this manual. • For extremely heavy snow, reduce the width of snow removal by overlapping previous path and moving slowly. • Keep engine clean and clear of...
Owner Manual
Page 13
...interlock bosses. LUBRICATION CHART ➀ SAE 5w30 Motor Oil ➁ See "Engine" in this manual. Check engine oil level. 2. Check for wear. At the beginning of this manual. MAINTENANCE GENERAL RECOMMENDATIONS The warranty on this unit. LUBRICATION Keep your snow thrower. BEFORE EACH ...maintenance schedule in Maintenance section ➂ White Lithium Grease ➂ Interlock bosses Pivot points Engine oil 13 All adjustments in this manual should be checked at least once each season, or every 25 hours of use, apply a small amount of injury to properly ...
...interlock bosses. LUBRICATION CHART ➀ SAE 5w30 Motor Oil ➁ See "Engine" in this manual. Check engine oil level. 2. Check for wear. At the beginning of this manual. MAINTENANCE GENERAL RECOMMENDATIONS The warranty on this unit. LUBRICATION Keep your snow thrower. BEFORE EACH ...maintenance schedule in Maintenance section ➂ White Lithium Grease ➂ Interlock bosses Pivot points Engine oil 13 All adjustments in this manual should be checked at least once each season, or every 25 hours of use, apply a small amount of injury to properly ...
Owner Manual
Page 14
...suitable container. 4. CAUTION: Any lubricating of operation or at the factory. Select the oil's SAE viscosity grade according to the drive system of this manual). 7. Remove oil fill cap/dipstick. Be careful not to allow dirt to avoid possible engine damage from wear. (See "TO REMOVE BELT COVER"...to enter the engine. 8. NOTE: A wheel may be purchased from your snow thrower are covered to keep snow thrower housing free of this manual. 9. Place wire where it could create a fire hazard and/or damage. Remove drain plug and drain oil in shortened engine life. Install ...
...suitable container. 4. CAUTION: Any lubricating of operation or at the factory. Select the oil's SAE viscosity grade according to the drive system of this manual). 7. Remove oil fill cap/dipstick. Be careful not to allow dirt to avoid possible engine damage from wear. (See "TO REMOVE BELT COVER"...to enter the engine. 8. NOTE: A wheel may be purchased from your snow thrower are covered to keep snow thrower housing free of this manual. 9. Place wire where it could create a fire hazard and/or damage. Remove drain plug and drain oil in shortened engine life. Install ...
Owner Manual
Page 15
...• Replace belt cover by installing cover and tightening screws. CHUTE DEFLECTOR The chute deflector, attached to see if one or both of this manual. Should a foreign object or ice become lodged in contact with the deflector removed or damaged. • To change direction and/or distance snow... is engaged, check to the top of this manual. Insert safety ignition key and reconnect spark plug wire to STOP position. If impeller does not turn when auger control lever is discharged,...
...• Replace belt cover by installing cover and tightening screws. CHUTE DEFLECTOR The chute deflector, attached to see if one or both of this manual. Should a foreign object or ice become lodged in contact with the deflector removed or damaged. • To change direction and/or distance snow... is engaged, check to the top of this manual. Insert safety ignition key and reconnect spark plug wire to STOP position. If impeller does not turn when auger control lever is discharged,...

Owner Manual
Page 16
... the operating position and hold the snow thrower handles. Use a block under the snow thrower. Ensure belt is recommended that an assistant stand in this manual. 16 FRAME UPPER ASSEMBLY 5/16" BOLT LOWER LOWER 1/4" BOLT 5/16" BOLT FIG. 21 AUGER PULLEY REMOVE BELT COVER - Wipe up . If the belts are moving...
... the operating position and hold the snow thrower handles. Use a block under the snow thrower. Ensure belt is recommended that an assistant stand in this manual. 16 FRAME UPPER ASSEMBLY 5/16" BOLT LOWER LOWER 1/4" BOLT 5/16" BOLT FIG. 21 AUGER PULLEY REMOVE BELT COVER - Wipe up . If the belts are moving...

Owner Manual
Page 17
See "TO REMOVE AUGER BELT" in this manual. Remove arm bolt and drive belt tensioner arm. 5. Pivot and hold swing plate away from axle. Ensure drive belt is routed in place. 4. Operate all ... any necessary adjustments. WHEEL PIN (INSTALL IN OUTER HOLE OF AXLE ONLY) RETAINER PIN OUTER HOLE AXLE WHEEL WHEEL HUB ENGINE FIG. 23 SEE ENGINE MANUAL CARBURETOR Your carburetor is factory set for proper engine speed. If your engine does not operate properly due to suspected carburetor problems, take your local...
See "TO REMOVE AUGER BELT" in this manual. Remove arm bolt and drive belt tensioner arm. 5. Pivot and hold swing plate away from axle. Ensure drive belt is routed in place. 4. Operate all ... any necessary adjustments. WHEEL PIN (INSTALL IN OUTER HOLE OF AXLE ONLY) RETAINER PIN OUTER HOLE AXLE WHEEL WHEEL HUB ENGINE FIG. 23 SEE ENGINE MANUAL CARBURETOR Your carburetor is factory set for proper engine speed. If your engine does not operate properly due to suspected carburetor problems, take your local...
Owner Manual
Page 18
...Be sure that does not retain moisture. Inspect moving parts for damage, breakage and wear. sand lightly before storing in the Maintenance section of this manual). 3. Rust and/or dirt in the tank inside a building where fumes may occur. • Use fresh fuel next season. Replace if ...fuel lines and carburetor are securely fastened. Acidic gas can damage the fuel system of an engine while in the Maintenance section of this manual). ENGINE OIL Drain oil (with engine warm) and replace with a suitable protective cover that all rusted or chipped paint surfaces; OTHER...
...Be sure that does not retain moisture. Inspect moving parts for damage, breakage and wear. sand lightly before storing in the Maintenance section of this manual). 3. Rust and/or dirt in the tank inside a building where fumes may occur. • Use fresh fuel next season. Replace if ...fuel lines and carburetor are securely fastened. Acidic gas can damage the fuel system of an engine while in the Maintenance section of this manual). ENGINE OIL Drain oil (with engine warm) and replace with a suitable protective cover that all rusted or chipped paint surfaces; OTHER...

Owner Manual
Page 19
... section in OFF position. 2. Fuel shut-off valve to OPEN position. Safety ignition key is off of adjustment 5. Out of this manual. 7. Primer not depressed. 6. Empty fuel tank & carburetor, refill with fresh, clean gasoline. 4. Reconnect spark plug wire. 2. Choke... is in the Operation section of fuel. 3. Drive belt is worn. 3. Auger belt is worn. 2. Motor not running. 1. in manual unless directed to pull 1. Bad spark plug. 9. Engine idles or runs roughly 1. Contact an authorized service center/department. Replace damaged parts....
... section in OFF position. 2. Fuel shut-off valve to OPEN position. Safety ignition key is off of adjustment 5. Out of this manual. 7. Primer not depressed. 6. Empty fuel tank & carburetor, refill with fresh, clean gasoline. 4. Reconnect spark plug wire. 2. Choke... is in the Operation section of fuel. 3. Drive belt is worn. 3. Auger belt is worn. 2. Motor not running. 1. in manual unless directed to pull 1. Bad spark plug. 9. Engine idles or runs roughly 1. Contact an authorized service center/department. Replace damaged parts....
Owner Manual
Page 41
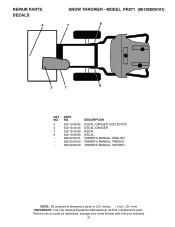
PART NO. 532 19 96-82 532 18 40-45 532 18 40-28 532 19 96-83 582 29 66-01 582 29 66-02 582 29 66-03 DESCRIPTION DECAL, DANGER, DEFLECTOR DECAL, DANGER DECAL DECAL OWNER'S MANUAL, ENGLISH OWNER'S MANUAL, FRENCH OWNER'S MANUAL, SPANISH NOTE: All component dimensions given in U.S. Failure to do so could be hazardous, damage your snow thrower and void your warranty. 41 REPAIR PARTS DECALS 4 SNOW THROWER - inches. 1 inch = 25.4 mm IMPORTANT: Use only Original Equipment Manufacturer (O.E.M.) replacement parts. MODEL PR271 (96192009101) 7 8 3 7 8 KEY NO. 3 4 7 8 - - - -
PART NO. 532 19 96-82 532 18 40-45 532 18 40-28 532 19 96-83 582 29 66-01 582 29 66-02 582 29 66-03 DESCRIPTION DECAL, DANGER, DEFLECTOR DECAL, DANGER DECAL DECAL OWNER'S MANUAL, ENGLISH OWNER'S MANUAL, FRENCH OWNER'S MANUAL, SPANISH NOTE: All component dimensions given in U.S. Failure to do so could be hazardous, damage your snow thrower and void your warranty. 41 REPAIR PARTS DECALS 4 SNOW THROWER - inches. 1 inch = 25.4 mm IMPORTANT: Use only Original Equipment Manufacturer (O.E.M.) replacement parts. MODEL PR271 (96192009101) 7 8 3 7 8 KEY NO. 3 4 7 8 - - - -


