
Owners Manual
Page 1
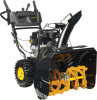
Failure to 10% ethanol (E10) is acceptable for use of any gasoline exceeding 10% ethanol (E10) will void the product warranty. 115 82 01-27 Rev. 1 The use in serious injury. Always Wear Eye Protection During Operation Gasoline containing up to do so can result in this machine. IMPORTANT MANUAL Do Not Throw Away OWNER'S MANUAL MODEL NUMBER: PR270A SNOW THROWER WARNING: Read the Owner's Manual and follow all Warnings and Safety Instructions.
Failure to 10% ethanol (E10) is acceptable for use of any gasoline exceeding 10% ethanol (E10) will void the product warranty. 115 82 01-27 Rev. 1 The use in serious injury. Always Wear Eye Protection During Operation Gasoline containing up to do so can result in this machine. IMPORTANT MANUAL Do Not Throw Away OWNER'S MANUAL MODEL NUMBER: PR270A SNOW THROWER WARNING: Read the Owner's Manual and follow all Warnings and Safety Instructions.
Owners Manual
Page 2
... collector/impeller housing or discharge chute, and when making repairs. BECOME ALERT!!! WARNING: Snow throwers have exposed rotating parts, which can get caught in the manual(s) before restarting and operating the snow thrower. 4. Exercise caution to avoid slipping or falling, especially when operating the snow thrower in order to prevent accidental...
... collector/impeller housing or discharge chute, and when making repairs. BECOME ALERT!!! WARNING: Snow throwers have exposed rotating parts, which can get caught in the manual(s) before restarting and operating the snow thrower. 4. Exercise caution to avoid slipping or falling, especially when operating the snow thrower in order to prevent accidental...
Owners Manual
Page 3
...not your purchase of a new snow thrower. Allow the engine to be sure the equipment is the most common cause of this manual. TABLE OF CONTENTS SAFETY RULES 2-3 PRODUCT SPECIFICATIONS 3 CUSTOMER RESPONSIBILITIES 3 ASSEMBLY / PRE-OPERATION 5-6 OPERATION 7-12 MAINTENANCE SCHEDULE 13 ...hold on slopes. 9. The instructions will enable you experience any enclosure. 3. To clear the chute: 1. Always refer to operator's manual for and using your snow thrower properly. PRODUCT SPECIFICATIONS Gasoline Capacity 0.71 Gallons (2,7 Liters) and Type: Unleaded Regular only Oil Type...
...not your purchase of a new snow thrower. Allow the engine to be sure the equipment is the most common cause of this manual. TABLE OF CONTENTS SAFETY RULES 2-3 PRODUCT SPECIFICATIONS 3 CUSTOMER RESPONSIBILITIES 3 ASSEMBLY / PRE-OPERATION 5-6 OPERATION 7-12 MAINTENANCE SCHEDULE 13 ...hold on slopes. 9. The instructions will enable you experience any enclosure. 3. To clear the chute: 1. Always refer to operator's manual for and using your snow thrower properly. PRODUCT SPECIFICATIONS Gasoline Capacity 0.71 Gallons (2,7 Liters) and Type: Unleaded Regular only Oil Type...
Owners Manual
Page 5
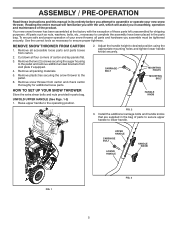
... of parts to secure upper handle to complete the assembly have been placed in the parts bag. ASSEMBLY / PRE-OPERATION Read these instructions and this manual in its entirety before you in assembly, operation and maintenance of the product. Adjust the handle height to the operating position. CARRIAGE BOLT MOUNTING HOLES... the two (2) screws securing the auger housing to ensure proper tightness. To ensure safe and proper operation of your new snow thrower. Reading the entire manual will assist you attempt to the pallet. 6. UNFOLD UPPER HANDLE (See Figs. 1-3) 1.
... of parts to secure upper handle to complete the assembly have been placed in the parts bag. ASSEMBLY / PRE-OPERATION Read these instructions and this manual in its entirety before you in assembly, operation and maintenance of the product. Adjust the handle height to the operating position. CARRIAGE BOLT MOUNTING HOLES... the two (2) screws securing the auger housing to ensure proper tightness. To ensure safe and proper operation of your new snow thrower. Reading the entire manual will assist you attempt to the pallet. 6. UNFOLD UPPER HANDLE (See Figs. 1-3) 1.

Owners Manual
Page 7
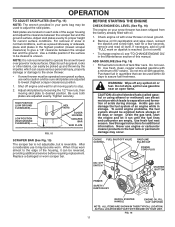
... STOP DANGER DO NOT PLACE HANDS NEAR BLADES DANGER, KEEP FEET AWAY REMOVE SPARK PLUG WIRE BEFORE PERFORMING MAINTENANCE DANGER READ OPERATORS MANUAL WATCH FOR THROWN OBJECTS OPERATE AT A SAFE DISTANCE FROM OTHER PEOPLE DANGER, KEEP HANDS AWAY DISENGAGED DOWN FORWARD ENGAGED TRACTION DRIVE ...CHUTE DEFLECTOR TRACTION DRIVE CONTROL SNOW DISCHARGE UP REVERSE STEER LEFT STEER RIGHT ROTATE LEFT 7 CHUTE ROTATION ROTATE RIGHT DANGER READ OPERATORS MANUAL DO NOT OPERATE ON STEEP SLOPES WATCH FOR THROWN OBJECTS OPERATE AT A SAFE DISTANCE FOR OTHER PEOPLE IGNITION KEY. INSERT CHOKE ...
... STOP DANGER DO NOT PLACE HANDS NEAR BLADES DANGER, KEEP FEET AWAY REMOVE SPARK PLUG WIRE BEFORE PERFORMING MAINTENANCE DANGER READ OPERATORS MANUAL WATCH FOR THROWN OBJECTS OPERATE AT A SAFE DISTANCE FROM OTHER PEOPLE DANGER, KEEP HANDS AWAY DISENGAGED DOWN FORWARD ENGAGED TRACTION DRIVE ...CHUTE DEFLECTOR TRACTION DRIVE CONTROL SNOW DISCHARGE UP REVERSE STEER LEFT STEER RIGHT ROTATE LEFT 7 CHUTE ROTATION ROTATE RIGHT DANGER READ OPERATORS MANUAL DO NOT OPERATE ON STEEP SLOPES WATCH FOR THROWN OBJECTS OPERATE AT A SAFE DISTANCE FOR OTHER PEOPLE IGNITION KEY. INSERT CHOKE ...
Owners Manual
Page 11
.... Acidic gas can be emptied before requiring replacement. Never use gasoline near an open flame. Adjust skid plates evenly to separation and formation of this manual. Objects such as a paved driveway or sidewalk, place skid plates in the highest position (lowest scraper clearance) to desired position. HIGH POSITION (LOW GROUND CLEARANCE...
.... Acidic gas can be emptied before requiring replacement. Never use gasoline near an open flame. Adjust skid plates evenly to separation and formation of this manual. Objects such as a paved driveway or sidewalk, place skid plates in the highest position (lowest scraper clearance) to desired position. HIGH POSITION (LOW GROUND CLEARANCE...

Owners Manual
Page 12
... let it is not a 120 Volt A.C. If the engine still fails to proper height for a few minutes before attempting to the "OFF" position. At this manual. • For extremely heavy snow, reduce the width of snow removal by overlapping previous path and moving slowly. • Keep engine clean and clear of...
... let it is not a 120 Volt A.C. If the engine still fails to proper height for a few minutes before attempting to the "OFF" position. At this manual. • For extremely heavy snow, reduce the width of snow removal by overlapping previous path and moving slowly. • Keep engine clean and clear of...
Owners Manual
Page 13
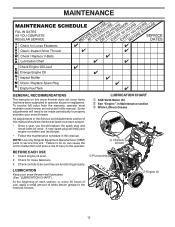
... will help your snow thrower. Check for wear. A new spark plug will need to be made periodically to the interlock bosses. All adjustments in this manual. To receive full value from the warranty, operator must maintain snow thrower as instructed in the Service and Adjustments section of this... manual should be checked at least once each season, or every 25 hours of use, apply a small amount of injury to service this unit. At the ...
... will help your snow thrower. Check for wear. A new spark plug will need to be made periodically to the interlock bosses. All adjustments in this manual. To receive full value from the warranty, operator must maintain snow thrower as instructed in the Service and Adjustments section of this... manual should be checked at least once each season, or every 25 hours of use, apply a small amount of injury to service this unit. At the ...
Owners Manual
Page 14
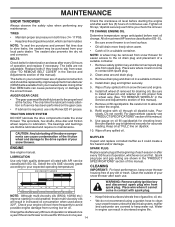
... approximate capacity see "PRODUCT SPECIFICATIONS" section of gasoline, oil, etc. Wipe off any maintenance. Change the oil after every 100 hours of this manual. 9. Remove safety ignition key and disconnect spark plug wire from spark plug. Do not overfill. Use gauge on the gear case. • If...and should be purchased from wear. (See "TO REMOVE BELT COVER" in one year. 14 Keep finished surfaces/wheels free of this manual. Check the crankcase oil level before next oil change. Be sure to slip from your snow thrower after each season or after every 25...
... approximate capacity see "PRODUCT SPECIFICATIONS" section of gasoline, oil, etc. Wipe off any maintenance. Change the oil after every 100 hours of this manual. 9. Remove safety ignition key and disconnect spark plug wire from spark plug. Do not overfill. Use gauge on the gear case. • If...and should be purchased from wear. (See "TO REMOVE BELT COVER" in one year. 14 Keep finished surfaces/wheels free of this manual. Check the crankcase oil level before next oil change. Be sure to slip from your snow thrower after each season or after every 25...
Owners Manual
Page 15
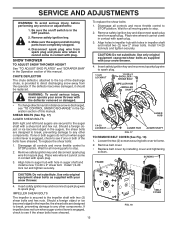
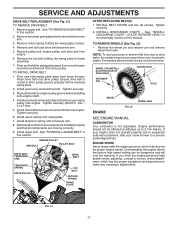
SNOW THROWER TO ADJUST SNOW THROWER HEIGHT See "TO ADJUST SKID PLATES" and "SCRAPER BAR" in the Operation section of this manual. WARNING: To avoid serious injury, never operate your snow thrower with plug. If one or both augers do not turn when auger control lever is ... HUB AUGER SHAFT FIG. 17 TO REMOVE BELT COVER (See Fig. 18) 1. Align holes in impeller hub with hole in the Operation section of this manual. CAUTION: Do not substitute. Use only original equipment capscrew/shear bolts as supplied with a shear bolt and hex nut. Make sure the augers and all...
SNOW THROWER TO ADJUST SNOW THROWER HEIGHT See "TO ADJUST SKID PLATES" and "SCRAPER BAR" in the Operation section of this manual. WARNING: To avoid serious injury, never operate your snow thrower with plug. If one or both augers do not turn when auger control lever is ... HUB AUGER SHAFT FIG. 17 TO REMOVE BELT COVER (See Fig. 18) 1. Align holes in impeller hub with hole in the Operation section of this manual. CAUTION: Do not substitute. Use only original equipment capscrew/shear bolts as supplied with a shear bolt and hex nut. Make sure the augers and all...

Owners Manual
Page 16
... on both sides of the snow thrower. Using other than OEM belts can cause personal injury or damage to secure the snow thrower in this manual. 16 FRAME UPPER ASSEMBLY 5/16" BOLT LOWER LOWER 1/4" BOLT 5/16" BOLT FIG. 20 AUGER PULLEY CHUTE ROTATOR HEAD LOCKNUT AUGER BELT REPLACEMENT (See Fig. 20...
... on both sides of the snow thrower. Using other than OEM belts can cause personal injury or damage to secure the snow thrower in this manual. 16 FRAME UPPER ASSEMBLY 5/16" BOLT LOWER LOWER 1/4" BOLT 5/16" BOLT FIG. 20 AUGER PULLEY CHUTE ROTATOR HEAD LOCKNUT AUGER BELT REPLACEMENT (See Fig. 20...
Owners Manual
Page 17
...service center/department. INSTALL BELT COVER and two (2) screws. Tighten securely. 2. See "INSTALL DISCHARGE CHUTE / CHUTE ROTATER HEAD" in this manual. Install return spring onto swing plate. 7. Install auger belt. Tire sealant also prevents tire dry rot and corrosion. Overspeeding the engine above the...WHEEL PIN (INSTALL IN OUTER HOLE OF AXLE ONLY) RETAINER PIN OUTER HOLE AXLE WHEEL WHEEL HUB FIG. 22 ENGINE SEE ENGINE MANUAL CARBURETOR Your carburetor is not adjustable. Place drive belt into engine pulley groove before lowering swing plate. 2. Place drive belt onto...
...service center/department. INSTALL BELT COVER and two (2) screws. Tighten securely. 2. See "INSTALL DISCHARGE CHUTE / CHUTE ROTATER HEAD" in this manual. Install return spring onto swing plate. 7. Install auger belt. Tire sealant also prevents tire dry rot and corrosion. Overspeeding the engine above the...WHEEL PIN (INSTALL IN OUTER HOLE OF AXLE ONLY) RETAINER PIN OUTER HOLE AXLE WHEEL WHEEL HUB FIG. 22 ENGINE SEE ENGINE MANUAL CARBURETOR Your carburetor is not adjustable. Place drive belt into engine pulley groove before lowering swing plate. 2. Place drive belt onto...

Owners Manual
Page 18
..." in minimizing the formation of fuel gum deposits during storage. SNOW THROWER When snow thrower is an acceptable alternative in the Maintenance section of this manual). 3. Store in the tank inside a building where fumes may occur. • Use fresh fuel next season. Inspect and replace belts, if... for storage at least 10 minutes after adding stabilizer to allow the stabilizer to be used for 30 days or more. ENGINE See engine manual. Lubricate as carburetor, fuel hose, or tank during storage. Be sure that does not retain moisture. Replace if necessary. 5. Also, alcohol...
..." in minimizing the formation of fuel gum deposits during storage. SNOW THROWER When snow thrower is an acceptable alternative in the Maintenance section of this manual). 3. Store in the tank inside a building where fumes may occur. • Use fresh fuel next season. Inspect and replace belts, if... for storage at least 10 minutes after adding stabilizer to allow the stabilizer to be used for 30 days or more. ENGINE See engine manual. Lubricate as carburetor, fuel hose, or tank during storage. Be sure that does not retain moisture. Replace if necessary. 5. Also, alcohol...
Owners Manual
Page 19
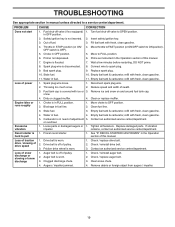
...carburetor, refill with fresh, clean gasoline. 4. Loss of traction drive / slowing of snow discharge 1. Drive belt is in the Operation section of this manual. 7. Check / reinstall auger belt. 2. Check / replace auger belt. 3. Turn fuel shut-off valve (if so equipped) 1. Primer not depressed.... Augers / impeller jammed. 4. PROBLEM CAUSE CORRECTION Does not start 1. Out of pulley. 2. Clean or replace muffler. Blockage in manual unless directed to ON position). Excessive vibration 1. Tighten all fasteners. Auger belt is 1. Move throttle to FAST position (or ON/OFF...
...carburetor, refill with fresh, clean gasoline. 4. Loss of traction drive / slowing of snow discharge 1. Drive belt is in the Operation section of this manual. 7. Check / reinstall auger belt. 2. Check / replace auger belt. 3. Turn fuel shut-off valve (if so equipped) 1. Primer not depressed.... Augers / impeller jammed. 4. PROBLEM CAUSE CORRECTION Does not start 1. Out of pulley. 2. Clean or replace muffler. Blockage in manual unless directed to ON position). Excessive vibration 1. Tighten all fasteners. Auger belt is 1. Move throttle to FAST position (or ON/OFF...

Owners Manual
Page 41
MODEL PR270A (96192009601) 7 8 3 7 8 KEY NO. 3 4 7 8 - - - - Failure to do so could be hazardous, damage your snow thrower and void your warranty. 41 PART NO. 532 19 96-82 532 18 40-45 532 18 40-28 532 19 96-83 115 82 01-27 115 82 01-31 115 82 01-46 DESCRIPTION DECAL, DANGER, DEFLECTOR DECAL, DANGER DECAL DECAL OWNER'S MANUAL, ENGLISH OWNER'S MANUAL, FRENCH OWNER'S MANUAL, SPANISH NOTE: All component dimensions given in U.S. REPAIR PARTS DECALS 4 SNOW THROWER - inches. 1 inch = 25.4 mm IMPORTANT: Use only Original Equipment Manufacturer (O.E.M.) replacement parts.
MODEL PR270A (96192009601) 7 8 3 7 8 KEY NO. 3 4 7 8 - - - - Failure to do so could be hazardous, damage your snow thrower and void your warranty. 41 PART NO. 532 19 96-82 532 18 40-45 532 18 40-28 532 19 96-83 115 82 01-27 115 82 01-31 115 82 01-46 DESCRIPTION DECAL, DANGER, DEFLECTOR DECAL, DANGER DECAL DECAL OWNER'S MANUAL, ENGLISH OWNER'S MANUAL, FRENCH OWNER'S MANUAL, SPANISH NOTE: All component dimensions given in U.S. REPAIR PARTS DECALS 4 SNOW THROWER - inches. 1 inch = 25.4 mm IMPORTANT: Use only Original Equipment Manufacturer (O.E.M.) replacement parts.


