
User Manual
Page 2
...turn off blades, set parking brake, stop or shift while on the slope. • Follow the manufacturer's recommendations for Ride-On Mowers IMPORTANT: THIS CUTTING MACHINE IS CAPABLE OF AMPUTATING HANDS AND FEET AND THROWING OBJECTS. III. Never assume that operators, age 60 years ... machine if anyone . All slopes require extra caution. Do not make adjustments or repairs with manufacturer's recommended parts, when necessary. • Mower blades are subject to wear, damage, and deterioration, which can result in place. • Slow down for traffic when operating near drop-...
...turn off blades, set parking brake, stop or shift while on the slope. • Follow the manufacturer's recommendations for Ride-On Mowers IMPORTANT: THIS CUTTING MACHINE IS CAPABLE OF AMPUTATING HANDS AND FEET AND THROWING OBJECTS. III. Never assume that operators, age 60 years ... machine if anyone . All slopes require extra caution. Do not make adjustments or repairs with manufacturer's recommended parts, when necessary. • Mower blades are subject to wear, damage, and deterioration, which can result in place. • Slow down for traffic when operating near drop-...

User Manual
Page 3
... known to the State of the tractor. Uneven terrain could overturn the machine. Wash hands after handling. 3 SAFETY RULES Safe Operation Practices for Ride-On Mowers • Be sure the area is dangerous.
... known to the State of the tractor. Uneven terrain could overturn the machine. Wash hands after handling. 3 SAFETY RULES Safe Operation Practices for Ride-On Mowers • Be sure the area is dangerous.
User Manual
Page 8
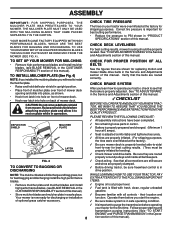
...familiar with fresh, clean, regular unleaded CUSTOMER RESPONSABILITY section of this manual). Be sure brake system is in safe operating condition. ! YOUR MOWER CAME FACTORY EQUIPPED WITH HIGH PERFORMANCE BLADES, WHICH ARE THE BEST BLADES FOR BAGGING AND DISCHARGING. TO INSTALL MULCHER PLATE (See Fig. 4).... • Reduce tire pressure to rest on plate while in the Service and Adjustments section of this manual. TO SET UP YOUR MOWER FOR MULCHING • Remove high performance blades and install mulcher blades, (see that are properly inflated. (For shipping purposes, the tires...
...familiar with fresh, clean, regular unleaded CUSTOMER RESPONSABILITY section of this manual). Be sure brake system is in safe operating condition. ! YOUR MOWER CAME FACTORY EQUIPPED WITH HIGH PERFORMANCE BLADES, WHICH ARE THE BEST BLADES FOR BAGGING AND DISCHARGING. TO INSTALL MULCHER PLATE (See Fig. 4).... • Reduce tire pressure to rest on plate while in the Service and Adjustments section of this manual. TO SET UP YOUR MOWER FOR MULCHING • Remove high performance blades and install mulcher blades, (see that are properly inflated. (For shipping purposes, the tires...

User Manual
Page 9
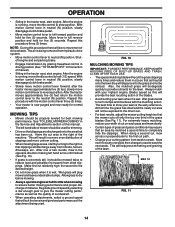
OPERATION These symbols may appear on your tractor or in literature supplied with the product. Learn and understand their meaning. BATTERY CAUTION OR WARNING REVERSE FORWARD FAST SLOW ENGINE ON ENGINE OFF OIL PRESSURE LIGHTS ON OVER TEMP LIGHT FUEL CHOKE MOWER HEIGHT PARKING BRAKE LOCKED UNLOCKED MOWER LIFT ATTACHMENT REVERSE CLUTCH ENGAGED NEUTRAL HIGH P LOW PARKING BRAKE 15 15 15 IGNITION ATTACHMENT CLUTCH DISENGAGED KEEP AREA CLEAR SLOPE HAZARDS (SEE SAFETY RULES SECTION) DANGER, KEEP HANDS AND FEET AWAY 9 FREE WHEEL (Automatic Models only)
OPERATION These symbols may appear on your tractor or in literature supplied with the product. Learn and understand their meaning. BATTERY CAUTION OR WARNING REVERSE FORWARD FAST SLOW ENGINE ON ENGINE OFF OIL PRESSURE LIGHTS ON OVER TEMP LIGHT FUEL CHOKE MOWER HEIGHT PARKING BRAKE LOCKED UNLOCKED MOWER LIFT ATTACHMENT REVERSE CLUTCH ENGAGED NEUTRAL HIGH P LOW PARKING BRAKE 15 15 15 IGNITION ATTACHMENT CLUTCH DISENGAGED KEEP AREA CLEAR SLOPE HAZARDS (SEE SAFETY RULES SECTION) DANGER, KEEP HANDS AND FEET AWAY 9 FREE WHEEL (Automatic Models only)

User Manual
Page 10
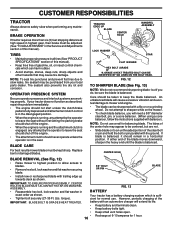
... LEVER IGNITION SWITCH THROTTLE CONTROL CLUTCH/BRAKE PEDAL FREE WHEEL CONTROL PARKING BRAKE LIGHT SWITCH POSITION LIFT LEVER PLUNGER ATTACHMENT LIFT LEVER MOWER DECK HEIGHT ADJUSTMENT POSITIONS MOTION CONTROL LEVER FIG. 5 Our tractors conform to the safety standards of battery. Used when starting ...and stopping the engine. ATTACHMENT CLUTCH LEVER: Used to engage the mower blades, or other attachments mounted to your tractor. ATTACHMENT LIFT LEVER: Used to raise, lower, and adjust the mower deck or other attachments mounted to your tractor. LIFT LEVER PLUNGER: Used ...
... LEVER IGNITION SWITCH THROTTLE CONTROL CLUTCH/BRAKE PEDAL FREE WHEEL CONTROL PARKING BRAKE LIGHT SWITCH POSITION LIFT LEVER PLUNGER ATTACHMENT LIFT LEVER MOWER DECK HEIGHT ADJUSTMENT POSITIONS MOTION CONTROL LEVER FIG. 5 Our tractors conform to the safety standards of battery. Used when starting ...and stopping the engine. ATTACHMENT CLUTCH LEVER: Used to engage the mower blades, or other attachments mounted to your tractor. ATTACHMENT LIFT LEVER: Used to raise, lower, and adjust the mower deck or other attachments mounted to your tractor. LIFT LEVER PLUNGER: Used ...

User Manual
Page 11
... vision safety mask over 3 inches during hot months. Pedal should remain in to desired position. To eliminate this possibility, always stop mower blades,move motion control lever to "DISENGAGED" position. to stop tractor completely, as described above, before stopping may cause "browning" ... • Release parking brake and clutch/brake pedal. • Slowly move attachment clutch lever to desired position. STOPPING (See Fig. 6) MOWER BLADES • To stop engine when stopping tractor on grass areas. IMPORTANT: THE MOTION CONTROL LEVER DOES NOT RETURN TO NEUTRAL (N) POSITION ...
... vision safety mask over 3 inches during hot months. Pedal should remain in to desired position. To eliminate this possibility, always stop mower blades,move motion control lever to "DISENGAGED" position. to stop tractor completely, as described above, before stopping may cause "browning" ... • Release parking brake and clutch/brake pedal. • Slowly move attachment clutch lever to desired position. STOPPING (See Fig. 6) MOWER BLADES • To stop engine when stopping tractor on grass areas. IMPORTANT: THE MOTION CONTROL LEVER DOES NOT RETURN TO NEUTRAL (N) POSITION ...

User Manual
Page 12
... or the deflector shield in same adjustment hole. 3/8-16 LOCKNUT GUAGE WHEEL MOUNTING BRACKET 3/8 WASHER GAUGE WHEEL FIG. 7 SHOULDER BOLT TO OPERATE MOWER (See Fig. 8) Your tractor is equipped with shoulder bolt, 3/8 washer, and 3/8-16 locknut and tighten securely. • Repeat for opposite ...an operator presence sensing switch. NOTE: To protect hood from damage when transporting your tractor on a flat level surface. • Adjust mower to disengage transmission by and comply with attach- Gauge wheels then keep the deck in proper position to slowest setting. • Make all...
... or the deflector shield in same adjustment hole. 3/8-16 LOCKNUT GUAGE WHEEL MOUNTING BRACKET 3/8 WASHER GAUGE WHEEL FIG. 7 SHOULDER BOLT TO OPERATE MOWER (See Fig. 8) Your tractor is equipped with shoulder bolt, 3/8 washer, and 3/8-16 locknut and tighten securely. • Repeat for opposite ...an operator presence sensing switch. NOTE: To protect hood from damage when transporting your tractor on a flat level surface. • Adjust mower to disengage transmission by and comply with attach- Gauge wheels then keep the deck in proper position to slowest setting. • Make all...
User Manual
Page 14
...section of the attachment being removed from dried clippings. After one week then change to east to slow position. This will plug mower and leave undesirable clumps. OPERATION • Sitting in the tractor seat, start engine. Regulate ground speed by placing freewheel control in... relatively high; For extremely heavy mulching, reduce your lawn is now purged and now ready for five (5) seconds. See "TO LEVEL MOWER HOUSING" in neutral (N) position, slowly disengage clutch/brake pedal. • Slowly move motion control lever forward, after the tractor moves ...
...section of the attachment being removed from dried clippings. After one week then change to east to slow position. This will plug mower and leave undesirable clumps. OPERATION • Sitting in the tractor seat, start engine. Regulate ground speed by placing freewheel control in... relatively high; For extremely heavy mulching, reduce your lawn is now purged and now ready for five (5) seconds. See "TO LEVEL MOWER HOUSING" in neutral (N) position, slowly disengage clutch/brake pedal. • Slowly move motion control lever forward, after the tractor moves ...

User Manual
Page 15
.... • Check brake operation. • Check tire pressure. • Check operator presence and interlock systems for proper operation. • Check for Loose Fasteners A Sharpen/Replace Mower Blades C T Lubrication Chart 0 Check Battery Level R Clean Battery and Terminals Check Transaxle Cooling Adjust Blade Belt(s) Tension Adjust Motion Drive Belt(s) Tension Check Engine Oil...
.... • Check brake operation. • Check tire pressure. • Check operator presence and interlock systems for proper operation. • Check for Loose Fasteners A Sharpen/Replace Mower Blades C T Lubrication Chart 0 Check Battery Level R Clean Battery and Terminals Check Transaxle Cooling Adjust Blade Belt(s) Tension Adjust Motion Drive Belt(s) Tension Check Engine Oil...
User Manual
Page 16
...horizontal position. The lobes of the center hole may appear to be sharpened with an automotive charger will cause excessive vibration and eventual damage to mower and engine. • The blade can harm rubber. • Avoid stumps, stones, deep ruts, sharp objects and other hazards that may ...be kept sharp. battery with a file or on the mower. • To check blade balance, you do not recommend sharpening blade - TIRES • Maintain proper air pressure in all tires (See "PRODUCT ...
...horizontal position. The lobes of the center hole may appear to be sharpened with an automotive charger will cause excessive vibration and eventual damage to mower and engine. • The blade can harm rubber. • Avoid stumps, stones, deep ruts, sharp objects and other hazards that may ...be kept sharp. battery with a file or on the mower. • To check blade balance, you do not recommend sharpening blade - TIRES • Maintain proper air pressure in all tires (See "PRODUCT ...

User Manual
Page 19
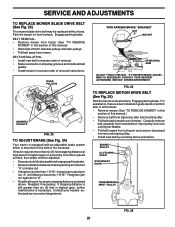
... from the right side of tractor. • Place attachment clutch in "DISENGAGED" position. • Move attachment lift lever forward to lower mower to its lowest position. • Roll belt off engine pulley. • Remove small retainer spring, and lift clutch spring off pulley bolt...8226; Disconnect anti-swaybar from chassis bracket by removing retainer springs. • Raise lift lever to its lowest position. • Install mower in reverse order of this manual). SERVICE AND ADJUSTMENTS CAUTION: BEFORE PERFORMING ANY SERVICE OR ADJUSTMENTS: • Depress clutch/brake pedal fully...
... from the right side of tractor. • Place attachment clutch in "DISENGAGED" position. • Move attachment lift lever forward to lower mower to its lowest position. • Roll belt off engine pulley. • Remove small retainer spring, and lift clutch spring off pulley bolt...8226; Disconnect anti-swaybar from chassis bracket by removing retainer springs. • Raise lift lever to its lowest position. • Install mower in reverse order of this manual). SERVICE AND ADJUSTMENTS CAUTION: BEFORE PERFORMING ANY SERVICE OR ADJUSTMENTS: • Depress clutch/brake pedal fully...

User Manual
Page 20
...lower than rear, tighten nut "F" against trunnion on both front links. SERVICE AND ADJUSTMENTS SIDE-TO-SIDE ADJUSTMENT (See Figs. 19 and 20) • Raise mower to its highest position. Tighten nut "E" on both front links an equal number of turns. • When distance "D" is 1/8" to 1/2" lower at front... than the rear when the mower is in length, adjust one link to same length as shown. • Before making any necessary adjustments, check that both front links are not equal...
...lower than rear, tighten nut "F" against trunnion on both front links. SERVICE AND ADJUSTMENTS SIDE-TO-SIDE ADJUSTMENT (See Figs. 19 and 20) • Raise mower to its highest position. Tighten nut "E" on both front links an equal number of turns. • When distance "D" is 1/8" to 1/2" lower at front... than the rear when the mower is in length, adjust one link to same length as shown. • Before making any necessary adjustments, check that both front links are not equal...
User Manual
Page 21
...Readjust if necessary. If stopping distance is still greater than six (6) feet in this section of this manual.) • Remove belt from mower. WITH PARKING BRAKE "ENGAGED" 1-9/16" NUT "A" JAM NUT OPERATING ARM DO NOT TOUCH THIS NUT. Engage parking brake. If tractor requires...the tractor on level surface. For assistance, there is necessary. Contact your nearest authorized service center/department. BELT REMOVAL • Remove mower from transmission input pulley and over cooling fan blades. • Pull belt toward rear of the transaxle. ENGINE PULLEY CLUTCHING IDLER STATIONARY...
...Readjust if necessary. If stopping distance is still greater than six (6) feet in this section of this manual.) • Remove belt from mower. WITH PARKING BRAKE "ENGAGED" 1-9/16" NUT "A" JAM NUT OPERATING ARM DO NOT TOUCH THIS NUT. Engage parking brake. If tractor requires...the tractor on level surface. For assistance, there is necessary. Contact your nearest authorized service center/department. BELT REMOVAL • Remove mower from transmission input pulley and over cooling fan blades. • Pull belt toward rear of the transaxle. ENGINE PULLEY CLUTCHING IDLER STATIONARY...

User Manual
Page 22
... adjustment bolt in the direction it should not be purged after reinstallation and before operating the tractor. After above steps until tractor does not move mower deck height to right) when wheels are not adjustable on your tractor. MOTION CONTROL LEVER NEUTRAL LOCK GATE TO ADJUST STEERING WHEEL ALIGNMENT If steering...
... adjustment bolt in the direction it should not be purged after reinstallation and before operating the tractor. After above steps until tractor does not move mower deck height to right) when wheels are not adjustable on your tractor. MOTION CONTROL LEVER NEUTRAL LOCK GATE TO ADJUST STEERING WHEEL ALIGNMENT If steering...
User Manual
Page 25
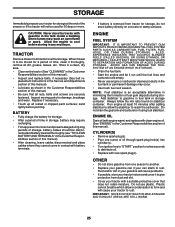
... • Remove spark plug(s). • Pour one season to another. • Replace your gasoline can if your can starts to rust. TRACTOR Remove mower from dust and dirt. • Cover your tractor with clean engine oil. (See "ENGINE" in the Customer Responsibilities section of the season or if ... and/or dirt in the Customer Responsibilities section of time, clean it run until the fuel lines and carburetor are securely fastened. When mower is to be disconnected and battery cleaned thoroughly (see "TO CLEAN BATTERY AND TERMINALS" in your gasoline will cause your tractor to cool...
... • Remove spark plug(s). • Pour one season to another. • Replace your gasoline can if your can starts to rust. TRACTOR Remove mower from dust and dirt. • Cover your tractor with clean engine oil. (See "ENGINE" in the Customer Responsibilities section of the season or if ... and/or dirt in the Customer Responsibilities section of time, clean it run until the fuel lines and carburetor are securely fastened. When mower is to be disconnected and battery cleaned thoroughly (see "TO CLEAN BATTERY AND TERMINALS" in your gasoline will cause your tractor to cool...

User Manual
Page 26
... battery terminals. 6. Faulty solenoid or starter. 9. Weak or dead battery. Loss of adjustment. 1. Build-up of mower housing. 4. Dirty air filter. 5. Set in Service Adjustments section. 10. Clean underside of grass, leaves and trash under mower. 4. Tighten loose part(s). Replace spark plug. 5. Drain fuel tank and carburetor, refill tank with fresh gasoline...
... battery terminals. 6. Faulty solenoid or starter. 9. Weak or dead battery. Loss of adjustment. 1. Build-up of mower housing. 4. Dirty air filter. 5. Set in Service Adjustments section. 10. Clean underside of grass, leaves and trash under mower. 4. Tighten loose part(s). Replace spark plug. 5. Drain fuel tank and carburetor, refill tank with fresh gasoline...
User Manual
Page 27
... bent or loose blade. 7. Check tires for 30 seconds before stopping engine. 1. Clean underside of grass, leaves, and trash under mower. 8. Clean around mandrels to open vent holes. Bulb(s) burned out. 3. Check/replace light switch. 4. Faulty alternator. 1. Replace ... light switch. 4. Replace bulb(s). 3. Replace alternator. Tighten blade bolt. 2. Clean around mandrels to open vent holes. Worn/damaged mower drive belt. 3. Replace blade mandrel. Buildup of grass, leaves, and trash around mandrels. 1. Blades improperly installed. 10. Shift to...
... bent or loose blade. 7. Check tires for 30 seconds before stopping engine. 1. Clean underside of grass, leaves, and trash under mower. 8. Clean around mandrels to open vent holes. Bulb(s) burned out. 3. Check/replace light switch. 4. Faulty alternator. 1. Replace ... light switch. 4. Replace bulb(s). 3. Replace alternator. Tighten blade bolt. 2. Clean around mandrels to open vent holes. Worn/damaged mower drive belt. 3. Replace blade mandrel. Buildup of grass, leaves, and trash around mandrels. 1. Blades improperly installed. 10. Shift to...

User Manual
Page 33
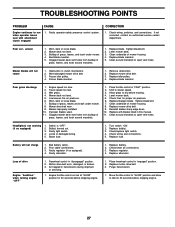
Blk NOTE: All component dimensions given in U.S. inches 1 inch = 25.4 mm 33 MODEL NUMBER PR20H42STB CHASSIS KEY PART NO. REPAIR PARTS TRACTOR - - DESCRIPTION 1 169830 Chassis 2 176554 Drawbar 3 17060612 Screw 3/8-16 X .75 5 155272 Bumper Hood/Dash 9 168337X012 Dash P/L 10 ...Lh 34 145243X428 Footrest Pnt Rh 35 72110606 Bolt Rdhd Sht Sqnk 3/8-16 x 3/4 37 17490508 Screw Thdrol 6/16-18 x 1/2 TYT 38 169834 Bracket Asm Pivot Mower Rear 51 73800400 Nut Lock Hex W/Ins 1/4-20 52 19091416 Washer 9/32 x 7/8 x 16 Ga. 53 144697 Bracjet Grukke Lh 54 161464 Screw Hex Wshd ...
Blk NOTE: All component dimensions given in U.S. inches 1 inch = 25.4 mm 33 MODEL NUMBER PR20H42STB CHASSIS KEY PART NO. REPAIR PARTS TRACTOR - - DESCRIPTION 1 169830 Chassis 2 176554 Drawbar 3 17060612 Screw 3/8-16 X .75 5 155272 Bumper Hood/Dash 9 168337X012 Dash P/L 10 ...Lh 34 145243X428 Footrest Pnt Rh 35 72110606 Bolt Rdhd Sht Sqnk 3/8-16 x 3/4 37 17490508 Screw Thdrol 6/16-18 x 1/2 TYT 38 169834 Bracket Asm Pivot Mower Rear 51 73800400 Nut Lock Hex W/Ins 1/4-20 52 19091416 Washer 9/32 x 7/8 x 16 Ga. 53 144697 Bracjet Grukke Lh 54 161464 Screw Hex Wshd ...
User Manual
Page 39
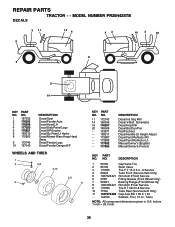
... Footrest Decal Handle Lft Height Adjust Decal Fend Reflector Rh Decal Fend Reflector Lh Manual Owner's (English) Manual Owner's (French) KEY PART NO. MODEL NUMBER PR20H42STB DECALS 2 11 9 16 4 43 10 2 20 1 8 6 5 14 KEY NO. 1 2 3 4 5 6 8 PART NO. 157032 176303 176308 177020 170851 169210 170563 9 172740 10 157140 ...DESCRIPTION Decal Oper Decal Fender Auto Decal Hood LH Decal Side Panel Logo Decal HP Engine Decal By Pass Lt Hydro Decal Mower Warn Keep Hand Away Decal Fender Logo Decal Fender Danger E/F WHEELS AND TIRES 1 2 5,8 4,10 7 3,9 6 11 KEY PART NO.
... Footrest Decal Handle Lft Height Adjust Decal Fend Reflector Rh Decal Fend Reflector Lh Manual Owner's (English) Manual Owner's (French) KEY PART NO. MODEL NUMBER PR20H42STB DECALS 2 11 9 16 4 43 10 2 20 1 8 6 5 14 KEY NO. 1 2 3 4 5 6 8 PART NO. 157032 176303 176308 177020 170851 169210 170563 9 172740 10 157140 ...DESCRIPTION Decal Oper Decal Fender Auto Decal Hood LH Decal Side Panel Logo Decal HP Engine Decal By Pass Lt Hydro Decal Mower Warn Keep Hand Away Decal Fender Logo Decal Fender Danger E/F WHEELS AND TIRES 1 2 5,8 4,10 7 3,9 6 11 KEY PART NO.

User Manual
Page 43
... x 5/8 159 72140614 Bolt Rdhd Sqn 3/8-16 UNC x 1-3/4 - - 130794 Mandrel Assembly (Includes Key Numbers 8-10,13-15, 31 and 33) - - 172559 Mower Deck, Complete NOTE: All component dimensions given in U.S. MODEL NUMBER PR20H42STB MOWER DECK KEY PART NO. NO. Sway Bar 3/42 4 165460X421 Bracket Asm Deck 42" Sway Bar 5 4939M Retainer Spring 6 130832 Arm...
... x 5/8 159 72140614 Bolt Rdhd Sqn 3/8-16 UNC x 1-3/4 - - 130794 Mandrel Assembly (Includes Key Numbers 8-10,13-15, 31 and 33) - - 172559 Mower Deck, Complete NOTE: All component dimensions given in U.S. MODEL NUMBER PR20H42STB MOWER DECK KEY PART NO. NO. Sway Bar 3/42 4 165460X421 Bracket Asm Deck 42" Sway Bar 5 4939M Retainer Spring 6 130832 Arm...


